SharePoint: How to import SharePoint 2007 list templates into SharePoint 2010
I was asked to transfer a few SharePoint 2007 lists with their contents into a SharePoint 2010 application. Obvious steps were create the lists’ templates (.stp files) in SP 2007 and redeploy them in SP 2010. Having successfully created and uploaded the templates into the List Template Gallery (_catalogs/lt) of a 2010 Site Collection, I got the following error whenever I tried to create a new list instance based on any of the uploaded templates:
Microsoft SharePoint Foundation version 3 templates are not supported
in this version of the product.
Fortunately, a straightforward solution was found quite quickly.
.stp File Content
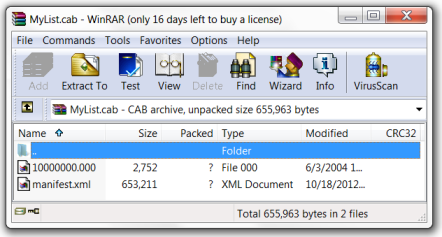
A .stp file is just a .cab archive (similar to a .wsp) and, after changing the file’s extension to cab, it can be opened and viewed with any popular archiver (WinRar, 7 zip and so on).

In the .cab you’ll see at least one file, manifest.xml (frequently, there is nothing but the one). The manifest.xml contains the target list’s schema and content (if the template was created with the appropriate option). The first lines of the manifest.xml look like the following:
<?xml version="1.0" encoding="UTF-8" ?>
<ListTemplate WebUrl="http://myapplication/mysitecollection">
    <Details>
        <TemplateDescription></TemplateDescription>
        <TemplateTitle>MyList</TemplateTitle>
        <ProductVersion>3</ProductVersion>
        <Language>1033</Language>
        <TemplateID>20</TemplateID>
        <Configuration>0</Configuration>
        <FeatureId>{00BFEA71-DE22-43C2-A848-C05706800101}</FeatureId>
        <TemplateType>100</TemplateType>
        <BaseType>0</BaseType>
    </Details>
...
</ListTemplate>
Pay attention to the <ProductVersion> element containing the value 3. So, the solution mentioned above is to modify the file so that its <ProductVersion> would contain 4. Having done that, we need to recreate the .cab file with the altered manifest.xml and change the output file’s extension back to stp.
Recreate .cab
The most tricky part in the solution is to repack file or group of files into .cab as the most popular archivers don’t allow that. So, we have to do it by ourselves using the Microsoft’s makecab.exe utility usually located at C:\Windows\System32. If your template contains only manifest.xml, use the command line like the following to repack it into .cab:
makecab.exe C:\ExtractedStpFiles\manifest.xml c:\RepackedStpFiles\MyList.cab
The first argument is a path to the file to be wrapped into .cab. Here the altered manifest.xml is assumed to be in the c:\ExtractedStpFiles folder. The second argument is a path to the output archive file. Here the destination folder is c:\RepackedStpFiles.
To avoid the step with changing the output file’s extension from cab to stp, you can modify the above command line to
makecab.exe C:\ExtractedStpFiles\manifest.xml c:\RepackedStpFiles\MyList.stp
If the list template contains more than one file inside, first of all, we need to prepare a directive file (.ddf file) containing instructions for makecab.exe how to compress and package the files. Each instruction starts with “.”, comment starts with “;”. For our task such file may look as follows (let’s name it MyList.ddf and place in C:\ExtractedStpFiles):
.OPTION EXPLICIT

.Set CabinetNameTemplate=MyList.stp ; Name of the output .cab file, in our case we can specify the file's extension as .stp
.Set Cabinet=on
.Set CompressionType=MSZIP ; All files will be compressed

.Set DiskDirectoryTemplate=CDROM ; All compressed files in the output .cab will be in a single directory
.Set DiskDirectory1=c:\RepackedStpFiles ; The output .cab file will be placed in this directory

; the next lines specify the files to be included into the output .cab
"c:\ExtractedStpFiles\manifest.xml"
"c:\ExtractedStpFiles\10000000.000"
Ok, now we need to run the following command line to repackage required files:
makecab.exe /f "C:\ExtractedStpFiles\MyList.ddf"
The /f key indicates that to create .cab file, the makecab.exe should use the directive file pointed next.
Converting Step-by-step
So, the straightforward solution to make a 2007 list template compatible with SharePoint 2010 includes the following steps:
- Change the extension of the original 2007 .stp file to cab;
- Extract files with any archiver into a folder (for example, c:\ExtractedStpFiles);
- Open the manifest.xml and set the value of <ProductVersion> element to 4;
- Repackage the modified manifest.xml and other files (if any) into .stp (generally .cab) file. Use for that either the command line like
makecab.exe C:\ExtractedStpFiles\manifest.xml c:\RepackedStpFiles\MyList.stp
when the list template in question contains only the manifest.xml, or the directive file (for example, C:\ExtractedStpFiles\MyList.ddf)
.OPTION EXPLICIT

.Set CabinetNameTemplate=MyList.stp ; Name of the output .cab file, in our case we can specify the file's extension as .stp
.Set Cabinet=on
.Set CompressionType=MSZIP ; All files will be compressed

.Set DiskDirectoryTemplate=CDROM ; All compressed files in the output .cab will be in a single directory
.Set DiskDirectory1=c:\RepackedStpFiles ; The output .cab file will be placed in this directory

; the next lines specify the files to be included into the output .cab
"c:\ExtractedStpFiles\manifest.xml"
"c:\ExtractedStpFiles\10000000.000"
along with the command line
makecab.exe /f "C:\ExtractedStpFiles\MyList.ddf"
when there are more than one files in the list template.
After that the output .stp file is ready for uploading into the List Template Gallery (_catalogs/lt) of the target Site Collection.
Summary
Be aware that this solution is not a best practice and it may not work in some cases.
If you have a lot of .stp files to migrate you can automate this process using the PowerShell scripts posted here and here.