Archive

Posts Tagged ‘Administration’

SharePoint: Shutdown SharePoint Services

July 20th, 2016 No comments

    Not working with SharePoint and to release some computer resources, I use the simple .bat-file listed below to stop all (hopefully) SharePoint services (let me know if I miss any).

The SC command communicates with the Service Controller and allows performing operations over the installed services (configuring services, retrieving their current status, stopping and starting ones, and so forth).

REM Stop SharePoint 2010 Administration, 
REM which performs administrative tasks for SharePoint
sc stop SPAdminV4

REM Stop SharePoint 2010 Timer, 
REM which sends notifications and performs scheduled tasks for SharePoint
sc stop SPTimerV4

REM Stop SharePoint 2010 Tracing, which manages trace output
sc stop SPTraceV4

REM Stop SharePoint 2010 User Code Host, 
REM which executes user code in a sandbox
sc stop SPUserCodeV4

REM Stop SharePoint 2010 VSS (SharePoint Volume Shadow Copy Service) Writer, 
REM which is used for backing up and restoring data
sc stop SPWriterV4

REM Stop SharePoint Foundation Search V4, 
REM which provides full-text indexing and search to SharePoint user and help content
sc stop SPSearch4

REM Stop SharePoint Server Search 14, 
REM which provides enhanced full-text indexing and search capabilities and 
REM is intended to replace the SharePoint Foundation Search
sc stop OSearch14

REM Launcher for Microsoft SharePoint Server 2010 Document Conversions Services
sc stop DCLauncher14

REM Load Balancer for Microsoft SharePoint Server 2010 Document Conversions Services
sc stop DCLoadBalancer14

REM Service for analyzing user behaviour
sc stop WebAnalyticsService

In my case the .bat-file usually has the following continuation to stop SQL Server services either

REM SQL Full-text Filter Daemon Launcher
sc stop MSSQLFDLauncher

REM SQL Server
sc stop MSSQLSERVER

REM SQL Server Agent
sc stop SQLSERVERAGENT

REM SQL Server Analysis Services
sc stop MSSQLServerOLAPService

REM SQL Server Browser
sc stop SQLBrowser

REM SQL Server Reporting Services 
sc stop ReportServer

REM SQL Server VSS Writer
sc stop SQLWriter

SharePoint: Simple Event Logger

June 3rd, 2013 No comments

    Errors, warnings and info messages in all my SharePoint applications are being logged to the Application Event Log. For that I use a simple class tritely named EventLogger and listed later in this post. As for the moment, a couple of words about the EventLogger are stated below.

If necessary, the EventLogger registers a source in the Application Event Log once any its method is called for the first time (see the static constructor). The event logging uses the information stored in the Eventlog registry key. So, when dealing with the Application Event Log, we have to be ready to get exception about a lack of rights to read from or write to the registry. Because of that, the EventLogger initially tries adding a new source under the current user account and then, in case of failure, repeats the same under the application pool account (SPSecurity.RunWithElevatedPrivileges) that is supposed to have all suitable permissions.

Due to the same reason, whenever a user different from the application pool account writes anything to the log, he will likely get an exception which is reporting that the current user doesn’t have write access. To guard users from that, we as administrators have to do some manual work, namely, to add the CustomSD value to the [HKEY_LOCAL_MACHINE\SYSTEM\CurrentControlSet\services\eventlog\Application] registry key how it’s described in the article SharePoint: Cannot open log for source. You may not have write access. If a SharePoint application supports anonymous access, use WD (all users) instead of AU (authenticated users). Also it’s very important to understand that the appropriate CustomSD must be added on all machines of a SharePoint farm. An alternative way is to wrap the writing to the log in SPSecurity.RunWithElevatedPrivileges. Remember, however, that the SPSecurity.RunWithElevatedPrivileges is quite resource-consuming and excessive for such frequent operation as event logging. So, use the SPSecurity.RunWithElevatedPrivileges as an extreme measure and only when the previous approach with CustomSD didn’t help for some reasons.

Another feature of the EventLogger is that, as a backup plan, it writes to the SharePoint Trace Log through the Unified Logging Service (see the WriteToHiveLog method). In other words, if the EventLogger doesn’t manage to write a message to the Application Event Log, it tries appending the message to the ULS Log stored in the file system and accessible, for example, through the ULS Viewer.

Logging an error or warning based on the passed exception, the EventLogger forms the final text, using the exception’s message along with the message of the inner exception (if any) and stack trace.

Below is a combined example that demonstrates how to use the EventLogger to log errors, warnings and info.

using dotNetFollower;
...

EventLogger.WriteInfo("How to use the EventLogger");

EventLogger.WriteError("Sorry, couldn't perform this operation!");
// OR
EventLogger.WriteWarning("Sorry, couldn't perform this operation!");

try
{
	// the next line throws an exception
	SPList spList = SPContext.Current.Web.Lists["Not existing list"];
}
catch (Exception ex)
{
	EventLogger.WriteError(ex);
	// OR
	EventLogger.WriteWarning(ex);
}

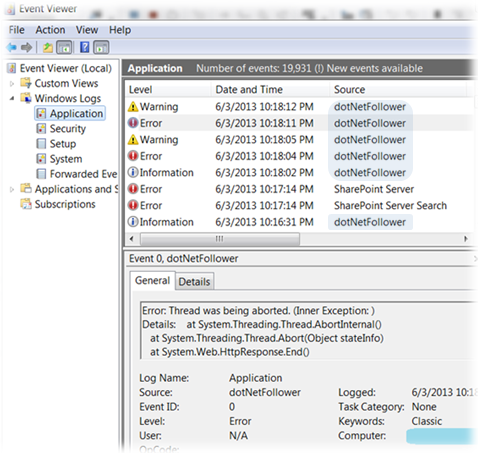
Below is depicted what those records look like in the Windows Event Viewer:
EventLogger Records

Ok, it’s about time for the EventLogger listing:

using System;
using System.Diagnostics;
using Microsoft.SharePoint;
using Microsoft.SharePoint.Administration;

namespace dotNetFollower
{
    public static class EventLogger
    {
        private const string SOURCE = "dotNetFollower"; // put here your own source name

        /// <summary>
        /// Writes an error message
        /// </summary>
        /// <param name="errorText">Error message</param>
        public static void WriteError(string errorText)
        {
            WriteWithinTryCatch(errorText, EventLogEntryType.Error);
        }
        /// <summary>
        /// Writes an error message
        /// </summary>
        /// <param name="ex">Exception</param>
        public static void WriteError(Exception ex)
        {
            WriteWithinTryCatch(GetExceptionFormatted(ex), EventLogEntryType.Error);
        }
        /// <summary>
        /// Writes a warning message
        /// </summary>
        /// <param name="text">Warning message</param>
        public static void WriteWarning(string text)
        {
            WriteWithinTryCatch(string.Format("Warning: {0}", text), EventLogEntryType.Warning);
        }
        /// <summary>
        /// Writes a warning message
        /// </summary>
        /// <param name="ex">Exception</param>
        public static void WriteWarning(Exception ex)
        {
            WriteWithinTryCatch(GetExceptionFormatted(ex), EventLogEntryType.Warning);
        }
        /// <summary>
        /// Writes an info message
        /// </summary>
        /// <param name="text">Info message</param>
        public static void WriteInfo(string text)
        {
            WriteWithinTryCatch(string.Format("Information: {0}", text), EventLogEntryType.Information);
        }

        /// <summary>
        /// Creates the appropriate source in Event Logs, if necessary
        /// </summary>
        public static void EnsureLogSourceExist()
        {
            if (!EventLog.SourceExists(SOURCE))
                EventLog.CreateEventSource(SOURCE, "Application");
        }

        /// <summary>
        /// Returns an error message based on a passed exception. Includes an inner exception (if any) and stack trace
        /// </summary>
        /// <param name="ex">Exception</param>
        /// <returns>Formed error message</returns>
        public static string GetExceptionFormatted(Exception ex)
        {
            return string.Format("Error: {0} (Inner Exception: {1})\t\nDetails: {2}", 
                ex.Message, 
                ex.InnerException != null ? ex.InnerException.Message : string.Empty, 
                ex.StackTrace);
        }

        static EventLogger()
        {
            bool error = false;

            Action action = delegate
                {
                    try
                    {
                        // register source in Event Logs
                        EnsureLogSourceExist();
                    }
                    catch
                    {
                        error = true;
                    }
                };

            // try under current user
            action();

            if(error)
                // try under application pool account
                SPSecurity.RunWithElevatedPrivileges(() => action());
        }

        private static void WriteWithinTryCatch(string message, EventLogEntryType type)
        {
            try
            {
                // To allow users (authenticated only or all of them) writing to Event Log,
                // follow the steps described in the article 
                // http://dotnetfollower.com/wordpress/2012/04/sharepoint-cannot-open-log-for-source-you-may-not-have-write-access/

                // If it doesn't help for some reason, uncomment the line with SPSecurity.RunWithElevatedPrivileges and 
                // comment the other one. Note, however, that the use of SPSecurity.RunWithElevatedPrivileges is 
                // resource-consuming and looks excessive for such frequent operation as event logging.

                //SPSecurity.RunWithElevatedPrivileges(() => EventLog.WriteEntry(SOURCE, message, type));
                EventLog.WriteEntry(SOURCE, message, type);
            }
            catch
            {
                WriteToHiveLog(message, type);
            }
        }

        private static void WriteToHiveLog(string message, EventLogEntryType type)
        {
            EventSeverity eventSeverity = type == EventLogEntryType.Error ? EventSeverity.Error : 
                (type == EventLogEntryType.Warning ? EventSeverity.Warning : EventSeverity.Information);

            var category = new SPDiagnosticsCategory(SOURCE, TraceSeverity.Unexpected, eventSeverity);

            SPDiagnosticsService.Local.WriteTrace(0, category, TraceSeverity.Unexpected, message, null);
        }
    }
}
Related posts:

SharePoint: Issue with calling an asmx web service in SharePoint 2010 through jQuery

November 20th, 2012 No comments

    After migration a SharePoint 2007 application to SharePoint 2010 my jQuery scripts communicating with asmx web services stopped working. The error I got was a 500 Internal Server Error. The scripts looks as follows:

$.ajax({
  type: "POST",
  url:  "http://someserver/someapp/_layouts/Services/Products.asmx/GetProductByCountry",

  data:        JSON.stringify({ countryCode: "USA" }),
  dataType:    "json",
  contentType: 'application/json; charset=utf-8',
  context:     this,

  success: function (data) {
		     alert(data.d);
           },
  error:   function (XMLHttpRequest, textStatus, errorThrown) {
		     alert(textStatus);
           }
});

Note: The JSON object mentioned in the script is defined in the json2.js available at http://www.json.org.

This issue can be solved by adding an appropriate <webServices> section to the SharePoint application’s web.config (in my case it’s located at C:\inetpub\wwwroot\wss\VirtualDirectories\80). So, find the global <system.web> section in your web.config and make changes so that the result would look like the following:

<system.web>
  <webServices>
    <protocols>
      <add name="HttpGet" />
      <add name="HttpPost" />
    </protocols>
  </webServices>
...
</system.web>

However, from the security point of view such solution is not ideal as it allows external access through the HTTP-GET and HTTP-POST messaging protocols to all your XML web services. So, it’s better to specify the access protocols for each web service separately, not affecting other ones. The <location> element added to the root <configuration> element provides us with this capability. The sample below defines the protocols for accessing the web service reachable by the specified path:

<configuration>
...
  <location path="_layouts/Services/Products.asmx">
    <system.web>
      <webServices>
        <protocols>
          <add name="HttpGet"/>
          <add name="HttpPost"/>
        </protocols>
      </webServices>
    </system.web>
  </location>
...
</configuration>

Note that the _layouts virtual directory is available as a subfolder of every SharePoint Web site. So if you want to limit the use of the web service by only one SharePoint Web site, specify the path like someapp/_layouts/Services/Products.asmx.

PS Here is a good article about how to create a custom web service in SharePoint 2010.

SharePoint: How to import SharePoint 2007 list templates into SharePoint 2010

November 5th, 2012 No comments

    I was asked to transfer a few SharePoint 2007 lists with their contents into a SharePoint 2010 application. Obvious steps were create the lists’ templates (.stp files) in SP 2007 and redeploy them in SP 2010. Having successfully created and uploaded the templates into the List Template Gallery (_catalogs/lt) of a 2010 Site Collection, I got the following error whenever I tried to create a new list instance based on any of the uploaded templates:

Microsoft SharePoint Foundation version 3 templates are not supported 
in this version of the product.

Fortunately, a straightforward solution was found quite quickly.

.stp File Content

A .stp file is just a .cab archive (similar to a .wsp) and, after changing the file’s extension to cab, it can be opened and viewed with any popular archiver (WinRar, 7 zip and so on).
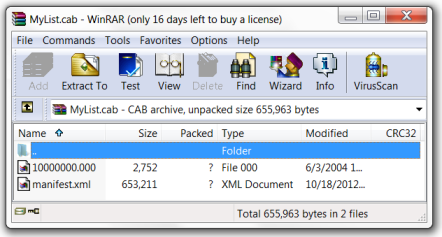
.stp file content

In the .cab you’ll see at least one file, manifest.xml (frequently, there is nothing but the one). The manifest.xml contains the target list’s schema and content (if the template was created with the appropriate option). The first lines of the manifest.xml look like the following:

<?xml version="1.0" encoding="UTF-8" ?>
<ListTemplate WebUrl="http://myapplication/mysitecollection">
    <Details>
        <TemplateDescription></TemplateDescription>
        <TemplateTitle>MyList</TemplateTitle>
        <ProductVersion>3</ProductVersion>
        <Language>1033</Language>
        <TemplateID>20</TemplateID>
        <Configuration>0</Configuration>
        <FeatureId>{00BFEA71-DE22-43C2-A848-C05706800101}</FeatureId>
        <TemplateType>100</TemplateType>
        <BaseType>0</BaseType>
    </Details>
...
</ListTemplate>

Pay attention to the <ProductVersion> element containing the value 3. So, the solution mentioned above is to modify the file so that its <ProductVersion> would contain 4. Having done that, we need to recreate the .cab file with the altered manifest.xml and change the output file’s extension back to stp.

Recreate .cab

The most tricky part in the solution is to repack file or group of files into .cab as the most popular archivers don’t allow that. So, we have to do it by ourselves using the Microsoft’s makecab.exe utility usually located at C:\Windows\System32. If your template contains only manifest.xml, use the command line like the following to repack it into .cab:

makecab.exe C:\ExtractedStpFiles\manifest.xml c:\RepackedStpFiles\MyList.cab

The first argument is a path to the file to be wrapped into .cab. Here the altered manifest.xml is assumed to be in the c:\ExtractedStpFiles folder. The second argument is a path to the output archive file. Here the destination folder is c:\RepackedStpFiles.

To avoid the step with changing the output file’s extension from cab to stp, you can modify the above command line to

makecab.exe C:\ExtractedStpFiles\manifest.xml c:\RepackedStpFiles\MyList.stp

If the list template contains more than one file inside, first of all, we need to prepare a directive file (.ddf file) containing instructions for makecab.exe how to compress and package the files. Each instruction starts with “.”, comment starts with “;”. For our task such file may look as follows (let’s name it MyList.ddf and place in C:\ExtractedStpFiles):

.OPTION EXPLICIT
 
.Set CabinetNameTemplate=MyList.stp ; Name of the output .cab file, in our case we can specify the file's extension as .stp
.Set Cabinet=on
.Set CompressionType=MSZIP ; All files will be compressed

.Set DiskDirectoryTemplate=CDROM ; All compressed files in the output .cab will be in a single directory
.Set DiskDirectory1=c:\RepackedStpFiles ; The output .cab file will be placed in this directory

; the next lines specify the files to be included into the output .cab
"c:\ExtractedStpFiles\manifest.xml"
"c:\ExtractedStpFiles\10000000.000"

Ok, now we need to run the following command line to repackage required files:

makecab.exe /f "C:\ExtractedStpFiles\MyList.ddf"

The /f key indicates that to create .cab file, the makecab.exe should use the directive file pointed next.

Converting Step-by-step

So, the straightforward solution to make a 2007 list template compatible with SharePoint 2010 includes the following steps:

  1. Change the extension of the original 2007 .stp file to cab;
  2. Extract files with any archiver into a folder (for example, c:\ExtractedStpFiles);
  3. Open the manifest.xml and set the value of <ProductVersion> element to 4;
  4. Repackage the modified manifest.xml and other files (if any) into .stp (generally .cab) file. Use for that either the command line like
    makecab.exe C:\ExtractedStpFiles\manifest.xml c:\RepackedStpFiles\MyList.stp
    

    when the list template in question contains only the manifest.xml, or the directive file (for example, C:\ExtractedStpFiles\MyList.ddf)

    .OPTION EXPLICIT
     
    .Set CabinetNameTemplate=MyList.stp ; Name of the output .cab file, in our case we can specify the file's extension as .stp
    .Set Cabinet=on
    .Set CompressionType=MSZIP ; All files will be compressed
    
    .Set DiskDirectoryTemplate=CDROM ; All compressed files in the output .cab will be in a single directory
    .Set DiskDirectory1=c:\RepackedStpFiles ; The output .cab file will be placed in this directory
    
    ; the next lines specify the files to be included into the output .cab
    "c:\ExtractedStpFiles\manifest.xml"
    "c:\ExtractedStpFiles\10000000.000"
    

    along with the command line

    makecab.exe /f "C:\ExtractedStpFiles\MyList.ddf"
    

    when there are more than one files in the list template.

After that the output .stp file is ready for uploading into the List Template Gallery (_catalogs/lt) of the target Site Collection.

Summary

Be aware that this solution is not a best practice and it may not work in some cases.

If you have a lot of .stp files to migrate you can automate this process using the PowerShell scripts posted here and here.
SharePoint: Removing a BDC model via PowerShell

May 7th, 2012 No comments

    In one of the previous posts I showed how to import a BDC model; the current one is about removing. The following script allows to remove a bdc model by its name:

$model = Get-SPBusinessDataCatalogMetadataObject 
    -Name "yourModelName" -BDCObjectType Model -ServiceContext "http://yourWebAppUrl"
Remove-SPBusinessDataCatalogModel -identity $model -Confirm:$false

Note: here command line parameters are wrapped to the next lines for readability only. In SharePoint 2010 Management Shell, each command and its parameters should be in the same line.

The Get-SPBusinessDataCatalogMetadataObject command gets a Model object by its name and saves reference to it in the $model variable. The Model object is relevant to your web application accessible through the url http://yourWebAppUrl. As its name implies, the Remove-SPBusinessDataCatalogModel method removes the received model using the $model variable. -Confirm:$false allows to skip an YES/NO confirmation arising right before a model is deleted indeed. Remember that the operation isn’t reversible, use the -Confirm:$false with precaution.

If you need to remove all bdc models, you can use the script as follows:

$metaStore = Get-SPBusinessDataCatalogMetadataObject
                -BdcObjectType Catalog -ServiceContext "http://yourWebAppUrl"
foreach ($model in $metaStore.GetModels("*")) { 
		Remove-SPBusinessDataCatalogModel –Identity $model -Confirm:$false
}

Note: here command line parameters are wrapped to the next lines for readability only. In SharePoint 2010 Management Shell, each command and its parameters should be in the same line.