Archive

Archive for November, 2012

jQuery: Plugins to detect iPad and iPhone devices

November 30th, 2012 No comments

jQuery plugin for iPad detection

Below is a simple jQuery plugin to detect whether a page is opened in an iPad:

(function ($) {
    $.isIPad = function () {        
        return (typeof navigator != "undefined" && 
               navigator && navigator.userAgent && 
               navigator.userAgent.match(/iPad/i) != null);
    };
})(jQuery);

...
// using
$(function(){
    if($.isIPad())
        alert('Hello, iPad');
});

jQuery plugin for iPhone detection

The next plugin allows to detect an iPhone:

(function ($) {
    $.isIPhone = function () {
        if(!$.isIPad())
            return (typeof navigator != "undefined" && 
               navigator && navigator.userAgent && 
               (navigator.userAgent.match(/iPhone/i) != null || 
                navigator.userAgent.match(/iPod/i) != null));
        return false;        
    };
})(jQuery);

...
// using
$(function(){
    if($.isIPhone())
        alert('Hello, iPhone');
});

Note, initially I check if the device is an iPad and only then try to identify it as an iPhone. I do so because people reports that some iPad browsers/applications use substring ‘iPhone’ in their userAgents along with the expected ‘iPad’. For example, such behavior was noticed in Facebook UIWebView.

jQuery plugin for Apple mobile device detection

To detect any Apple mobile devices (iPad, iPhone or iPod) you can use the following jQuery plugin:

(function ($) {
    $.isAppleMobile = function () {
        return (typeof navigator != "undefined" && 
               navigator && navigator.userAgent && 
               navigator.userAgent.match(/(iPad|iPhone|iPod)/i) != null);
    };
})(jQuery);

...
// using
$(function(){
    if($.isAppleMobile())
        alert('Hello, Apple device');
});
Related posts:

JavaScript: How to determine whether a variable has a valid value

November 29th, 2012 No comments

    A good way to examine whether a variable (or object’s field) has a valid value looks like the following:

if( variable /* obj.field */ ) {
}

This statement allows to check if the value is null (explicit assignment of null to variable happened) or undefined (variable wasn’t initialized). To be more precise it returns true when the variable is not

  • null
  • undefined
  • NaN
  • empty string (“”)
  • 0
  • false

Mostly, such validity check is more than enough for further safe treating with the variable. However, we’ll get the “‘variable’ is undefined error” if the variable is undeclared. In this case we have to perform the following check in advance:

if(typeof variable !== 'undefined') {    
}

Of course, if you are pretty sure that the variable exists (is declared), you can omit the typeof check. But if you deal with something going from an external library or source, I recommend having it. So, gathering all together, we obtain the following code:

if(typeof variable !== 'undefined' && variable) {    
}

In some forums, people from time to time suggest to wrap such check into a function. Let’s assume we have such function:

function isValid(obj) {    
  return typeof obj !== 'undefined' && obj;
}

However, it doesn’t make sense at all as you can’t call the function, passing an undeclared variable, in any case. The mentioned above error is thrown whenever you try addressing to the unknown variable:

if(isValid(varibale)) // throw "'variable' is undefined error", 
                      // if the variable doesn't exist
  ...

Thus, in case of undeclared variable, we have to have inline typeof check. In all other cases, it’s enough to have simple if(variable). So, using variables and objects likely declared outside of my code, I examine them like in the sample below:

if(typeof navigator != "undefined" && navigator && navigator.userAgent)
     alert(navigator.userAgent);
Categories: JavaScript, jQuery Tags: ,

jQuery: IsNullOrEmpty plugin for jQuery

November 20th, 2012 No comments

    I was a bit disappointed when couldn’t find in jQuery library a method similar to String.IsNullOrEmpty from C#. So, below is a simple jQuery plugin to examine whether the passed string is empty or null.

(function ($) {
    $.isNullOrEmpty = function (str) {
        return !str || $.trim(str) === ""; // the trim method is provided by jQuery 
    };
})(jQuery);

Some samples of use

var res = $.isNullOrEmpty(''); // true
res = $.isNullOrEmpty("bla-bla-bla"); // false
res = $.isNullOrEmpty(null); // true
res = $.isNullOrEmpty(); // true
Related posts:
Categories: JavaScript, jQuery Tags: ,

SharePoint: Issue with calling an asmx web service in SharePoint 2010 through jQuery

November 20th, 2012 No comments

    After migration a SharePoint 2007 application to SharePoint 2010 my jQuery scripts communicating with asmx web services stopped working. The error I got was a 500 Internal Server Error. The scripts looks as follows:

$.ajax({
  type: "POST",
  url:  "http://someserver/someapp/_layouts/Services/Products.asmx/GetProductByCountry",

  data:        JSON.stringify({ countryCode: "USA" }),
  dataType:    "json",
  contentType: 'application/json; charset=utf-8',
  context:     this,

  success: function (data) {
		     alert(data.d);
           },
  error:   function (XMLHttpRequest, textStatus, errorThrown) {
		     alert(textStatus);
           }
});

Note: The JSON object mentioned in the script is defined in the json2.js available at http://www.json.org.

This issue can be solved by adding an appropriate <webServices> section to the SharePoint application’s web.config (in my case it’s located at C:\inetpub\wwwroot\wss\VirtualDirectories\80). So, find the global <system.web> section in your web.config and make changes so that the result would look like the following:

<system.web>
  <webServices>
    <protocols>
      <add name="HttpGet" />
      <add name="HttpPost" />
    </protocols>
  </webServices>
...
</system.web>

However, from the security point of view such solution is not ideal as it allows external access through the HTTP-GET and HTTP-POST messaging protocols to all your XML web services. So, it’s better to specify the access protocols for each web service separately, not affecting other ones. The <location> element added to the root <configuration> element provides us with this capability. The sample below defines the protocols for accessing the web service reachable by the specified path:

<configuration>
...
  <location path="_layouts/Services/Products.asmx">
    <system.web>
      <webServices>
        <protocols>
          <add name="HttpGet"/>
          <add name="HttpPost"/>
        </protocols>
      </webServices>
    </system.web>
  </location>
...
</configuration>

Note that the _layouts virtual directory is available as a subfolder of every SharePoint Web site. So if you want to limit the use of the web service by only one SharePoint Web site, specify the path like someapp/_layouts/Services/Products.asmx.

PS Here is a good article about how to create a custom web service in SharePoint 2010.

SharePoint: How to import SharePoint 2007 list templates into SharePoint 2010

November 5th, 2012 No comments

    I was asked to transfer a few SharePoint 2007 lists with their contents into a SharePoint 2010 application. Obvious steps were create the lists’ templates (.stp files) in SP 2007 and redeploy them in SP 2010. Having successfully created and uploaded the templates into the List Template Gallery (_catalogs/lt) of a 2010 Site Collection, I got the following error whenever I tried to create a new list instance based on any of the uploaded templates:

Microsoft SharePoint Foundation version 3 templates are not supported 
in this version of the product.

Fortunately, a straightforward solution was found quite quickly.

.stp File Content

A .stp file is just a .cab archive (similar to a .wsp) and, after changing the file’s extension to cab, it can be opened and viewed with any popular archiver (WinRar, 7 zip and so on).
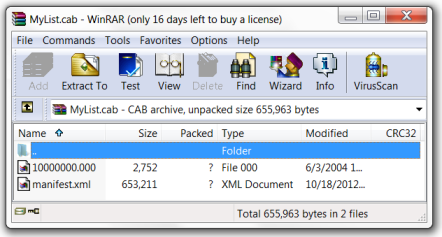
.stp file content

In the .cab you’ll see at least one file, manifest.xml (frequently, there is nothing but the one). The manifest.xml contains the target list’s schema and content (if the template was created with the appropriate option). The first lines of the manifest.xml look like the following:

<?xml version="1.0" encoding="UTF-8" ?>
<ListTemplate WebUrl="http://myapplication/mysitecollection">
    <Details>
        <TemplateDescription></TemplateDescription>
        <TemplateTitle>MyList</TemplateTitle>
        <ProductVersion>3</ProductVersion>
        <Language>1033</Language>
        <TemplateID>20</TemplateID>
        <Configuration>0</Configuration>
        <FeatureId>{00BFEA71-DE22-43C2-A848-C05706800101}</FeatureId>
        <TemplateType>100</TemplateType>
        <BaseType>0</BaseType>
    </Details>
...
</ListTemplate>

Pay attention to the <ProductVersion> element containing the value 3. So, the solution mentioned above is to modify the file so that its <ProductVersion> would contain 4. Having done that, we need to recreate the .cab file with the altered manifest.xml and change the output file’s extension back to stp.

Recreate .cab

The most tricky part in the solution is to repack file or group of files into .cab as the most popular archivers don’t allow that. So, we have to do it by ourselves using the Microsoft’s makecab.exe utility usually located at C:\Windows\System32. If your template contains only manifest.xml, use the command line like the following to repack it into .cab:

makecab.exe C:\ExtractedStpFiles\manifest.xml c:\RepackedStpFiles\MyList.cab

The first argument is a path to the file to be wrapped into .cab. Here the altered manifest.xml is assumed to be in the c:\ExtractedStpFiles folder. The second argument is a path to the output archive file. Here the destination folder is c:\RepackedStpFiles.

To avoid the step with changing the output file’s extension from cab to stp, you can modify the above command line to

makecab.exe C:\ExtractedStpFiles\manifest.xml c:\RepackedStpFiles\MyList.stp

If the list template contains more than one file inside, first of all, we need to prepare a directive file (.ddf file) containing instructions for makecab.exe how to compress and package the files. Each instruction starts with “.”, comment starts with “;”. For our task such file may look as follows (let’s name it MyList.ddf and place in C:\ExtractedStpFiles):

.OPTION EXPLICIT
 
.Set CabinetNameTemplate=MyList.stp ; Name of the output .cab file, in our case we can specify the file's extension as .stp
.Set Cabinet=on
.Set CompressionType=MSZIP ; All files will be compressed

.Set DiskDirectoryTemplate=CDROM ; All compressed files in the output .cab will be in a single directory
.Set DiskDirectory1=c:\RepackedStpFiles ; The output .cab file will be placed in this directory

; the next lines specify the files to be included into the output .cab
"c:\ExtractedStpFiles\manifest.xml"
"c:\ExtractedStpFiles\10000000.000"

Ok, now we need to run the following command line to repackage required files:

makecab.exe /f "C:\ExtractedStpFiles\MyList.ddf"

The /f key indicates that to create .cab file, the makecab.exe should use the directive file pointed next.

Converting Step-by-step

So, the straightforward solution to make a 2007 list template compatible with SharePoint 2010 includes the following steps:

  1. Change the extension of the original 2007 .stp file to cab;
  2. Extract files with any archiver into a folder (for example, c:\ExtractedStpFiles);
  3. Open the manifest.xml and set the value of <ProductVersion> element to 4;
  4. Repackage the modified manifest.xml and other files (if any) into .stp (generally .cab) file. Use for that either the command line like
    makecab.exe C:\ExtractedStpFiles\manifest.xml c:\RepackedStpFiles\MyList.stp
    

    when the list template in question contains only the manifest.xml, or the directive file (for example, C:\ExtractedStpFiles\MyList.ddf)

    .OPTION EXPLICIT
     
    .Set CabinetNameTemplate=MyList.stp ; Name of the output .cab file, in our case we can specify the file's extension as .stp
    .Set Cabinet=on
    .Set CompressionType=MSZIP ; All files will be compressed
    
    .Set DiskDirectoryTemplate=CDROM ; All compressed files in the output .cab will be in a single directory
    .Set DiskDirectory1=c:\RepackedStpFiles ; The output .cab file will be placed in this directory
    
    ; the next lines specify the files to be included into the output .cab
    "c:\ExtractedStpFiles\manifest.xml"
    "c:\ExtractedStpFiles\10000000.000"
    

    along with the command line

    makecab.exe /f "C:\ExtractedStpFiles\MyList.ddf"
    

    when there are more than one files in the list template.

After that the output .stp file is ready for uploading into the List Template Gallery (_catalogs/lt) of the target Site Collection.

Summary

Be aware that this solution is not a best practice and it may not work in some cases.

If you have a lot of .stp files to migrate you can automate this process using the PowerShell scripts posted here and here.