Archive

Posts Tagged ‘Share Point’

SharePoint: How to add a new SPGroup through the code

March 9th, 2014 No comments

    The below listed CreateSpGroup methods along with a few subsidiary ones could be used to add a new SPGroup to a SPWeb

public static SPGroup CreateSpGroup(SPWeb spWeb, string groupName, 
                                    string description, bool isAssociated)
{
  SPGroup res = GetGroupByName(spWeb, groupName);
  if (res == null)
  {
    spWeb.SiteGroups.Add(groupName, spWeb.Site.SystemAccount, null, description);
    res = spWeb.SiteGroups[groupName];

    if (isAssociated)
    {
      spWeb.AssociatedGroups.Add(res);

      const string createdGroupsProperty = "vti_createdassociategroups";
      var createdAssociatedGroupsStr = spWeb.AllProperties[createdGroupsProperty] as string;
      if (!string.IsNullOrEmpty(createdAssociatedGroupsStr))
      {
        var createdAssociatedGroups = ParseAssociateGroupsFromString(createdAssociatedGroupsStr);
        if (!createdAssociatedGroups.Contains(res.ID))
        {
          createdAssociatedGroups.Add(res.ID);
          spWeb.AllProperties[createdGroupsProperty] = 
                               ConvertAssociateGroupsToString(createdAssociatedGroups);
        }
      }
      spWeb.Update();
    }
  }
  return res;
}

public static SPGroup CreateSpGroup(SPWeb spWeb, string groupName)
{
	return CreateSpGroup(spWeb, groupName, string.Empty, false);
}

public static List<int> ParseAssociateGroupsFromString(string str)
{
  var list = new List<int>();
  if (!string.IsNullOrEmpty(str))
    foreach (string str2 in str.Split(new[] { ';' }))
    {
        int num2;
        if ((!string.IsNullOrEmpty(str2) && 
            int.TryParse(str2, NumberStyles.Integer, CultureInfo.InvariantCulture, out num2)) && 
                    ((num2 > 0) && !list.Contains(num2)))
          list.Add(num2);
    }
  return list;
}

public static string ConvertAssociateGroupsToString(List<int> groupIds)
{
	var builder = new StringBuilder();
	for (int i = 0; i < groupIds.Count; i++)
	{
		if (builder.Length > 0)
			builder.Append(';');
		builder.Append(groupIds[i].ToString(CultureInfo.InvariantCulture));
	}
	return builder.ToString();
}

public static SPGroup GetGroupByName(SPWeb spWeb, string groupName)
{
	foreach (SPGroup group in spWeb.SiteGroups)
		if (groupName.Equals(group.Name, StringComparison.OrdinalIgnoreCase))
			return group;
	return null;
}

At first the CreateSpGroup method makes sure whether the target group doesn’t exist by calling the GetGroupByName. If such group has been found, it’s returned, otherwise a new empty group is being created. The SPWeb.Site.SystemAccount aka Site Collection administrator will be the owner of the new group.

The isAssociated flag indicates if the group has to be associated with the site. Let’s linger on associated groups a bit longer.

When a site (or sub-site with unique permissions) is created, three default groups associated with the site become available. Their names usually are “YourSiteName Owners”, “YourSiteName Members” and “YourSiteName Visitors”, where the YourSiteName is the name you gave to your site. You can see them in the Groups section at Quick Launch area when going to the “People and Groups” page (Site Actions -> Site Settings -> People and groups). Through the code those groups are accessible as SPWeb.AssociatedOwnerGroup, SPWeb.AssociatedMemberGroup and SPWeb.AssociatedVisitorGroup respectively. We also can get their IDs from the AllProperties collection of a SPWeb instance like SPWeb.AllProperties[“vti_associateownergroup”], SPWeb.AllProperties[“vti_associatemembergroup”] and SPWeb.AllProperties[“vti_associatevisitorgroup”] respectively. We are able to associate our own custom groups with the site by adding them to the SPWeb.AssociatedGroups collection, so that our groups would appear in the Quick Launch at the “People and Groups” page. So, that’s the first thing the CreateSpGroup does in case the isAssociated is set to true.

One more often-mentioned feature of associated groups is that they allegedly can be deleted automatically when the site/sub-site they are associated with is being deleted. Here, however, there is a pitfall: all groups are SiteCollection-level objects, therefore removing the site/sub-site, the groups (including associated ones) are still available as they are linked to the site collection. SharePoint, however, treats the associated default groups in a special way, namely the groups specified in the SPWeb.AssociatedOwnerGroup, SPWeb.AssociatedMemberGroup and SPWeb.AssociatedVisitorGroup will be actually deleted with the site/sub-site jointly. As regards custom associated groups, in the general case, they will never be automatically deleted with the site. So, don’t count on it. If, however, you are still eager to make your custom group deletable by default, you don’t have any choice but to override one of the associated default groups with the custom one. That’s not a complete solution though, you also have to add the id of the custom group to the spWeb.AllProperties[“vti_createdassociategroups”]. I came to this, having reviewed such methods as Microsoft.SharePoint.Utilities.SPUtilityInternal.CreateDefaultSharePointGroups and Microsoft.SharePoint.ApplicationPages.DeleteWebPage.OnLoad by means of .Net Reflector. So, in case the isAssociated is set to true, the second thing the CreateSpGroup does is adding group’s id to the “vti_createdassociategroups” property. After that the only step you have to do to make your custom group deletable is something like this

spWeb.AssociatedVisitorGroup = CreateSpGroup(spWeb, "my own custom group", string.Empty, true);
//spWeb.AssociatedMemberGroup  = CreateSpGroup(spWeb, "my own custom group", string.Empty, true);
//spWeb.AssociatedOwnerGroup   = CreateSpGroup(spWeb, "my own custom group", string.Empty, true);

Note that, doing that, the overridden default group still remains and is linked to the Site Collection. In case it is not needed any more, remove it. So, before overriding the default group, you’d better save the reference to it and then, after overriding, remove it by calling SPWeb.SiteGroups.Remove.

Nevertheless I suggest you not override associated default groups as you are always able to customize them the way you need instead: change name and description, add users you want and so on.

One more important thing to be aware of is, deleting a site/sub-site, you likely just move it to the Site Collection Recycle Bin (unless the Recycle Bin is off). That means the associated default groups will not be deleted right away, they will be deleted only at that moment when the site is being erased from the Recycle Bin. Unlike the site they are associated with, the groups will not be moved to the Recycle Bin. Moreover SharePoint doesn’t even mark them as “being deleted”. Thus during the Recycle Bin retention period (30 days by default) the associated default groups, being the SiteCollection-level objects, remain available and can be used by someone else. So, somebody who rashly uses the default groups of the “deleted” site may be unpleasantly surprised some day as the groups suddenly disappear. To avoid this, I personally (of course if I have no doubts that the site/sub-site has to vanish completely) erase it from Recycle Bin right away or ask Site Collection administrators to do this as soon as possible.

Let’s go back to the rest of the methods listed above. The ParseAssociateGroupsFromString method parses the value of vti_createdassociategroups into an array of groups’ IDs. The ConvertAssociateGroupsToString, in turn, makes inverse operation and turns the array into a string to save it in the vti_createdassociategroups property. The format of the vti_createdassociategroups is very simple, it’s a set of groups’ IDs separated with semicolons like 1;2;3. Nothing is easier than to implement parse of such string. I, however, decided to use the methods found in SharePoint‘s interior. So, ParseAssociateGroupsFromString and ConvertAssociateGroupsToString are internal methods defined in the Microsoft.SharePoint.ApplicationPages.PeopleGroupPageBase and captured by .Net Reflector.

The GetGroupByName is intended to look for a group with a specified name and used to check if the group about to be created exists.

As I said before, the groups are SiteCollection-level objects, so groups have to be created under privileged account at least under Site Collection administrator. So, the CreateSpGroup could be called as shown below:

// use of system account
string siteUrl = "some site url";
SPUserToken spUserToken = GetSystemToken(siteUrl);
using (SPSite spSite = new SPSite(siteUrl, spUserToken))
{
	using (SPWeb spWeb = spSite.OpenWeb())
	{
		SPGroup newGroup = CreateSpGroup(spWeb, "new group", string.Empty, true);
		// do something with the new group
	}
}

*Note: the GetSystemToken method is described here – SharePoint: How to get SystemAccount token.

or

// use of application pool identity
SPSecurity.RunWithElevatedPrivileges(delegate
{
    using (SPSite spSite = new SPSite("some site url"))
        using (SPWeb spWeb = spSite.OpenWeb())
        {
            SPGroup newGroup = CreateSpGroup(spWeb, "new group", string.Empty, true);
            // do something with the new group
        }
});

SharePoint: Simple Event Logger

June 3rd, 2013 No comments

    Errors, warnings and info messages in all my SharePoint applications are being logged to the Application Event Log. For that I use a simple class tritely named EventLogger and listed later in this post. As for the moment, a couple of words about the EventLogger are stated below.

If necessary, the EventLogger registers a source in the Application Event Log once any its method is called for the first time (see the static constructor). The event logging uses the information stored in the Eventlog registry key. So, when dealing with the Application Event Log, we have to be ready to get exception about a lack of rights to read from or write to the registry. Because of that, the EventLogger initially tries adding a new source under the current user account and then, in case of failure, repeats the same under the application pool account (SPSecurity.RunWithElevatedPrivileges) that is supposed to have all suitable permissions.

Due to the same reason, whenever a user different from the application pool account writes anything to the log, he will likely get an exception which is reporting that the current user doesn’t have write access. To guard users from that, we as administrators have to do some manual work, namely, to add the CustomSD value to the [HKEY_LOCAL_MACHINE\SYSTEM\CurrentControlSet\services\eventlog\Application] registry key how it’s described in the article SharePoint: Cannot open log for source. You may not have write access. If a SharePoint application supports anonymous access, use WD (all users) instead of AU (authenticated users). Also it’s very important to understand that the appropriate CustomSD must be added on all machines of a SharePoint farm. An alternative way is to wrap the writing to the log in SPSecurity.RunWithElevatedPrivileges. Remember, however, that the SPSecurity.RunWithElevatedPrivileges is quite resource-consuming and excessive for such frequent operation as event logging. So, use the SPSecurity.RunWithElevatedPrivileges as an extreme measure and only when the previous approach with CustomSD didn’t help for some reasons.

Another feature of the EventLogger is that, as a backup plan, it writes to the SharePoint Trace Log through the Unified Logging Service (see the WriteToHiveLog method). In other words, if the EventLogger doesn’t manage to write a message to the Application Event Log, it tries appending the message to the ULS Log stored in the file system and accessible, for example, through the ULS Viewer.

Logging an error or warning based on the passed exception, the EventLogger forms the final text, using the exception’s message along with the message of the inner exception (if any) and stack trace.

Below is a combined example that demonstrates how to use the EventLogger to log errors, warnings and info.

using dotNetFollower;
...

EventLogger.WriteInfo("How to use the EventLogger");

EventLogger.WriteError("Sorry, couldn't perform this operation!");
// OR
EventLogger.WriteWarning("Sorry, couldn't perform this operation!");

try
{
	// the next line throws an exception
	SPList spList = SPContext.Current.Web.Lists["Not existing list"];
}
catch (Exception ex)
{
	EventLogger.WriteError(ex);
	// OR
	EventLogger.WriteWarning(ex);
}

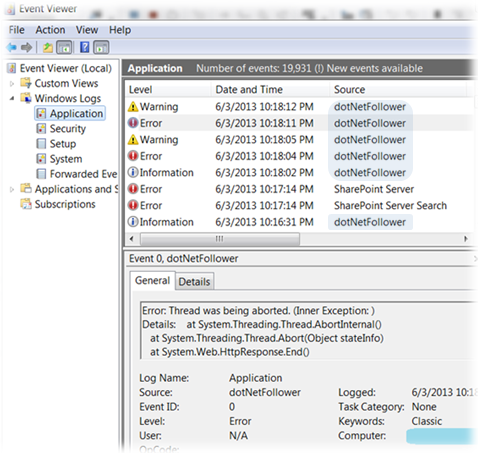
Below is depicted what those records look like in the Windows Event Viewer:
EventLogger Records

Ok, it’s about time for the EventLogger listing:

using System;
using System.Diagnostics;
using Microsoft.SharePoint;
using Microsoft.SharePoint.Administration;

namespace dotNetFollower
{
    public static class EventLogger
    {
        private const string SOURCE = "dotNetFollower"; // put here your own source name

        /// <summary>
        /// Writes an error message
        /// </summary>
        /// <param name="errorText">Error message</param>
        public static void WriteError(string errorText)
        {
            WriteWithinTryCatch(errorText, EventLogEntryType.Error);
        }
        /// <summary>
        /// Writes an error message
        /// </summary>
        /// <param name="ex">Exception</param>
        public static void WriteError(Exception ex)
        {
            WriteWithinTryCatch(GetExceptionFormatted(ex), EventLogEntryType.Error);
        }
        /// <summary>
        /// Writes a warning message
        /// </summary>
        /// <param name="text">Warning message</param>
        public static void WriteWarning(string text)
        {
            WriteWithinTryCatch(string.Format("Warning: {0}", text), EventLogEntryType.Warning);
        }
        /// <summary>
        /// Writes a warning message
        /// </summary>
        /// <param name="ex">Exception</param>
        public static void WriteWarning(Exception ex)
        {
            WriteWithinTryCatch(GetExceptionFormatted(ex), EventLogEntryType.Warning);
        }
        /// <summary>
        /// Writes an info message
        /// </summary>
        /// <param name="text">Info message</param>
        public static void WriteInfo(string text)
        {
            WriteWithinTryCatch(string.Format("Information: {0}", text), EventLogEntryType.Information);
        }

        /// <summary>
        /// Creates the appropriate source in Event Logs, if necessary
        /// </summary>
        public static void EnsureLogSourceExist()
        {
            if (!EventLog.SourceExists(SOURCE))
                EventLog.CreateEventSource(SOURCE, "Application");
        }

        /// <summary>
        /// Returns an error message based on a passed exception. Includes an inner exception (if any) and stack trace
        /// </summary>
        /// <param name="ex">Exception</param>
        /// <returns>Formed error message</returns>
        public static string GetExceptionFormatted(Exception ex)
        {
            return string.Format("Error: {0} (Inner Exception: {1})\t\nDetails: {2}", 
                ex.Message, 
                ex.InnerException != null ? ex.InnerException.Message : string.Empty, 
                ex.StackTrace);
        }

        static EventLogger()
        {
            bool error = false;

            Action action = delegate
                {
                    try
                    {
                        // register source in Event Logs
                        EnsureLogSourceExist();
                    }
                    catch
                    {
                        error = true;
                    }
                };

            // try under current user
            action();

            if(error)
                // try under application pool account
                SPSecurity.RunWithElevatedPrivileges(() => action());
        }

        private static void WriteWithinTryCatch(string message, EventLogEntryType type)
        {
            try
            {
                // To allow users (authenticated only or all of them) writing to Event Log,
                // follow the steps described in the article 
                // http://dotnetfollower.com/wordpress/2012/04/sharepoint-cannot-open-log-for-source-you-may-not-have-write-access/

                // If it doesn't help for some reason, uncomment the line with SPSecurity.RunWithElevatedPrivileges and 
                // comment the other one. Note, however, that the use of SPSecurity.RunWithElevatedPrivileges is 
                // resource-consuming and looks excessive for such frequent operation as event logging.

                //SPSecurity.RunWithElevatedPrivileges(() => EventLog.WriteEntry(SOURCE, message, type));
                EventLog.WriteEntry(SOURCE, message, type);
            }
            catch
            {
                WriteToHiveLog(message, type);
            }
        }

        private static void WriteToHiveLog(string message, EventLogEntryType type)
        {
            EventSeverity eventSeverity = type == EventLogEntryType.Error ? EventSeverity.Error : 
                (type == EventLogEntryType.Warning ? EventSeverity.Warning : EventSeverity.Information);

            var category = new SPDiagnosticsCategory(SOURCE, TraceSeverity.Unexpected, eventSeverity);

            SPDiagnosticsService.Local.WriteTrace(0, category, TraceSeverity.Unexpected, message, null);
        }
    }
}
Related posts:

SharePoint: What is a People Picker? Part 1 – PeopleEditor

April 30th, 2013 No comments

In fact, there is no control with the name PeoplePicker in SharePoint, it’s a common name of the group of elements: a few controls, one aspx-page and a couple of JavaScript files. These elements are closely connected with each other, use each other and all together allow searching and picking out users and groups available in SharePoint and/or Active Directory.

Let’s take a closer look at each element of the People Picker.

PeopleEditor

PeopleEditor is a visual control providing an entry point to deal with People Picker. So, to leverage the People Picker functionality we need just to add the PeopleEditor control to our aspx-page as follows:

<%@ Register TagPrefix="wssawc" Namespace="Microsoft.SharePoint.WebControls" 
 Assembly="Microsoft.SharePoint, Version=14.0.0.0, Culture=neutral, PublicKeyToken=71e9bce111e9429c" %> 
... 
<wssawc:PeopleEditor id="peoplePicker" runat="server" SelectionSet="User,SecGroup,DL" 
  MultiSelect="true" Height="20px" Width="200px" />
...
 

Below is a class diagram demonstrating the ancestors of the PeopleEditor and supported interfaces:
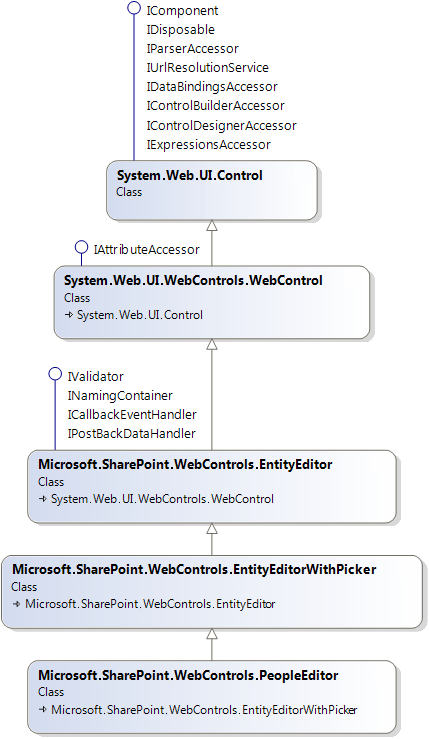
PeoplePicker Class Diagram

The PeopleEditor usually consists of a composite Edit Box and two buttons: Check Names and Browse.
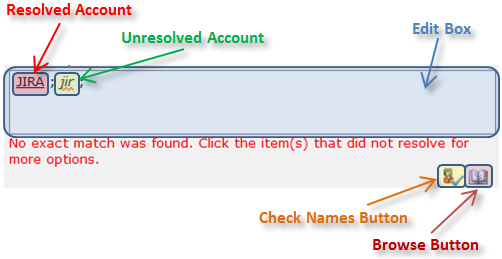
PeopleEditor Parts

The Hml markup generated by the PeopleEditor is listed below. The listing is a relatively large bunch of the Html-tags but helps figure out what DOM elements are involved in and where in the markup they are located. The Html comments, indents and formatting are added for clarity.

Click to open the PeopleEditor’s Html markup

<span id="ctl00_PlaceHolderMain_ctl00_ctl01_userPicker" editoroldvalue="" 
  removetext="Remove" value="" nomatchestext="&lt;No Matching Names&gt;" 
  moreitemstext="More Names..." prefercontenteditablediv="true" 
  showdatavalidationerrorborder="false" eeaftercallbackclientscript="" 
  invalidate="false" allowtypein="true" showentitydisplaytextintextbox="0">

 <!-- [Begin] Hidden inputs of the composite Edit Box -->
 <input type="hidden" value=""
  name="ctl00$PlaceHolderMain$ctl00$ctl01$userPicker$hiddenSpanData"
  id="ctl00_PlaceHolderMain_ctl00_ctl01_userPicker_hiddenSpanData">
 <input type="hidden" value="&lt;Entities /&gt;"
  name="ctl00$PlaceHolderMain$ctl00$ctl01$userPicker$OriginalEntities" 
  id="ctl00_PlaceHolderMain_ctl00_ctl01_userPicker_OriginalEntities">
 <input type="hidden"
  name="ctl00$PlaceHolderMain$ctl00$ctl01$userPicker$HiddenEntityKey" 
  id="ctl00_PlaceHolderMain_ctl00_ctl01_userPicker_HiddenEntityKey">
 <input type="hidden"
  name="ctl00$PlaceHolderMain$ctl00$ctl01$userPicker$HiddenEntityDisplayText" 
  id="ctl00_PlaceHolderMain_ctl00_ctl01_userPicker_HiddenEntityDisplayText">
 <!-- [End] Hidden inputs of the composite Edit Box -->

 <table id="ctl00_PlaceHolderMain_ctl00_ctl01_userPicker_OuterTable" class="ms-usereditor" cellspacing="0" cellpadding="0" border="0" style="border-collapse:collapse;">
  <tr>
   <td valign="top">
    <table cellpadding="0" cellspacing="0" border="0" style="width:100%;table-layout:fixed;">
     <tr>
      <td id="ctl00_PlaceHolderMain_ctl00_ctl01_userPicker_containerCell">

 <!-- [Begin] Visible up level div of the composite Edit Box -->
 <div id="ctl00_PlaceHolderMain_ctl00_ctl01_userPicker_upLevelDiv" tabindex="0" 
   onfocus="StoreOldValue('ctl00_PlaceHolderMain_ctl00_ctl01_userPicker');
            saveOldEntities('ctl00_PlaceHolderMain_ctl00_ctl01_userPicker');"
   onclick="onClickRw(true, true,event,'ctl00_PlaceHolderMain_ctl00_ctl01_userPicker');"
   onchange="updateControlValue('ctl00_PlaceHolderMain_ctl00_ctl01_userPicker');"
   onpaste="dopaste('ctl00_PlaceHolderMain_ctl00_ctl01_userPicker',event);"
   autopostback="0" rows="3" 
   ondragstart="canEvt(event);" 
   onkeyup="return onKeyUpRw('ctl00_PlaceHolderMain_ctl00_ctl01_userPicker');" 
   oncopy="docopy('ctl00_PlaceHolderMain_ctl00_ctl01_userPicker',event);" 
   onblur="
    if(typeof(ExternalCustomControlCallback)=='function'){		
     if(ShouldCallCustomCallBack('ctl00_PlaceHolderMain_ctl00_ctl01_userPicker',event)){
      if(!ValidatePickerControl('ctl00_PlaceHolderMain_ctl00_ctl01_userPicker')){
        ShowValidationError();
        return false;
      }
      else
        ExternalCustomControlCallback('ctl00_PlaceHolderMain_ctl00_ctl01_userPicker');                          
     }
    }"
   title="People Picker" 
   onkeydown="return onKeyDownRw('ctl00_PlaceHolderMain_ctl00_ctl01_userPicker', 3, true, event);" 
   aria-multiline="true" contenteditable="true" aria-haspopup="true" class="ms-inputuserfield" 
   style="word-wrap: break-word; overflow-x: hidden; background-color: window; color: windowtext; overflow-y: auto; height: 48px;" 
   prefercontenteditablediv="true" name="upLevelDiv" role="textbox">
 </div>
 <!-- [End] Visible up level div of the composite Edit Box -->

 <!-- [Begin] Usually invisible down level textarea of the composite Edit Box -->
 <textarea rows="3" cols="20" style="width:100%;display: none;position: absolute; "
  name="ctl00$PlaceHolderMain$ctl00$ctl01$userPicker$downlevelTextBox" 
  id="ctl00_PlaceHolderMain_ctl00_ctl01_userPicker_downlevelTextBox" 
  class="ms-inputuserfield" autopostback="0" 
  onkeyup="return onKeyUpRw('ctl00_PlaceHolderMain_ctl00_ctl01_userPicker');" 
  title="People Picker" 
  onfocus="StoreOldValue('ctl00_PlaceHolderMain_ctl00_ctl01_userPicker');
           saveOldEntities('ctl00_PlaceHolderMain_ctl00_ctl01_userPicker');" 
  onblur="
   if(typeof(ExternalCustomControlCallback)=='function'){		
    if(ShouldCallCustomCallBack('ctl00_PlaceHolderMain_ctl00_ctl01_userPicker',event)){
     if(!ValidatePickerControl('ctl00_PlaceHolderMain_ctl00_ctl01_userPicker')){
       ShowValidationError();
       return false;
     }
     else
       ExternalCustomControlCallback('ctl00_PlaceHolderMain_ctl00_ctl01_userPicker');                          
    }
   }"
  onkeydown="return onKeyDownRw('ctl00_PlaceHolderMain_ctl00_ctl01_userPicker', 3, true, event);" 
  renderascontenteditablediv="true" 
  onchange="updateControlValue('ctl00_PlaceHolderMain_ctl00_ctl01_userPicker');">
 </textarea>
 <!-- [End] Usually invisible down level textarea of the composite Edit Box -->

      </td>
     </tr>
    </table>
   </td>
  </tr>
  <tr>
   <td>
    <span id="ctl00_PlaceHolderMain_ctl00_ctl01_userPicker_errorLabel" class="ms-error"></span>
   </td>
  </tr>
  <tr style="padding-top:2;">
   <td>
    <table cellspacing="0" cellpadding="0" border="0" style="width:100%;border-collapse:collapse;">
     <tr>
      <td valign="top" style="width:88%;">
       <span style="font-size:8pt;"></span>
      </td>
      <td valign="top" nowrap="true" style="padding-left:5px;padding-right:5px;">

 <!-- [Begin] Check Names Button -->
 <a id="ctl00_PlaceHolderMain_ctl00_ctl01_userPicker_checkNames" 
  title="Check Names"
  href="javascript:"
  onclick="
    if(!ValidatePickerControl('ctl00_PlaceHolderMain_ctl00_ctl01_userPicker')){
      ShowValidationError(); 
      return false;
    }
    var arg=getUplevel('ctl00_PlaceHolderMain_ctl00_ctl01_userPicker'); 
    var ctx='ctl00_PlaceHolderMain_ctl00_ctl01_userPicker';
    EntityEditorSetWaitCursor(ctx);
    WebForm_DoCallback('ctl00$PlaceHolderMain$ctl00$ctl01$userPicker',arg,
           EntityEditorHandleCheckNameResult,
           ctx,EntityEditorHandleCheckNameError,true);
    return false;">
  <img title="Check Names" src="/_layouts/images/checknames.png" alt="Check Names" style="border-width:0px;">
 </a>&nbsp;
 <!-- [End] Check Names Button -->

 <!-- [Begin] Browse Button -->
 <a id="ctl00_PlaceHolderMain_ctl00_ctl01_userPicker_browse" 
  title="Browse" href="javascript:"
  onclick="__Dialog__ctl00_PlaceHolderMain_ctl00_ctl01_userPicker(); 
          return false;">
  <img title="Browse" src="/_layouts/images/addressbook.gif" alt="Browse" style="border-width:0px;">
 </a>
 <!-- [End] Browse Button -->

      </td>
     </tr>
    </table>
   </td>
  </tr>
 </table>
</span>

*Note that this markup corresponds to the empty PeopleEditor when nothing is typed in.

The PeopleEditor (like other classes derived from EntityEditor) uses functions defined in the entityeditor.js that located at 14\TEMPLATE\LAYOUTS.

Composite Edit Box

The composite Edit Box performs the following two functions:

  • displays the already selected users and groups (I call them “resolved accounts”);
  • allows typing names (or part of them) of users and groups (I call them “unresolved accounts”).

All names (resolved and unresolved) should be delimited by the so-called Entity Separator. Usually it’s a semicolon (“;“). So, typing two or more names we need to separate them from each other to let the validation know what entries should be resolved.

Being aggregative, the Edit Box usually comprises a few hidden inputs, one invisible textarea and one visible div element (see the PeopleEditor‘s Html markup above). The div element, so-called upLevelDiv, displays everything we see in the Edit Box and allows typing by handling key pressing. And, of course, there are a lot of JavaScript defined in the entityeditor.js and intended to apply all that rich functionality to the simple div. Besides the upLevelDiv another quite important element of the Edit Box is one of the hidden inputs namely the so-called hiddenSpanData. The value attribute of the hiddenSpanData at any moment contains the copy of the content (innerHtml) of the upLevelDiv. Whenever the content of the upLevelDiv is changed those changes are reflected in the hiddenSpanData by calling the copyUplevelToHidden function defined in the entityeditor.js. As you know, the content of div elements is never sent when submitting data to the server. That’s why we need the hiddenSpanData, which is an input (though invisible) and, therefore, takes part in form submitting. So, everything we typed in or selected in the upLevelDiv will be sent to the server by the hiddenSpanData. Also note that the hiddenSpanData keeps the copy of the upLevelDiv‘s inner Html as is, NO transformation is applied. That means that the very Html used to visualize the “resolved accounts” in the upLevelDiv is going to be posted to the server. That requires the server side to parse the Html (usually bunch of SPAN and DIV tags) to extract the entries. I have no idea why the Microsoft uses such a complex and excess format to pass the entries, but that’s a fact. Later in the article we’ll see an example of such Html-formatted entries sent to the server.

The usually invisible so-called downlevelTextBox textarea is used when browser doesn’t support content editable div. So, in case of legacy browser the downlevelTextBox gets visible while the upLevelDiv disappears. All changes of the text inside the downlevelTextBox are being reflected in the hiddenSpanData as well. Note that since textarea doesn’t support Html formatting inside, the typed entries are being sent to the server as a plain text.

The hidden input so-called OriginalEntities is aimed to keep the users and groups (“resolved accounts”) that were selected formerly. For example, if we are opening a list item to edit and the page contains the PeopleEditor bound to a field of the “Person or Group” type, the current value of the field will be persisted into the OriginalEntities. When data is submitted back to the server the original entities allow tracking whether the set of users and groups has been changed. Unlike the hiddenSpanData, the OriginalEntities input keeps the “resolved accounts” as a pure Xml string. The following two methods are used on the server side to serialize entities to and deserialize from the Xml stored in the OriginalEntities: PickerEntity.ConvertEntitiesToXmlData and PickerEntity.ParseEntitiesFromXml respectively. Below in the article we’ll see an example of such Xml-formatted entries as the same format is used to return the result of the validation process.

Two more hidden inputs, HiddenEntityKey and HiddenEntityDisplayText, make sense only if the MultiSelect property of the PeopleEditor is set to false (that’s true for other controls derived from the EntityEditor unless that behavior is overridden somehow). The inputs keep respectively the Key (ID) and DisplayText (readable alias) of the first and only resolved entity. Both look quite useless for the PeopleEditor, but you can learn the way they are employed for picking out a BDC entity through the Enhanced ItemPicker.

Check Names button

The Check Names button validates/resolves the typed names. If the typed names match real accounts, such accounts are displayed in the Edit Box as the resolved ones. If no matches are found or some typed name matches multiple accounts, the name becomes clickable, and clicking on it displays the drop-down menu that looks like the one depicted below:

Multiple Accounts Matched

The menu allows choosing an entity that, in user’s opinion, best conforms to the typed name. Clicking Remove in the menu deletes the typed name. While More Names… does the same what the Browse button does (described below).

The PeopleEditor implements the ICallbackEventHandler interface and therefore supports Client Callbacks. Clicking Check Names button ends up with sending an async request to the page that hosts the PeopleEditor. When on the server side the page and all its controls have been re-created the instance of the PeopleEditor handles the request by parsing input, validating/resolving entries and sending the result back to the browser, then on the client side the Edit Box’s content is updated. What is the input sent to the server? It’s an inner Html of the upLevelDiv (or text of the downlevelTextBox textarea in case of a legacy browser). The GetInnerHTMLOrTextOfUpLevelDiv function from the entityeditor.js is responsible for getting the current input. So, in case of the Client Callback the Html-like data is taken directly from the upLevelDiv/downlevelTextBox, while in case of the usual Form Submit the data of the same format is posted by the hiddenSpanData.

Ok, let’s take a look at possible inputs (__CALLBACKPARAM in the request) that come into the ICallbackEventHandler.RaiseCallbackEvent method of the PeopleEditor. For example, in case the “jira; student” is typed in the Edit Box, the input will be the same – “jira; student“. If, however, the Edit Box contains one or more of the “resolved accounts”, the input becomes much trickier. For example, the string “JIRA; jir” transforms to the following (indents and formatting are added for clarity):

&nbsp;
<SPAN id=spanHQ\jira class=ms-entity-resolved 
   onmouseover=this.contentEditable=false; 
   title=HQ\jira tabIndex=-1 
   onmouseout=this.contentEditable=true; 
   contentEditable=true isContentType="true">

  <DIV id=divEntityData description="HQ\jira" 
     isresolved="True" displaytext="JIRA" key="HQ\jira" style="DISPLAY: none">

    <DIV data='<ArrayOfDictionaryEntry xmlns:xsi="http://www.w3.org/2001/XMLSchema-instance" xmlns:xsd="http://www.w3.org/2001/XMLSchema">
                      <DictionaryEntry>
                        <Key xsi:type="xsd:string">AccountName</Key>
                        <Value xsi:type="xsd:string">HQ\jira</Value>
                      </DictionaryEntry>
                      <DictionaryEntry>
                        <Key xsi:type="xsd:string">Email</Key>
                        <Value xsi:type="xsd:string">jira@someservername.com</Value>
                      </DictionaryEntry>
                      <DictionaryEntry>
                        <Key xsi:type="xsd:string">PrincipalType</Key>
                        <Value xsi:type="xsd:string">User</Value>
                      </DictionaryEntry></ArrayOfDictionaryEntry>'>
    </DIV>

  </DIV>
  <SPAN id=content tabIndex=-1 contentEditable=true
     oncontextmenu='onContextMenuSpnRw(event,"ctl00_PlaceHolderMain_ctl00_ctl01_userPicker");' 
     onmousedown=onMouseDownRw(event);>
		JIRA 
  </SPAN>

</SPAN>; jir&nbsp;; 

So, this listing demonstrates three things at once: the inner html of the upLevelDiv, the data stored in the hiddenSpanData and the data sent during the Client Callback. The EntityEditor.ParseSpanData is called on the server side to parse the input like that, while the ConvertEntityToSpan function from the entityeditor.js is used on the client side to turn the Client Callback result into such Html-like string.

To get the picture of how the PeopleEditor processes the input, see the code along with my comments that are listed below. The code is borrowed from the EntityEditor class (the ancestor of the PeopleEditor).

// eventArgument is an input similar to the ones shown above
private string InvokeCallbackEvent(string eventArgument)
{
	// ensure that all child controls of the PeopleEditor are re-created
    this.EnsureChildControls();
	// remove all "&nbsp;", i.e. Html spaces
    string spans = StrEatUpNbsp(eventArgument);
	// parse input, extract entries, convert them to instances of PickerEntity 
    // and then add to the Entities collection
    this.ParseSpanData(spans);
	// go through the collection and try resolving the entities
    this.Validate();
	// serialize the entities into the output xml string
    return this.GenerateCallbackData(this.Entities, false);
}

During the validation process itself the following methods are used ultimately: SPUtility.ResolvePrincipal or SPUtility.ResolveWindowsPrincipal, or, in case of the claims-based authentication, SPClaimProviderOperations.Resolve. If a name can’t be resolved, the process will make an attempt to find suitable accounts by calling such methods as SPUtility.SearchWindowsPrincipals or SPUtility.SearchPrincipals. As regards the claims-based authentication, the SPClaimProviderOperations.Resolve itself is able to return suitable accounts if the only one couldn’t be found.

Ok, let’s take a look at what kind of result is returned to the browser in case the “jira” entity has been resolved while the “jir” has multiple matches:

Click to open the Client Callback’s XML result

<Entities Append="False" DoEncodeErrorMessage="True" Separator=";" MaxHeight="3"
    Error="No exact match was found. Click the item(s) that did not resolve for more options.">

  <Entity Key="HQ\jira" DisplayText="JIRA" IsResolved="True" Description="HQ\jira">
    <ExtraData>
      <ArrayOfDictionaryEntry xmlns:xsi="http://www.w3.org/2001/XMLSchema-instance" xmlns:xsd="http://www.w3.org/2001/XMLSchema">
        <DictionaryEntry>
          <Key xsi:type="xsd:string">AccountName</Key>
          <Value xsi:type="xsd:string">HQ\jira</Value>
        </DictionaryEntry>
        <DictionaryEntry>
          <Key xsi:type="xsd:string">Email</Key>
          <Value xsi:type="xsd:string">jira@someservername.com</Value>
        </DictionaryEntry>
        <DictionaryEntry>
          <Key xsi:type="xsd:string">PrincipalType</Key>
          <Value xsi:type="xsd:string">User</Value>
        </DictionaryEntry>
      </ArrayOfDictionaryEntry>
    </ExtraData>
    <MultipleMatches />
  </Entity>

  <Entity Key="jir" DisplayText="jir" IsResolved="False" Description="Multiple entries matched, please click to resolve.">
    <MultipleMatches>      
      <Entity Key="HQ\jira-users" DisplayText="HQ\jira-users" IsResolved="True" Description="HQ\jira-users">
        <ExtraData>
          <ArrayOfDictionaryEntry xmlns:xsi="http://www.w3.org/2001/XMLSchema-instance" xmlns:xsd="http://www.w3.org/2001/XMLSchema">
            <DictionaryEntry>
              <Key xsi:type="xsd:string">AccountName</Key>
              <Value xsi:type="xsd:string">HQ\jira-users</Value>
            </DictionaryEntry>
            <DictionaryEntry>
              <Key xsi:type="xsd:string">PrincipalType</Key>
              <Value xsi:type="xsd:string">SecurityGroup</Value>
            </DictionaryEntry>
          </ArrayOfDictionaryEntry>
        </ExtraData>
      </Entity>
      <Entity Key="HQ\locadmin" DisplayText="Jira Admin Local" IsResolved="True" Description="HQ\locadmin">
        <ExtraData>
          <ArrayOfDictionaryEntry xmlns:xsi="http://www.w3.org/2001/XMLSchema-instance" xmlns:xsd="http://www.w3.org/2001/XMLSchema">
            <DictionaryEntry>
              <Key xsi:type="xsd:string">AccountName</Key>
              <Value xsi:type="xsd:string">HQ\locadmin</Value>
            </DictionaryEntry>
            <DictionaryEntry>
              <Key xsi:type="xsd:string">PrincipalType</Key>
              <Value xsi:type="xsd:string">User</Value>
            </DictionaryEntry>
          </ArrayOfDictionaryEntry>
        </ExtraData>
      </Entity>
      <Entity Key="HQ\jira" DisplayText="JIRA" IsResolved="True" Description="HQ\jira">
        <ExtraData>
          <ArrayOfDictionaryEntry xmlns:xsi="http://www.w3.org/2001/XMLSchema-instance" xmlns:xsd="http://www.w3.org/2001/XMLSchema">
            <DictionaryEntry>
              <Key xsi:type="xsd:string">AccountName</Key>
              <Value xsi:type="xsd:string">HQ\jira</Value>
            </DictionaryEntry>
            <DictionaryEntry>
              <Key xsi:type="xsd:string">Email</Key>
              <Value xsi:type="xsd:string">jira@someservername.com</Value>
            </DictionaryEntry>
            <DictionaryEntry>
              <Key xsi:type="xsd:string">PrincipalType</Key>
              <Value xsi:type="xsd:string">User</Value>
            </DictionaryEntry>
          </ArrayOfDictionaryEntry>
        </ExtraData>
      </Entity>
    </MultipleMatches>
  </Entity>

</Entities>

So, the server response is a Xml-based string where each resolved or unresolved name is presented by an Entity-node. The IsResolved attribute indicates if the name is resolved, i.e. whether the name matches a real user or group. Each Entity may contain the nested ones wrapped into MultipleMatches-tag in case the name matches multiple accounts. Those nested Entities will be enumerated in the drop-down menu when clicking the unresolved name.

Note that the OriginalEntities input contains the data in the same format.

Browse button

The Browse button opens the search dialog namely the dialog containing the picker.aspx page. Note that the static method PickerDialog.PickerActivateScript is called to get the appropriate JavaScript opening/activating the search dialog. The PickerDialog.PickerActivateScript, in turn, uses another static method PickerDialog.GetPickerDialogPage that constructs the url to the picker.aspx including all needed query string parameters. The PickerDialog is an ancestor of the PeoplePickerDialog class that along with the picker.aspx will be described in another article.

Related posts:
SharePoint: How to Delete a List Field/Column programmatically

July 13th, 2012 No comments

    Sometimes I need to remove a list field, which is not in use anymore. To remove the field we need just to call SPField.Delete method. However, there are situations when the field cannot be deleted due to some conditions, for example, when the field is read-only and etc. Because of that you might get such exceptions as

"The field cannot be deleted because it is a read only field in the list."
"The field cannot be deleted because it is a sealed field in the list."
"The field cannot be deleted because it is a hidden field in the list."

and other. So, let’s consider how these difficulties can be overcome (if it’s possible at all).

Inside the SPField.Delete method

The SPField.Delete does nothing except calling the Delete method of the SPFieldCollection class. The listing below demonstrates the short version of the SPFieldCollection.Delete:

public void Delete(string internalFieldName)
{
    SPField fld = ... // get the field from the current collection
    ...	

    if (!fld.CanBeDeleted)
        ... // throw an eception

    SPFieldLookup lookup = fld as SPFieldLookup;
    if (((lookup != null) && !lookup.IsDependentLookup) && (lookup.GetDependentLookupInternalNames().ToArray().Length != 0))
        ... // throw an eception     

    ... // delete the field
}

Where the CanBeDeleted property of the field defined as the following:

public bool CanBeDeleted
{
    get
    {
        if (this.AllowDeletion.HasValue)
            return this.AllowDeletion.Value;
        return (!this.FromBaseType && !this.Sealed);
    }
}

*Note: this code is true for both SharePoint 2007 and SharePoint 2010.

As we can see, deleting a list field, SharePoint explicitly analyzes such properties of the field as AllowDeletion, Sealed and FromBaseType. Additionally, experiments show that the ReadOnlyField and Hidden properties are being examined as well (likely it happens somewhere in the unmanaged SharePoint modules).

Workaround

An obvious workaround is, before calling SPField.Delete, change the above properties so that the field would be allowed for deletion. So, taking that into account, I implemented the following method(s) to delete list fields:

public static bool RemoveField(SPField spField)
{
    if (spField == null)
    {
        WriteErrorToLog("spField is null! Please, provide a valid one");
        return false;
    }

    bool res = false;
    try
    {
        // check if it's a ReadOnly field.
        // if so, reset it
        if (spField.ReadOnlyField)
        {
            spField.ReadOnlyField = false;
            spField.Update();
        }

        // check if it's a Hidden field.
        // if so, reset it
        if (spField.Hidden)
        {
            spField.Hidden = false;
            spField.Update();
        }

        // check if the AllowDeletion property is set to false.
        // if so, reset it to true
        if (spField.AllowDeletion == null || !spField.AllowDeletion.Value)
        {
            spField.AllowDeletion = true;
            spField.Update();
        }

        // If the AllowDeletion property is set, 
        // the Sealed property seems not to be examined at all.
        // So the following piece of code is commented.
        /*if(spField.Sealed)
        {
            spField.Sealed = false;
            spField.Update();
        }*/

        // If the AllowDeletion property is set, 
        // the FromBaseType property seems not to be examined at all.
        // So the following piece of code is commented.
        /*if(spField.FromBaseType)
        {
            spField.FromBaseType = false;
            spField.Update();
        }*/

        // finally, remove the field
        spField.Delete();
        spField.ParentList.Update();

        res = true;
    }
    catch (Exception ex)
    {
        WriteErrorToLog(ex.Message);
    }

    return res;
}

public static bool RemoveField(SPList spList, string displayNameOrInternalNameOrStaticName)
{
    SPField spField = GetFieldByName(spList, displayNameOrInternalNameOrStaticName);
    if(spField == null)
    {
        WriteErrorToLog(string.Format("Couldn't find field {0}!", displayNameOrInternalNameOrStaticName));
        return false;
    }

    return RemoveField(spField);
}

public static void WriteErrorToLog(string errorMsg)
{
    // write error into log
}

*Note: the GetFieldByName method is described here – Getting SPField with no exceptions to be thrown.

According to the code of the CanBeDeleted, the Sealed and FromBaseType properties are not being examined at all while the AllowDeletion is set. Thus the dealing with them is commented, but retained just in case.

Below is a sample of use:

SPSecurity.RunWithElevatedPrivileges(delegate
{
    using (SPSite spSite = new SPSite("some site url"))
        using (SPWeb spWeb = spSite.OpenWeb())
        {
            SPList spList = GetListByUrl(spWeb, "Lists/Products");
            RemoveField(spList, "product name");
        }
});

*Note: the GetListByUrl method is described here – Getting SPList with no exceptions to be thrown.

The RemoveField method isn’t a panacea. For example, you still will have problems if the field going to be deleted is a part of a multiple column lookup.

Be very careful when deleting fields, because it can lead to severe issues in your SharePoint applications. If you are uncertain, don’t delete anything, especially if it concerns a live application on a production server. Remember that you are always able to just make the field hidden instead.

SharePoint: Getting a SPField with no exceptions to be thrown

June 29th, 2012 No comments

    As you probably know, a SharePoint field has a few names: display name, internal and static. The display name usually differs from the internal and static ones. In some exotic cases, the internal and static names differ from each other too. List’s fields can be reached through the SPList.Fields collection of the SPFieldCollection class.

Get SPField by different names in SharePoint 2007

In SharePoint 2007 the SPFieldCollection exposes a few methods to get a field by its known display or internal name, but not the static name. These methods are the indexer of the SPFieldCollection that accepts the field’s display name, the GetFieldByInternalName method accepting the internal name, and the GetField method accepting both display and internal names. Unfortunately, all these methods are case sensitive and throw an exception if the field with the passed display or internal name wasn’t found. I don’t like to wrap every piece of code into try-catch, so, for SharePoint 2007 applications I’m involved in, when it’s possible I use the simple method shown below:

public static SPField GetFieldByName(SPList spList, string displayNameOrInternalNameOrStaticName)
{
    displayNameOrInternalNameOrStaticName = displayNameOrInternalNameOrStaticName.ToLower();

    foreach (SPField spField in spList.Fields)
    {
        if (spField.Title.ToLower() == displayNameOrInternalNameOrStaticName)
            return spField;
        if (spField.InternalName.ToLower() == displayNameOrInternalNameOrStaticName)
            return spField;
        if (spField.StaticName.ToLower() == displayNameOrInternalNameOrStaticName)
            return spField;
    }

    return null;
}

// how to use
// ...
    using (SPSite spSite = new SPSite("some site url"))
        using (SPWeb spWeb = spSite.OpenWeb())
        {
            SPList  spList  = GetListByUrl(spWeb, "Lists/Products");
            SPField spField = GetFieldByName(spList, "product name"); // the field's real display name is Product Name
            // do something
        }
// ...

*Note: find the GetListByUrl method in the previous blog post – SharePoint: Getting SPList with no exceptions to be thrown

The GetFieldByName accepts a field’s all possible names including the static name, it’s not case sensitive and returns null if the sought-for field doesn’t exist.

Of course, I’m aware that enumerating fields takes more time than retrieving them from the SPFieldCollection’s internal hashtables so as the built-in methods do. But when time isn’t so crucial for a particular piece of code, I prefer using the GetFieldByName method. In addition I don’t have an alternative for the GetFieldByName when I know only the field’s static name.

Get SPField by different names in SharePoint 2010

In SharePoint 2010 the new TryGetFieldByStaticName method has been added to the SPFieldCollection class. So, as the method’s name implies, we get a field by its static name, and no one exception even will be thrown in case the field doesn’t exist. Thus, for SharePoint 2010 I’ve modified the GetFieldByName as follows:

public static SPField GetFieldByName(SPList spList, string displayNameOrInternalNameOrStaticName)
{
    SPField spFieldByStaticName = spList.Fields.TryGetFieldByStaticName(displayNameOrInternalNameOrStaticName);
    if (spFieldByStaticName != null)
        return spFieldByStaticName;

    displayNameOrInternalNameOrStaticName = displayNameOrInternalNameOrStaticName.ToLower();

    foreach (SPField spField in spList.Fields)
    {
        if (spField.Title.ToLower() == displayNameOrInternalNameOrStaticName)
            return spField;
        if (spField.InternalName.ToLower() == displayNameOrInternalNameOrStaticName)
            return spField;
        if (spField.StaticName.ToLower() == displayNameOrInternalNameOrStaticName)
            return spField;
    }

    return null;
}

Check whether a field exists

To check whether a field exists, we can use the following method based on the GetFieldByName:

public static bool FieldExist(SPList spList, string displayNameOrInternalNameOrStaticName)
{
    return GetFieldByName(spList, displayNameOrInternalNameOrStaticName) != null;
}
Related posts: