SharePoint: How to create a custom REST WCF Service available in _layouts folder
In the given blogpost I’ll describe step by step how to create a simple REST WCF Service residing in the _layouts folder. To create a demonstration project we’ll use Visual Studio 2012. I believe, however, the similar steps could be done in Visual Studio 2010 as well.
* Don’t look for a meaning in the source code of the demonstration project as its main goal is just to show how to communicate with WCF Services operating under SharePoint and how they return and accept parameters of standard and custom types.
* If you are too lazy to go through all steps, you can download the demonstration project right away and play with it 🙂
1. Create a SharePoint project in the Visual Studio 2012
* Note that if you plan to add the service to an existent project, just skip this step.
Click to see how to create the SharePoint project in details
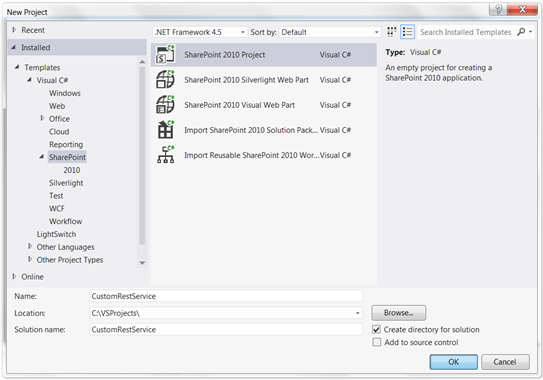
- Go to FILE -> New -> Project and select the SharePoint 2010 Project available under Templates/Visial C#/SharePoint (see the image below). Type the name and location of the project. Let’s name it CustomRestService.
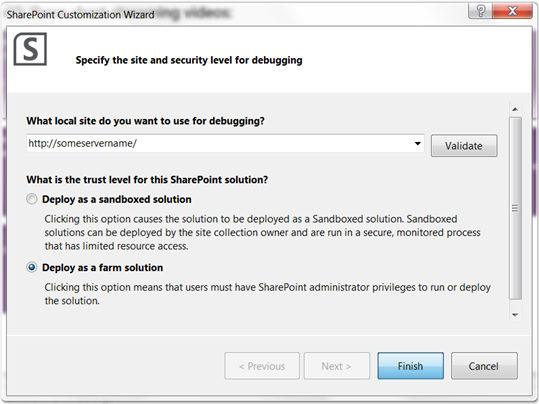
- Click OK button, then the SharePoint Customization Wizard opens (see the image below). Type the proper URL of the local site for debugging and choose the Deploy as a farm solution option.
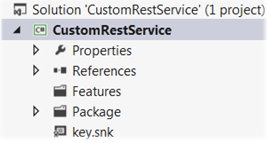
- Click Finish button. In Solution Explorer the created project resembles the following:
2. Add a WCF Service to the project
Click to see how to add WCF Service to the project in details
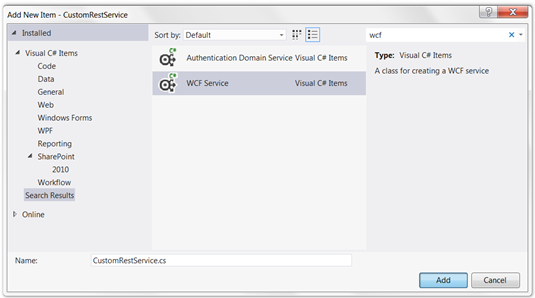
- Ensure that the CustomRestService project is selected in Solution Explorer and then go to PROJECT -> Add New Item. In the opened dialog, locate the WCF Service among available templates. It’s usually under the Visual C# Items. Alternatively you can find the required template by typing WCF in the search box (Search Installed Templates) at the right top corner (see the picture below). Let’s name the service CustomRestService as well.
- Click Add button. After the WCF Service has been added, the project should look like the following:
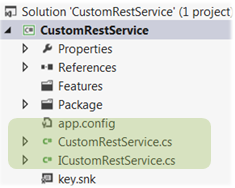
There are 3 new files in the project:- ICustomRestService.cs, defines the interface supported by the service, i.e. specifies the methods available in the service;
- CustomRestService.cs, provides the actual implementation of the service’s methods;
- app.config, presets the WCF Service configuration;
Delete the app.config from the project as we don’t actually need it.
* If you don’t have the WCF Service template available in Visual Studio or you don’t want to use it for some reason, you can just add two .cs files, ICustomRestService.cs and CustomRestService.cs, to the project. In this case don’t forget to add references to such assemblies as System.Runtime.Serialization and System.ServiceModel.
3. Add references to System.ServiceModel.Web and System.Web assemblies to the project
Click to see how to add references to the project in details
- Ensure the CustomRestService project is selected in Solution Explorer and then go to PROJECT -> Add Reference…. In the opened dialog, find the System.ServiceModel.Web and System.Web assemblies (usually they are located under Assemblies/Framework) and check the checkboxs against them (see the picture below).
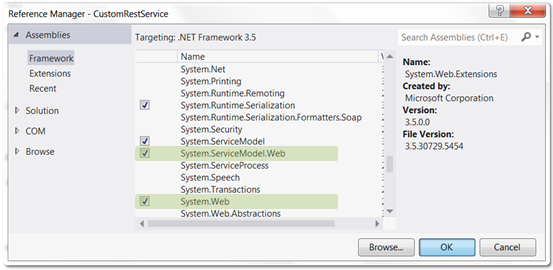
- Click OK button. The References at that stage for the project created from scratch should look like the following:
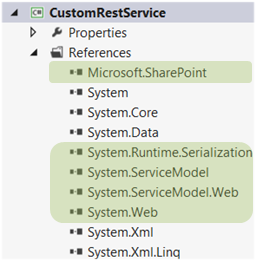
The highlighted assemblies are essential for developing WCF Services operating under SharePoint.
4. Modify the service’s interface
Open the ICustomRestService.cs and bring it to the following state:
using System.ServiceModel;
using System.ServiceModel.Web;

namespace CustomRestService
{
    /// <summary>
    /// Wraps the service result and provides the error message (if any)
    /// </summary>
    public class ServiceResult<T>
    {
        public bool   Success      { get; set; }
        public string ErrorMessage { get; set; }
        public T      Data         { get; set; }
    }

    /// <summary>
    /// Represents basic info about a book
    /// </summary>
    public class Book
    {
        public int    Id     { get; set; }
        public string Title  { get; set; }
        public string Author { get; set; }
    }

    /// <summary>
    /// Service's interface
    /// </summary>
    [ServiceContract]
    public interface ICustomRestService
    {
        /// <summary>
        /// Checks if book is already registered in the system
        /// </summary>
        [OperationContract]
        [WebInvoke(Method  = "POST",
            RequestFormat  = WebMessageFormat.Json,
            ResponseFormat = WebMessageFormat.Json,
            BodyStyle      = WebMessageBodyStyle.WrappedRequest)]
        ServiceResult<bool> BookExists(string bookTitle);

        /// <summary>
        /// Returns book by id
        /// </summary>
        [OperationContract]
        [WebInvoke(Method  = "POST",
            RequestFormat  = WebMessageFormat.Json,
            ResponseFormat = WebMessageFormat.Json,
            BodyStyle      = WebMessageBodyStyle.WrappedRequest)]
        ServiceResult<Book> GetBook(int id);

        /// <summary>
        /// Adds the passed book to the system
        /// </summary>
        [OperationContract]
        [WebInvoke(Method  = "POST",
            RequestFormat  = WebMessageFormat.Json,
            ResponseFormat = WebMessageFormat.Json,
            BodyStyle      = WebMessageBodyStyle.WrappedRequest)]
        ServiceResult<int> AddBook(Book book);
    }
}
Here the ServiceResult is a simple class that wraps the service result and provides the error message in case it occurs. The Book class provides basic info about a book and is intended to show how REST WCF Service deals with custom types.
5. Modify the service implementation
Open the CustomRestService.cs and modify it so that it looks like the following:
using System;
using System.ServiceModel.Activation;
using System.Web;
using Microsoft.SharePoint;

namespace CustomRestService
{
    [AspNetCompatibilityRequirements(RequirementsMode = AspNetCompatibilityRequirementsMode.Allowed)]
    public class CustomRestService : ICustomRestService
    {
        public ServiceResult<bool> BookExists(string bookTitle)
        {
            // allow access for anonymous users

            if (string.IsNullOrEmpty(bookTitle))
                return new ServiceResult<bool>()
                {
                    Success      = false,
                    ErrorMessage = "Book title is undefined!"
                };

            var result = new ServiceResult<bool>() { Success = true };

            try
            {
                SPList spList = SPContext.Current.Web.Lists["Books"];

                SPQuery spQuery = new SPQuery
                {
                    Query = "<Where><Eq><FieldRef Name='Title' /><Value Type='Text'>" +
                        bookTitle.ToLower() + "</Value></Eq></Where>",
                    ViewAttributes = "Scope='Recursive'"
                };

                SPListItemCollection books = spList.GetItems(spQuery);
                result.Data = books.Count > 0;
            }
            catch (Exception ex)
            {
                result.Success      = false;
                result.ErrorMessage = ex.Message;
            }

            return result;
        }

        public ServiceResult<Book> GetBook(int id)
        {
            // check if user is authenticated
            if (!HttpContext.Current.Request.IsAuthenticated)
                return new ServiceResult<Book>()
                    {
                        Success      = false,
                        ErrorMessage = "Unauthenticated access!"
                    };

            if (id <= 0)
                return new ServiceResult<Book>()
                    {
                        Success      = false,
                        ErrorMessage = "Invalid book id!"
                    };

            var result = new ServiceResult<Book>() { Success = true };

            try
            {
                SPList spList = SPContext.Current.Web.Lists["Books"];

                SPListItem spListItem = spList.GetItemById(id);
                result.Data = new Book()
                {
                    Id     = spListItem.ID,
                    Title  = spListItem.Title,
                    Author = Convert.ToString(spListItem["BookAuthor"])
                };
            }
            catch (Exception ex)
            {
                result.Success      = false;
                result.ErrorMessage = ex.Message;
            }

            return result;
        }

        public ServiceResult<int> AddBook(Book book)
        {
            // check if user is authenticated
            if (!HttpContext.Current.Request.IsAuthenticated)
                return new ServiceResult<int>()
                    {
                        Success      = false,
                        ErrorMessage = "Unauthenticated access!"
                    };

            if (book == null)
                return new ServiceResult<int>()
                    {
                        Success      = false,
                        ErrorMessage = "Invalid book!"
                    };

            // checking if the book is already presented is omitted

            var result = new ServiceResult<int>() { Success = true };

            try
            {
                SPList spList = SPContext.Current.Web.Lists["Books"];

                SPListItem spListItem = spList.AddItem();
                spListItem["Title"]      = book.Title;
                spListItem["BookAuthor"] = book.Author;

                SPContext.Current.Web.AllowUnsafeUpdates = true;
                spListItem.Update();
                SPContext.Current.Web.AllowUnsafeUpdates = false;

                result.Data = spListItem.ID;
            }
            catch (Exception ex)
            {
                result.Success      = false;
                result.ErrorMessage = ex.Message;
            }

            return result;
        }
    }
}
The implementation operates with the Books list and assumes that the list is available at the SharePoint Site in the boundaries of which the service is called. Note that we work with SharePoint objects in the same way as we would do this in code-behind of an .aspx-page.
The GetBook and AddBook methods require users to be authenticated before calling them, while the BookExists allows anonymous access (of course, in case it’s turned on for Web Application and Site). Since it’s a best practice, always put the checking whether user is authenticated and authorized in the beginning of every web method unless you have some contrary requirements (for example, to provide anonymous access).
6. Add Layouts mapped folder to the project
* Note that if you already have the folder, just skip this step.
Click to see how to add “Layouts” mapped folder to the project in details
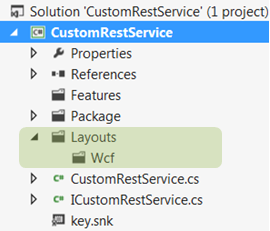
7. Add .svc file to the Layouts folder
Click to see how to add .svc file to the Layouts folder in details
- Ensure that the Wcf folder nested in the Layouts is selected in Solution Explorer and then go to PROJECT -> Add New Item. In the opened dialog, locate the Text File among available templates. It’s usually under the Visual C# Items/General (see the image below). Name the file CustomRestService.svc.
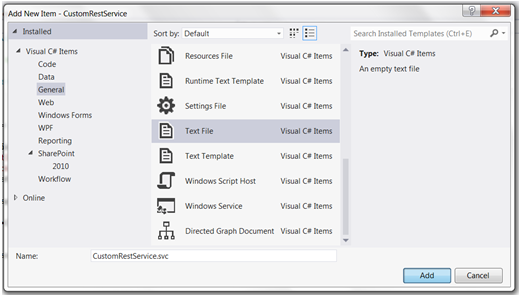
- Click Add button. After the .svc file has been added, the project should look like the following:
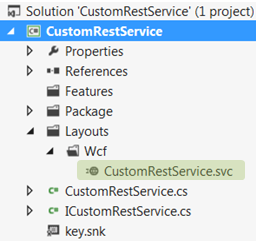
8. Modify the .svc file
Open the CustomRestService.svc and bring it to the following:
<%@ ServiceHost Language="C#" Debug="true"
    Service="CustomRestService.CustomRestService, $SharePoint.Project.AssemblyFullName$"
    CodeBehind="CustomRestService.cs"
    Factory="Microsoft.SharePoint.Client.Services.MultipleBaseAddressWebServiceHostFactory,
             Microsoft.SharePoint.Client.ServerRuntime, Version=14.0.0.0, Culture=neutral, PublicKeyToken=71e9bce111e9429c" %>
The MultipleBaseAddressWebServiceHostFactory declares the REST type of the Web Service and creates proper endpoints with Web Bindings. The factory takes upon itself the configuring of the Web Service, that is why we don’t need the app.config deleted previously.
The Service attribute provides the Fully Qualified Name (including the assembly’s full name) of the class representing the service. Instead of putting in the proper full name of the assembly I used such replaceable parameter as $SharePoint.Project.AssemblyFullName$. When building the project, Visual Studio is supposed to replace the parameter with the full name of the output assembly. One nuisance here is that Visual Studio doesn’t perform replacement in .svc files by default. To make Visual Studio look into .svc, we have to manually alter the .csproj. So, open the project’s .csproj file in Notepad or other Notepad-like text editor, find the first <PropertyGroup> node, insert the following before the closing </PropertyGroup> and save the file:
<TokenReplacementFileExtensions>svc</TokenReplacementFileExtensions>
* Note that, having modified the .csproj, you likely will be prompted by Visual Studio to reload the project.
After the alteration of the project’s file it should resemble the following (some tags and attributes are skipped for simplicity):
<?xml version="1.0" encoding="utf-8"?>
<Project ToolsVersion="4.0" DefaultTargets="Build" ...>
  <Import ... />
  <PropertyGroup>
    <Configuration Condition=" '$(Configuration)' == '' ">Debug</Configuration>
    <Platform Condition=" '$(Platform)' == '' ">AnyCPU</Platform>
    <ProjectGuid>{16585D01-2995-48EF-8DFA-1371C9EF6EE9}</ProjectGuid>
    <OutputType>Library</OutputType>
    <AppDesignerFolder>Properties</AppDesignerFolder>
    <RootNamespace>CustomRestService</RootNamespace>
    <AssemblyName>CustomRestService</AssemblyName>
    <TargetFrameworkVersion>v3.5</TargetFrameworkVersion>
    <FileAlignment>512</FileAlignment>
    <ProjectTypeGuids>{BB1F664B-9266-4fd6-B973-E1E44974B511};...</ProjectTypeGuids>
    <SandboxedSolution>False</SandboxedSolution>
    <WcfConfigValidationEnabled>True</WcfConfigValidationEnabled>
	<TokenReplacementFileExtensions>svc</TokenReplacementFileExtensions>
  </PropertyGroup>
...
</Project>
* Note that for the project attached to the given article, the .csproj has been already modified.
Of course, instead of the $SharePoint.Project.AssemblyFullName$ you can use the real full name of your assembly. To get such name I usually use .Net Reflector. Alternatively you can make Visual Studio display the name, following instructions from the article How to: Create a Tool to Get the Full Name of an Assembly.
9. Build the project and deploy it
Right-click the CustomRestService project in Solution Explorer and then click Deploy. Behind the scenes, Visual Studio compiles the project, creates a .wsp file and deploys the package to the farm.
10. Test the service
- First of all try to open the service in a browser. You can use for that any SharePoint Site, just add the /_layouts/wcf/customrestservice.svc at the end of the URL. For example:
http://someservername:1200/somesite/_layouts/wcf/customrestservice.svc
If you see the message “Endpoint not found“, don’t worry, that’s what we need. That means all of the steps above have been done correctly.
- Let’s test the web methods of the service. As you remember, the service interacts with the Books list. It’s a list with two main fields: Title and BookAuthor, both are Single Line of Text (see the image below).

* I do not cite the list’s schema here as you can find it (schema, instance, feature to create the instance) in the attached project.
The test page named TestPage.aspx is added to the demonstration project as well. The page has been created as an Application Page, locates in the Layouts folder and contains one button that executes JavaScript functions to test each web method. Below is the shortened listing of the page to show how to call web methods using jQuery and Ajax:... <%@ Page ... CodeBehind="TestPage.aspx.cs" Inherits="CustomRestService.Layouts.TestPage" DynamicMasterPageFile="~masterurl/default.master" %> <asp:Content ID="PageHead" ContentPlaceHolderID="PlaceHolderAdditionalPageHead" runat="server"> <script src="http://code.jquery.com/jquery-latest.min.js" type="text/javascript"></script> <script type="text/javascript"> // makes POST json-request to a web method var getJsonData = function (url, param, callback, errorcallback) { $.ajax({ url : url, dataType : "json", type : "POST", contentType: 'application/json; charset=utf-8', data : JSON.stringify(param), success : function (data) { if (callback) callback(data); }, error : function (XMLHttpRequest, textStatus, errorThrown) { if (errorcallback) errorcallback(XMLHttpRequest, textStatus, errorThrown); } }); }; // makes request to the BookExists method function testBookExists() { getJsonData('Wcf/CustomRestService.svc/BookExists', { "bookTitle": 'the adventures of tom sawyer' }, function (data) { if (data.Success) alert('Success. Result: ' + data.Data); else alert('Fail. Error: ' + data.ErrorMessage); }, function(XMLHttpRequest, textStatus, errorThrown) { alert(errorThrown); }); } // makes request to the GetBook method function testGetBook() { getJsonData('Wcf/CustomRestService.svc/GetBook', { "id": 2 }, function (data) { if (data.Success) alert('Success. Title: ' + data.Data.Title + ' Author: ' + data.Data.Author); else alert('Fail. Error: ' + data.ErrorMessage); }, function (XMLHttpRequest, textStatus, errorThrown) { alert(errorThrown); }); } // makes request to the AddBook method function testAddBook() { getJsonData('Wcf/CustomRestService.svc/AddBook', { "book": { "Author": "Mark Twain", "Title": "The Adventures of Huckleberry Finn" } }, function (data) { if (data.Success) alert('Success. Book Id: ' + data.Data); else alert('Fail. Error: ' + data.ErrorMessage); }, function (XMLHttpRequest, textStatus, errorThrown) { alert(errorThrown); }); } </script> </asp:Content> <asp:Content ID="Main" ContentPlaceHolderID="PlaceHolderMain" runat="server"> <asp:Button ID="test" Text="Test Web Methods" runat="server" OnClientClick="testBookExists(); testGetBook(); testAddBook(); return false;" /> </asp:Content> ...Pay attention to the URLs used to send request to web methods. The given test page is located directly in _layouts, so to access the Web Service placed in the _layouts/Wcf I use the relative URL Wcf/CustomRestService.svc. If your page dealing with the Web Service resides somewhere outside of _layouts or within the folders nested in _layouts you have to provide the proper URL (relative or not) to the Web Service.
Open the test page in a browser, the URL should be like the followinghttp://someservername:1200/somesite/_layouts/TestPage.aspx
Click Test Web Methods button. If everything works fine you’ll get 3 alert messages and each of them starts with the word “Success”. The order of the alerts may vary as requests are asynchronous.
The demonstration project you can download here – CustomRestService.zip. Note that the archive contains the .wsp package in the CustomRestService\bin subfolder, use it in case you are not able to compile/build the project for some reason.
