Archive

Archive for the ‘ASP.NET’ Category

SharePoint: How To Maximize a Modal Dialog Window

July 17th, 2012 No comments

    In SharePoint 2010 by default a list item is opened in a Modal Dialog Window. The dialog adjusts its size depending on the size of the contained content and provides users with buttons to maximize and close itself. So, I was asked to maximize the dialog when opening some list items.

Creating and Initializing of a Modal Dialog Window

The JavaScript responsible for the dialog rendering is in the SP.UI.Dialog.js file (usually located in C:\Program Files\Common Files\Microsoft Shared\Web Server Extensions\14\TEMPLATE\LAYOUTS). Clicking on a link-title, for example, in a list view leads to creating and displaying a new Modal Dialog Window in a manner similar to the following:

var options = SP.UI.$create_DialogOptions();

options.url           = 'display-page corresponding to the current list item';
options.title         = 'list item title';
options.allowMaximize = true;
options.showClose     = true;

// possible option, but it's not used in the place in question
//options.showMaximized = true;

var modalDialog = SP.UI.ModalDialog.showModalDialog(options);

The commented line demonstrates one of the possible settings, showMaximized, which apparently does exactly what we need. So, it would be a good solution if we had control under creation of the dialog. Unfortunately, we don’t have. Modifying scripts in SharePoint system js-files runs counter to all known “best practices”, therefore I don’t even consider it. Another possible way is override the client-side OnClick-events of the link-title fields everywhere (in list views, web parts and so on) so that your own script would create and display the dialog in a required manner. Obviously, it’s a very time-consuming solution. Moreover, every time when creating a list view, web part or something else you always have to keep in mind the possible need to rewrite their OnClick-events. In my opinion the only acceptable approach is allow a web page itself to maximize the dialog window it’s placed in.

Script to Maximize a Modal Dialog Window

For that, first of all, we need to have a JavaScript to maximize the current dialog. As SP.UI.Dialog.js doesn’t provide a function/method intended for use outside, we have to consume undocumented internal functions. A suitable script is described in the blog post – “How to maximize a Modal Dialog in JavaScript?“. With slight changes the JavaScript looks like the following

function _maximizeWindow() {
    var currentDialog = SP.UI.ModalDialog.get_childDialog();
    if (currentDialog != null && !currentDialog.$S_0)
        currentDialog.$z();    
    }
    ExecuteOrDelayUntilScriptLoaded(_maximizeWindow, 'sp.ui.dialog.js');

_maximizeWindow gets the current dialog window instance and tries to maximize it if it hasn’t been done before. ExecuteOrDelayUntilScriptLoaded, in turn, is applied to ensure the _maximizeWindow is called after the sp.ui.dialog.js has been completely loaded.

Script Applying

Having the script, we can insert it into the end of a web page to be maximized. It could be done through SharePoint Designer or by modifying a physical aspx-file defined as a display/new/edit form for a list or a content type. However, I decided to add the script dynamically in a page’s code-behind. So, the resultant code is shown below:

using System;
using System.Web.UI;
using Microsoft.SharePoint;

//...

public class DisplayListItem : Page
{
    protected override void OnLoad(EventArgs e)
    {
        base.OnLoad(e);
        if(!IsPostBack)
            AddMaximizeWindowScript();
    }

    //...

    protected virtual void AddMaximizeWindowScript()
    {
        if (SPContext.Current.IsPopUI)
        {
            const string scriptKey = "MaxWinwScript";
            if (!ClientScript.IsClientScriptBlockRegistered(GetType(), scriptKey))
            {
                const string jsScript =
                    @"function _maximizeWindow() {
                        var currentDialog = SP.UI.ModalDialog.get_childDialog();
                        if (currentDialog != null && !currentDialog.$S_0)
                            currentDialog.$z();    
                        }
                        ExecuteOrDelayUntilScriptLoaded(_maximizeWindow, 'sp.ui.dialog.js');";

                ClientScript.RegisterClientScriptBlock(GetType(), scriptKey, jsScript, true);
            }
        }
    }
    
    //...
}

You may ask why I use RegisterClientScriptBlock instead of RegisterStartupScript or window.onload, or jQuery‘s $(document).ready (the latest two arise on client side). The reason is that initially the dialog window is created with the autoSize option. So, it’s very reasonable to maximize the window as soon as possible to prevent the content’s size calculating, which apparently happens after the page has been loaded entirely.
SharePoint: How to hide All Site Content links for unprivileged users

June 8th, 2012 No comments

    If you need to hide All Site Content links for unprivileged users, follow the steps shown below.

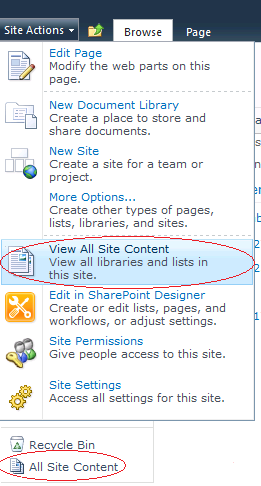
All Site Content Links

Your application’s master page is to be modified. If you use a built-in master page (for example, v4.master for 2010 or default.master for 2007), I recommend to create a full copy of the built-in one and deploy it. These steps are described in the article SharePoint: How to create a custom master page.

In the master page, locate all places where _layouts/viewlsts.aspx is pointed out. You’ll likely find several controls (for example, a MenuItemTemplate, a SPLinkButton and so on), which render All Site Content links one way or another. These controls can be divided into three groups described below.

The controls exposing the PermissionsString property

The controls expose such opportune property as PermissionsString defining a permission set the user must have in order to see the content the controls provide. For this group of controls PermissionsString is likely set by default to ViewFormPages. That is, if the user has permission to view forms, views and application pages, and enumerate lists, he will have access to All Site Content links displayed by these controls. So, set PermissionsString to ManageWeb in order that the links in question would be visible only for users able to perform administration tasks for the Web site (e.g. content managing, features activating and deactivating and so on). For example, within your copy of v4.master you’ll definitely run into such controls as MenuItemTemplate and ClusteredSPLinkButton declared as follows:

<SharePoint:SiteActions id="SiteActionsMenuMain" runat="server" ...>
  <CustomTemplate>
    <SharePoint:FeatureMenuTemplate ID="FeatureMenuTemplate1" runat="server" ...>
      ...
        <SharePoint:MenuItemTemplate runat="server" 
          id="MenuItem_ViewAllSiteContents"
          Text="<%$Resources:wss,quiklnch_allcontent%>"
          Description="<%$Resources:wss,siteactions_allcontentdescription%>"
          ImageUrl="/_layouts/images/allcontent32.png"
          MenuGroupId="300"
          Sequence="302"
          UseShortId="true"
          ClientOnClickNavigateUrl="~site/_layouts/viewlsts.aspx"
          PermissionsString="ViewFormPages"
          PermissionMode="Any" />
      ...
    </SharePoint:FeatureMenuTemplate>
  </CustomTemplate>
</SharePoint:SiteActions>

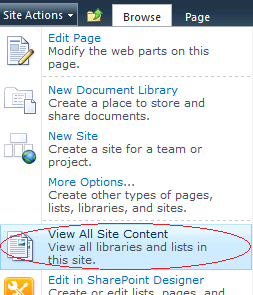
The control represents an item in the drop-down Site Actions menu.

View All Site Content Site Actions Menu Item

Another control is ClusteredSPLinkButton

<asp:ContentPlaceHolder id="PlaceHolderQuickLaunchBottom" runat="server">
  ...
  <SharePoint:UIVersionedContent id="PlaceHolderQuickLaunchBottomV4" UIVersion="4" runat="server">
    <ContentTemplate>
      <ul class="s4-specialNavLinkList">
        ...
        <li>
          <SharePoint:ClusteredSPLinkButton
            id="idNavLinkViewAllV4"
            runat="server"
            PermissionsString="ViewFormPages"
            NavigateUrl="~site/_layouts/viewlsts.aspx"
            ImageClass="s4-specialNavIcon"
            ImageUrl="/_layouts/images/fgimg.png"
            ImageWidth=16
            ImageHeight=16
            OffsetX=0
            OffsetY=0
            Text="<%$Resources:wss,quiklnch_allcontent_short%>"
            accesskey="<%$Resources:wss,quiklnch_allcontent_AK%>"/>
        </li>       
      </ul>
    </ContentTemplate>
  </SharePoint:UIVersionedContent>
</asp:ContentPlaceHolder>

The control represents a link in the Quick Launch Bar.

All Site Content Quick Launch Link

So, change the PermissionsString property of the above controls to ManageWeb.

The controls, which are wrapped in a SPSecurityTrimmedControl

The controls lies in SPSecurityTrimmedControl. SPSecurityTrimmedControl renders the content it contains (Html or other controls) depending on the current user’s permissions. It exposes the same PermissionsString property. Thus, set the property to ManageWeb. Within a master page based on v4.master there is a SPLinkButton surrounded by the SPSecurityTrimmedControl, see the following markup:

<asp:ContentPlaceHolder id="PlaceHolderQuickLaunchTop" runat="server">
  <SharePoint:UIVersionedContent UIVersion="3" runat="server">
    <ContentTemplate>
      <h3 class="ms-standardheader">
        ...
        <Sharepoint:SPSecurityTrimmedControl runat="server" PermissionsString="ViewFormPages">
          <div class="ms-quicklaunchheader">
            <SharePoint:SPLinkButton id="idNavLinkViewAll" 
              runat="server" NavigateUrl="~site/_layouts/viewlsts.aspx" 
              Text="<%$Resources:wss,quiklnch_allcontent%>" 
              accesskey="<%$Resources:wss,quiklnch_allcontent_AK%>"/>
          </div>
        </SharePoint:SPSecurityTrimmedControl>
      </h3>
    </ContentTemplate>
  </SharePoint:UIVersionedContent>
</asp:ContentPlaceHolder>

Here the SPLinkButton represents the All Site Content link in the Quick Launch Bar as well, but it’s displayed for applications migrated from SharePoint 2007 with the previous version of UI. So, set the PermissionsString of the surrounding SPSecurityTrimmedControl to ManageWeb.

All other controls

The controls from the last group are not wrapped in SPSecurityTrimmedControl and don’t provide any ability to limit the access to their contents for unprivileged users. What is needed to do is put such controls into SPSecurityTrimmedControl and set the PermissionsString property of the last to ManageWeb. Within your copy of v4.master there are a few such controls:

<Sharepoint:UIVersionedContent runat="server" UIVersion="3">
  <ContentTemplate>
    <Sharepoint:SPNavigationManager id="TreeViewNavigationManager" runat="server" ...>
      <table class="ms-navSubMenu1" ...>
        <tr>
          <td>
            <table class="ms-navheader" ...>
              <tr>
                <td nowrap="nowrap" id="idSiteHierarchy">
                  <SharePoint:SPLinkButton runat="server" id="idNavLinkSiteHierarchy"
                    NavigateUrl="~site/_layouts/viewlsts.aspx"
                    Text="<%$Resources:wss,treeview_header%>" 
                    accesskey="<%$Resources:wss,quiklnch_allcontent_AK%>"/>
                </td>
              </tr>
            </table>
          </td>
        </tr>
      </table>
      ...
    </Sharepoint:SPNavigationManager>
  </ContentTemplate>
</SharePoint:UIVersionedContent>

Here the All Site Content link is presented by SPLinkButton. It’s displayed under Quick Launch, when the previous version of UI is enabled and when the TreeView navigation option is turned on in Site Settings. Wrap the link into SPSecurityTrimmedControl. It may look like the following:

<Sharepoint:UIVersionedContent runat="server" UIVersion="3">
  <ContentTemplate>
    <Sharepoint:SPNavigationManager id="TreeViewNavigationManager" runat="server" ...>
      <SharePoint:SPSecurityTrimmedControl ID="SPSecurityTrimmedControl2" 
          runat="server" PermissionsString="ManageWeb">
        <table class="ms-navSubMenu1" ...>
          <tr>
            <td>
              <table class="ms-navheader" ...>
                <tr>
                  <td nowrap="nowrap" id="idSiteHierarchy">
                    <SharePoint:SPLinkButton runat="server" id="idNavLinkSiteHierarchy"
                      NavigateUrl="~site/_layouts/viewlsts.aspx"
                      Text="<%$Resources:wss,treeview_header%>" 
                      accesskey="<%$Resources:wss,quiklnch_allcontent_AK%>"/>
                  </td>
                </tr>
              </table>
            </td>
          </tr>
        </table>
      </SharePoint:SPSecurityTrimmedControl>
      ...
    </Sharepoint:SPNavigationManager>
  </ContentTemplate>
</SharePoint:UIVersionedContent>

Another control is declared as SPLinkButton too:

<Sharepoint:UIVersionedContent runat="server" UIVersion="4">
  <ContentTemplate>
    <Sharepoint:SPNavigationManager id="TreeViewNavigationManagerV4" runat="server" ...>
      <SharePoint:SPLinkButton runat="server" id="idNavLinkSiteHierarchyV4"
          NavigateUrl="~site/_layouts/viewlsts.aspx" 
          Text="<%$Resources:wss,treeview_header%>" 
          accesskey="<%$Resources:wss,quiklnch_allcontent_AK%>" 
          CssClass="s4-qlheader" />
      ...
    </Sharepoint:SPNavigationManager>
  </ContentTemplate>
</SharePoint:UIVersionedContent>

It’s a link in the treeview under Quick Launch, when the TreeView Navigation option is enabled in Site Settings. It can be modified to the following:

<Sharepoint:UIVersionedContent runat="server" UIVersion="4">
  <ContentTemplate>
    <Sharepoint:SPNavigationManager id="TreeViewNavigationManagerV4" runat="server" ...>
      <SharePoint:SPSecurityTrimmedControl ID="SPSecurityTrimmedControl3" 
          runat="server" PermissionsString="ManageWeb">  
        <SharePoint:SPLinkButton runat="server" id="idNavLinkSiteHierarchyV4"
            NavigateUrl="~site/_layouts/viewlsts.aspx" 
            Text="<%$Resources:wss,treeview_header%>" 
            accesskey="<%$Resources:wss,quiklnch_allcontent_AK%>" 
            CssClass="s4-qlheader" />
      </SharePoint:SPSecurityTrimmedControl>
      ...
    </Sharepoint:SPNavigationManager>
  </ContentTemplate>
</SharePoint:UIVersionedContent>

Summary

Let’s sum up. If you see a control exposing PermissionsString, set the property to ManageWeb. If a control is within a SPSecurityTrimmedControl, set the PermissionsString of the last one to ManageWeb as well. And finally, if it’s just a control, add a new SPSecurityTrimmedControl, place the first one in it and set the ManageWeb permission.

SharePoint: How to create a custom master page

May 26th, 2012 No comments

    Sometimes we need to add a JavaScript to, change layout or make other alterations in a master page that is used by a SharePoint application. Certainly, we can modify built-in master pages, but it’s far away from the best practices. Moreover, all changes we made may be lost after a regular SharePoint update. So, we should make a copy of a particular built-in master page, deploy it through a feature and set as default for our application instead of the built-in one.

Making a full copy

Let’s assume our application is bound to the V4.master (usually located in C:\Program Files\Common Files\Microsoft Shared\Web Server Extensions\14\TEMPLATE\GLOBAL or C:\Program Files\Common Files\Microsoft Shared\Web Server Extensions\14\TEMPLATE\LAYOUTS), which is default for SharePoint 2010. We make a full copy of the master page and name it MyV4.master.

If you still use SharePoint 2007, your application is likely bound to the default.master (usually located in C:\Program Files\Common Files\Microsoft Shared\Web Server Extensions\12\TEMPLATE\GLOBAL). Create a full copy of it.

Creating a feature

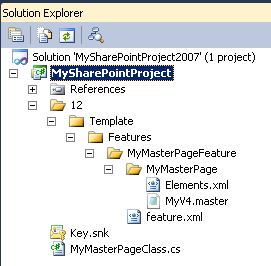
In a new VisualStudio 2010 SharePoint project or in an existent one, we create a feature and call it, for example, MyMasterPageFeature. We add a Module to the project, let’s say MyMasterPage, put the MyV4.master into the Module and modify Elements.xml properly. Below is the possible project’s structure:

Structure of SharePoint Project containing Feature

Where the Elements.xml from the MyMasterPage Module should look like:

<?xml version="1.0" encoding="utf-8"?>
<Elements xmlns="http://schemas.microsoft.com/sharepoint/">
  <Module Name="MyMasterPage" Url="_catalogs/masterpage" Path="" RootWebOnly="FALSE">    
    <File Path="MyMasterPage\MyV4.master" Url="MyV4.master" Type="GhostableInLibrary" />
  </Module>
</Elements>

The manifest of the MyMasterPageFeature in design mode (or the feature.xml in a resultant wsp package) should look like the following:

<?xml version="1.0" encoding="utf-8"?>
<Feature xmlns="http://schemas.microsoft.com/sharepoint/" 
             Title="MySharePointProject Feature" 
             Description="MySharePointProject Feature" 
             Id="a1e26f45-41c5-4581-8b69-8385923ddd11" 
             Scope="Web">
  <ElementManifests>
    <ElementManifest Location="MyMasterPage\Elements.xml" />
    <ElementFile Location="MyMasterPage\MyV4.master" />
  </ElementManifests>
</Feature>

If it’s a new SharePoint project intended for the feature only, we can leave Package.Template.xml and MyMasterPageFeature.Template.xml without any changes.

For a SharePoint 2007 application or one migrated from it the possible project’s structure is shown below. The content of the xml files in question is the same as for 2010 version.

Structure of SharePoint 2007 Project containing Feature

Subclassing MasterPage

On this stage I also suggest to subclass the master page‘s class. In this case you will have more control under the master page‘s rendering; it can be very useful in the future. For this, just add a new cs-file (for example, MyMasterPageClass.cs) to the project and put the following code into the file:

using System;
using System.Web.UI;

namespace MySharePointProject
{
    public class MyMasterPageClass : MasterPage
    {
        protected override void OnLoad(EventArgs e)
        {
            base.OnLoad(e);
        }
    }
}

In the MyV4.master replace the line

<%@Master language="C#" %>

with the one like this

<%@Master language="C#" 
   Inherits="MySharePointProject.MyMasterPageClass,MySharePointProject, 
   Version=1.0.0.0, Culture=neutral, PublicKeyToken=acf3114812c89a34" %>

Deploying the wsp package and activating the feature

Ok, now we need to build the project, make a wsp package and deploy it. All these actions can be easily done from Visual Studio 2010, or, in case of SharePoint 2007, by means of WSPBuilder. If you prefer deploying wsp packages through PowerShell (SharePoint 2010 only), it’s mentioned here. Or use stsadm.exe for SharePoint 2007.

Make sure that the MyMasterPageClass is registered as safe control in a web.config corresponding to your SharePoint application:

<SafeControls>
	...
	<SafeControl Assembly="MySharePointProject, Version=1.0.0.0, 
                                  Culture=neutral, PublicKeyToken=acf3114812c89a34" 
                          Namespace="MySharePointProject" TypeName="*" 
                          Safe="True" SafeAgainstScript="False" />
	...
</SafeControls>

Now everything is ready to activate the feature, so we do this through the UI, PowerShell (SharePoint 2010 only) or stsadm.exe (SharePoint 2007 only).

Set the custom Master Page as Default

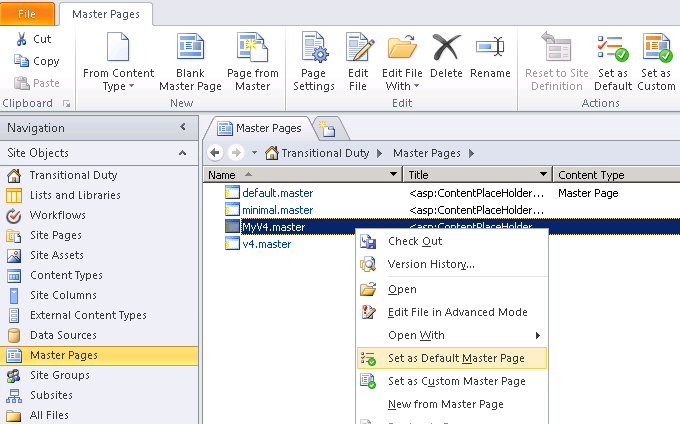
After the feature is activated we need to set the MyV4.master as Default. For already deployed SharePoint applications it can be done through the SharePoint Designer.

Set Default Master Page

For new applications we should provide something like this within our ONET.xml:

<Configurations>
    ...
    <Configuration ID="0" Name="Default" MasterUrl="_catalogs/masterpage/MyV4.master">
    ...
</Configurations>

Since that moment we have our own customizable master page and have a full control under what and how is being rendered.

SharePoint: Code blocks are not allowed in this file

March 23rd, 2012 No comments

    The SharePoint is based on ASP.Net, so all possible ASP.Net errors may easily become apparent in a SharePoint application. The ‘Code blocks are not allowed in this file‘ issue isn’t an exception. To get rid of it we need to enable server side scripts by modifying the web.config file. Specifically we need to locate <PageParserPaths> within web.config and add a proper <PageParserPath> node to it. The following example demonstrates how to allow server side scripts for all pages, which contain the apps virtual folder in their relative paths:

<PageParserPaths>
    <PageParserPath VirtualPath="/apps/*" CompilationMode="Always" 
              AllowServerSideScript="true" IncludeSubFolders="true" />
</PageParserPaths>

After the modification, server side scripts will work for such pages as e.g.

http://myServer/apps/default.aspx
http://myServer/apps/appsubfolder1/MyPage.aspx (*)
http://myServer/apps/appsubfolder2/MyPage.aspx (*)
http://myServer/apps/appsubfolder2/subfolder3/MyPage.aspx (*)
and so on. 

Note that pages urls marked with asterisks (*) are eligible only if IncludeSubFolders is set to true.

To enable server side scripts for certain page, use something like this:

<PageParserPath VirtualPath="/apps/appsubfolder2/subfolder3/MyPage.aspx" 
              CompilationMode="Always" AllowServerSideScript="true" />

SharePoint: Migration of custom upload page derived from UploadPage to SP 2010

March 5th, 2012 No comments

    In our SharePoint 2007 application, there was a custom upload page for a document library. The custom upload page was derived from the Microsoft.SharePoint.ApplicationPages.UploadPage defined in the Microsoft.SharePoint.ApplicationPages.dll. Within application web pages, all links to the upload page were direct, while the page itself was located in the _layouts folder. After migration to the SharePoint 2010, I’ve found out that every request to the custom upload page is transferred to the Uploadex.aspx (located in the _layouts folder as well): the URL in browser corresponds to our upload page, but the content corresponds to the Uploadex.aspx. After a short investigation by means of .Net Reflector I found the reason in the UploadPage base class defined in Microsoft.SharePoint.ApplicationPages.dll, Version=14.0.0.0. Let’s take a look at the OnPreInit method of the UploadPage:

protected override void OnPreInit(EventArgs e)
{
    if (!this.customPage)
    {
        string customUploadPage = base.Web.CustomUploadPage;
        if (!string.IsNullOrEmpty(customUploadPage))
        {
            try
            {
                base.Server.Transfer(customUploadPage);
            }
            catch (Exception)
            {
            }
        }
    }
    base.OnPreInit(e);
}

*Note: this code was added in SharePoint 2010 and wasn’t presented in SharePoint 2007

As we can see, the SharePoint 2010 itself allows to define the CustomUploadPage for a website. If it’s defined, the UploadPage automatically transfers every request to it. Apparently, after migration the CustomUploadPage was somehow set to _layouts/Uploadex.aspx. Another interesting moment here is the customPage boolean field, which acts as marker indicating whether the current page is the custom upload page or not.

Probably, the acceptable solution for our issue would be to set the CustomUploadPage property of the SPWeb object to the URL of our own custom upload page. But, firstly, the problem here is that our upload page derived from the UploadPage doesn’t know that it’s a custom one as the customPage field is set to false by default. Thus, without any code modification, we will have a kind of loop here, because our custom page due to the UploadPage base class will be transferring the request to itself infinitely. Secondly, I don’t want to rely on the CustomUploadPage property, which can be unexpectedly changed. I just want when I click on the direct link to our upload page, this page would be opened without any sudden redirections and transfers.

So, the best solution is to set the customPage field to true within the constructor of our custom upload page. No transfer happens in this case, and we don’t need to deal with the CustomUploadPage at all. In our case It looks like:

public class MyUploadPage : UploadPage
{
    // ...
    public MyUploadPage()
    {
        customPage = true;
    }
    // ...
}

That’s all!