Archive

Posts Tagged ‘SharePoint 2010’

SharePoint: Remove duplicated fields from a Content Type

March 25th, 2012 No comments

    After in-place upgrading one of our SharePoint applications, we had been faced with the fact that some content types comprised duplicated fields. In other words, within the several <ContentType> sections of a list’s schema, we could find the pair <FieldRef> nodes with identical identifiers and names. Schematically, it looked like the following:

<?xml version="1.0" encoding="utf-8"?>
<List Name="SomeList" Title="Some List" BaseType="0" Url="Lists/SomeList" 
           Type="100" Id="a5bba3b3-5b1d-4186-ada7-bbd82b17f76d" ...>
  <MetaData>
    <Views>
       ...
    </Views>

    <Fields>
       ...
    </Fields>

    <ContentTypes>
       ...
       <ContentType ID="0x0100078C8A39971A4532AB9C5EB6DCB388A3" Name="SomeContentType" ...>
        <FieldRefs>
           ...
           <FieldRef Name="SomeField" ID="{b986cd1a-8bd0-4072-93af-5c48571bbf56}" />
           ...
           <FieldRef Name="SomeField2" ID="{6d245d53-63ef-4650-b676-6e4ee66dcda5}" />
           ...           
           <FieldRef Name="SomeField2" ID="{6d245d53-63ef-4650-b676-6e4ee66dcda5}" />
           ...   
           <FieldRef Name="SomeField" ID="{b986cd1a-8bd0-4072-93af-5c48571bbf56}" />
           ...
        </FieldRefs>
       ...    
    </ContentTypes>

    <Forms>
       ...
    </Forms>
   </MetaData>
</List>

The reason of such duplication still isn’t clear for me, but I’ve figured out how to get rid of it 🙂 Below is a simple method for deleting the excess fields from a passed content type:

protected static void RemoveDuplicatedFields(SPContentType spContentType)
{
    bool duplicationFound = false;

    // identify how many times every field encounter
    Dictionary<Guid, int> tmpDir = new Dictionary<Guid, int>();
    foreach (SPFieldLink spFieldLink in spContentType.FieldLinks)
        if (!tmpDir.ContainsKey(spFieldLink.Id))
            tmpDir.Add(spFieldLink.Id, 1);
        else
        {
            tmpDir[spFieldLink.Id]++;
            duplicationFound = true;
        }
   

    if (duplicationFound)
        // remove all excess mentions of fields
        foreach (KeyValuePair<Guid, int> keyValuePair in tmpDir)
        {
            int removeIterationCount = keyValuePair.Value - 1;
            for (int i = 0; i < removeIterationCount; i++)
                spContentType.FieldLinks.Delete(keyValuePair.Key);
        }
}
SharePoint: Code blocks are not allowed in this file

March 23rd, 2012 No comments

    The SharePoint is based on ASP.Net, so all possible ASP.Net errors may easily become apparent in a SharePoint application. The ‘Code blocks are not allowed in this file‘ issue isn’t an exception. To get rid of it we need to enable server side scripts by modifying the web.config file. Specifically we need to locate <PageParserPaths> within web.config and add a proper <PageParserPath> node to it. The following example demonstrates how to allow server side scripts for all pages, which contain the apps virtual folder in their relative paths:

<PageParserPaths>
    <PageParserPath VirtualPath="/apps/*" CompilationMode="Always" 
              AllowServerSideScript="true" IncludeSubFolders="true" />
</PageParserPaths>

After the modification, server side scripts will work for such pages as e.g.

http://myServer/apps/default.aspx
http://myServer/apps/appsubfolder1/MyPage.aspx (*)
http://myServer/apps/appsubfolder2/MyPage.aspx (*)
http://myServer/apps/appsubfolder2/subfolder3/MyPage.aspx (*)
and so on. 

Note that pages urls marked with asterisks (*) are eligible only if IncludeSubFolders is set to true.

To enable server side scripts for certain page, use something like this:

<PageParserPath VirtualPath="/apps/appsubfolder2/subfolder3/MyPage.aspx" 
              CompilationMode="Always" AllowServerSideScript="true" />

SharePoint: Manually Upgrade Business Data Catalog Application Definitions to Business Data Connectivity Models

March 13th, 2012 No comments

    Trying to import a legacy Application Definition File of SharePoint 2007 into Business Data Connectivity Service of SharePoint 2010, you apparently got at least one of the errors shown below:

  • Application definition import failed. The following error occurred: The root element of a valid Metadata package must be ‘Model’ in namespace ‘http://schemas.microsoft.com/windows/2007/BusinessDataCatalog’. The root in the given package is ‘LobSystem’ in namespace ‘http://schemas.microsoft.com/office/2006/03/BusinessDataCatalog’. Error was encountered at or just before Line: ‘2’ and Position: ‘2’;
  • Application definition import failed. The following error occurred: BDC Model does not correctly match the schema. The required attribute ‘Namespace’ is missing. Error was encountered at or just before Line: ’20’ and Position: ’10’;
  • Application definition import failed. The following error occurred: ReturnTypeDescriptor of MethodInstance with Name ‘ProductSpecificFinderInstance’ on Entity (External Content Type) with Name ‘Product’ in Namespace ‘ExternalProductDB’ should not be a Collection TypeDescriptor for MethodInstances of Type ‘SpecificFinder’. Parameter name: rawValues.ReturnTypeDescriptorId Error was encountered at or just before Line: ‘171’ and Position: ’18’;
  • and so on

As it’s known, in SharePoint 2010, Business Data Catalog (BDC) was replaced with Business Data Connectivity with the same abbreviation. One of the changed things is the format of xml-based Application Definition Files. If you make an in-place upgrade of a live SharePoint 2007 application to SharePoint 2010, bdc metadata will be automatically upgraded as well and will become usable with the Business Data Connectivity. But if the in-place upgrade isn’t an option for you, you can upgrade your xml-based Application Definition Files manually. The manual algorithm step by step is described here – How to: Manually Upgrade Business Data Catalog Application Definitions to Business Data Connectivity Models.

For one of our applications we settled on the manual upgrade of its metadata files. But If I call myself a programmer, I have to try to automate the algorithm, especially taking into account 20+ files required to upgrade. So, I’ve developed a simple application for alteration of the legacy xml-based Application Definition Files to make them compatible with SharePoint 2010. However I’d like to notice that the given converter doesn’t follow entirely the procedure described by Microsoft, but performs only steps allowing our particular metadata files to be successfully imported into the Business Data Connectivity Service. For example, our files don’t comprise actions and associations, thus the application does nothing at all with <Action> and <Association> elements. So, consider this converter as a start point of developing the new one satisfying your own conditions and requirements.

Below I enumerated the necessary and sufficient changes to be applied to our particular metadata files so that it enables us to make them compatible with SharePoint 2010. Exactly these very steps and a few less important I’ve implemented in the converter.

  • the root element in the Application Definition File must be a <Model>;
  • the <Model> must contain <LobSystems> element, which in turn must wrap the former root node – <LobSystem>;
  • the <LobSystem> element mustn’t contain the Version-attribute;
  • the <Entity> element must contain the new attributes – Namespace and Version;
  • the <Identifier> element mustn’t contain an assembly name in its TypeName-attribute; For example, TypeName=”System.String, mscorlib” has to turn into TypeName=”System.String”;
  • the <MethodInstance> element with Type-attribute value of SpecificFinder should include the Default-attribute with value of true;
  • if the <TypeDescriptor> element has the IsCollection attribute set to true, the MethodInstance return TypeDescriptor should be updated to be an element of the collection. In practice, that means the ReturnTypeDescriptorPath-attribute with an appropriate value should be added to <MethodInstance> element, and the obsolete ReturnTypeDescriptorLevel and ReturnTypeDescriptorName attributes should be deleted;

Note that when modifying a <Entity> element, the values of the Namespace and Version attributes are copied respectively from the values of Name and Version attributes of the <LobSystem> element, which wraps the <Entity> element. The same approach is used while the in-place upgrade takes place.

After the changes are applied, and if they are sufficient for your metadata, the result files can be imported into Business Data Connectivity Service. During the import process, you may get the warnings. Consider fixing them in the future, but at the present stage you can simply ignore them. The most popular warnings are listed below:

  • This Model contains LobSystem (External System) of Type ‘WebService’ which is deprecated and may be removed in future releases.
  • The MethodInstance of type ‘Finder’ with Name ‘FindProducts’ does not have a Limit Filter.
  • The TypeDescriptor ‘From’ on Parameter ‘GetProductsFiltered’ on Method ‘GetItems’ of Entity (External Content Type) ‘Product’ with Namespace ‘ExternalProductDB’ has a DateTime value, but there is no Interpretation describing what the External System expects and returns as the DateTimeKind. The DateTime value is assumed to be UTC.
  • Note: I made the converter-application fix the warnings regarding the DateTime type and UTC, so they won’t bother you.

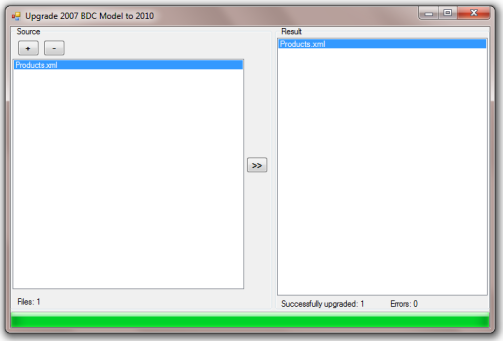
    The converter is very straightforward to use. Using the button ‘+’, simply add to the left section the files to be upgraded. Then click the button ‘>>’, and you’ll get the upgraded ones in the right section. Double click on file name opens an overview form to browse the input or result xml. Physically, the result files are located in c:\output folder. The application doesn’t use any SharePoint-related libraries.

    Upgrade 2007 BDC model to SP2010

    You can download the application from this page or by using the direct link. The Visual Studio 2010 solution and appropriate executable file are in the archive.

SharePoint: Migration of custom upload page derived from UploadPage to SP 2010

March 5th, 2012 No comments

    In our SharePoint 2007 application, there was a custom upload page for a document library. The custom upload page was derived from the Microsoft.SharePoint.ApplicationPages.UploadPage defined in the Microsoft.SharePoint.ApplicationPages.dll. Within application web pages, all links to the upload page were direct, while the page itself was located in the _layouts folder. After migration to the SharePoint 2010, I’ve found out that every request to the custom upload page is transferred to the Uploadex.aspx (located in the _layouts folder as well): the URL in browser corresponds to our upload page, but the content corresponds to the Uploadex.aspx. After a short investigation by means of .Net Reflector I found the reason in the UploadPage base class defined in Microsoft.SharePoint.ApplicationPages.dll, Version=14.0.0.0. Let’s take a look at the OnPreInit method of the UploadPage:

protected override void OnPreInit(EventArgs e)
{
    if (!this.customPage)
    {
        string customUploadPage = base.Web.CustomUploadPage;
        if (!string.IsNullOrEmpty(customUploadPage))
        {
            try
            {
                base.Server.Transfer(customUploadPage);
            }
            catch (Exception)
            {
            }
        }
    }
    base.OnPreInit(e);
}

*Note: this code was added in SharePoint 2010 and wasn’t presented in SharePoint 2007

As we can see, the SharePoint 2010 itself allows to define the CustomUploadPage for a website. If it’s defined, the UploadPage automatically transfers every request to it. Apparently, after migration the CustomUploadPage was somehow set to _layouts/Uploadex.aspx. Another interesting moment here is the customPage boolean field, which acts as marker indicating whether the current page is the custom upload page or not.

Probably, the acceptable solution for our issue would be to set the CustomUploadPage property of the SPWeb object to the URL of our own custom upload page. But, firstly, the problem here is that our upload page derived from the UploadPage doesn’t know that it’s a custom one as the customPage field is set to false by default. Thus, without any code modification, we will have a kind of loop here, because our custom page due to the UploadPage base class will be transferring the request to itself infinitely. Secondly, I don’t want to rely on the CustomUploadPage property, which can be unexpectedly changed. I just want when I click on the direct link to our upload page, this page would be opened without any sudden redirections and transfers.

So, the best solution is to set the customPage field to true within the constructor of our custom upload page. No transfer happens in this case, and we don’t need to deal with the CustomUploadPage at all. In our case It looks like:

public class MyUploadPage : UploadPage
{
    // ...
    public MyUploadPage()
    {
        customPage = true;
    }
    // ...
}

That’s all!

SharePoint: Get Installation Directory Path

December 30th, 2011 No comments

    To get the directory path, which SharePoint was installed into, the SPUtility.GetGenericSetupPath method can be used. MSDN says the method returns the full local path for the specified subdirectory. It’s supposed, you pass a relative path of the subdirectory being located inside the SP installation directory. Getting exactly the SP installation directory path, just pass an empty string to the method.

...
using Microsoft.SharePoint.Utilities;
...
string spInstDirPath = SPUtility.GetGenericSetupPath(string.Empty);

In my case the above code sample returns C:\Program Files\Common Files\Microsoft Shared\Web Server Extensions\14 for SharePoint 2010 and C:\Program Files\Common Files\Microsoft Shared\Web Server Extensions\12 for SharePoint 2007. To get the path of the Features directory, use the following code snippet:

string spFeaturesDirPath = SPUtility.GetGenericSetupPath(@"template\features");

The GetGenericSetupPath method is accessible only if an application has reference to Microsoft.SharePoint.dll. Let’s assume we develop a SharePoint independent application. How can we get the SP installation directory path in this case? Having analyzed the GetGenericSetupPath method using .Net Reflector, I’ve disclosed that the directory path we are interested in is read from Windows Registry. The SharePoint independent method to get the SP installation directory path and an accompanying method are presented below:

using System;
using System.IO;
using Microsoft.Win32;

...

public static T GetLocalMachineRegistryValue<T>(string path, string valueName, T defaultValue)
{            
    T res = defaultValue;
    try
    {
        using (RegistryKey key = Registry.LocalMachine.OpenSubKey(path))
        {
            if (key != null)
            {
                object valObj = key.GetValue(valueName);
                if (valObj is T)
                    res = (T)valObj;
            }
        }
    }
    catch (Exception)
    {
        // write to log
    }            
    return res;
}

public static string GetSPInstallationDirectoryPath()
{
    const string keyVer2007 = @"SOFTWARE\Microsoft\Shared Tools\Web Server Extensions\12.0";
    const string keyVer2010 = @"SOFTWARE\Microsoft\Shared Tools\Web Server Extensions\14.0";            
    const string valueName  = "Location";

    string res = GetLocalMachineRegistryValue<string>(keyVer2010, valueName, null);

    if(res == null)
        res = GetLocalMachineRegistryValue<string>(keyVer2007, valueName, null);

    return res;
}

The following method is dedicated to get the path of the Features directory:

public static string GetSPFeaturesDirectoryPath()
{
    const string featuresDirPathPattern = @"template\features";

    string res = null;

    string instDirPath = GetSPInstallationDirectoryPath();
    if (instDirPath != null)
        res = Path.Combine(instDirPath, featuresDirPathPattern);

    return res;
}

Here is how you can use these methods:

string spInstallationDir = GetSPInstallationDirectoryPath();
string spFeaturesDir     = GetSPFeaturesDirectoryPath();

Please note, when accessing Registry on x64 Windows from a x32 application, you may stumble upon Registry Reflection and Registry Redirector. Please, take a look at the article to read from the right Registry Key.

Related posts: