Archive

Posts Tagged ‘Share Point’

SharePoint: Getting a SPList with no exceptions to be thrown

June 15th, 2012 No comments

List 'some list name' does not exist at site with URL 'some site url'.

    Getting a SPList object in code, I prefer not using an indexer of the SPWeb.Lists collection (SPListCollection) as it throws the above exception every time when the list with the specified name wasn’t found in the collection. It should be noted, however, that in SharePoint 2010, there is the TryGetList method, that has been added to SPListCollection and which returns null if the list isn’t presented in the collection. But I still use my own simple methods free of ‘not found’ exceptions and compatible with both SharePoint 2007 and 2010.

Get SPList by title

The first method returns a SPList object by specified title or null if nothing is found:

public static SPList GetListByName(SPWeb web, string listName)
{
    listName = listName.ToLower();
    foreach (SPList spList in web.Lists)
        if (spList.Title.ToLower() == listName)
            return spList;
    return null;
}

// usage
// ...
    using (SPSite spSite = new SPSite("some site url"))
        using (SPWeb spWeb = spSite.OpenWeb())
        {
            SPList spList = GetListByName(spWeb, "Products");
        }
// ...

Get SPList by url

Unfortunately, list title tends to be changed in the course of time. Unlike title, list url is unchangeable in list’s life time. So, the use of url (or its part) for list search is more reliable. The second method exactly uses url to find a list:

public static SPList GetListByUrl(SPWeb web, string url)
{
    url = url.ToLower();
    foreach (SPList spList in web.Lists)
        if (spList.RootFolder.Url.ToLower().EndsWith(url))
            return spList;
    return null;
}

// usage
// ...
    using (SPSite spSite = new SPSite("some site url"))
        using (SPWeb spWeb = spSite.OpenWeb())
        {
            SPList spList = GetListByUrl(spWeb, "Lists/Products");
        }
// ...

I hope these methods would be useful for somebody else.

Related posts:

SharePoint: How to hide All Site Content links for unprivileged users

June 8th, 2012 No comments

    If you need to hide All Site Content links for unprivileged users, follow the steps shown below.
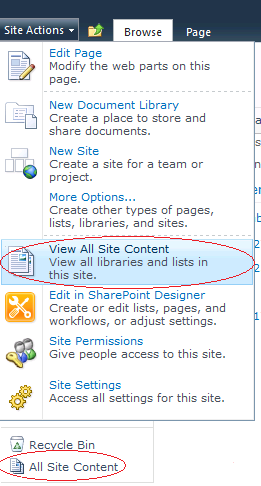
All Site Content Links

Your application’s master page is to be modified. If you use a built-in master page (for example, v4.master for 2010 or default.master for 2007), I recommend to create a full copy of the built-in one and deploy it. These steps are described in the article SharePoint: How to create a custom master page.

In the master page, locate all places where _layouts/viewlsts.aspx is pointed out. You’ll likely find several controls (for example, a MenuItemTemplate, a SPLinkButton and so on), which render All Site Content links one way or another. These controls can be divided into three groups described below.

The controls exposing the PermissionsString property

The controls expose such opportune property as PermissionsString defining a permission set the user must have in order to see the content the controls provide. For this group of controls PermissionsString is likely set by default to ViewFormPages. That is, if the user has permission to view forms, views and application pages, and enumerate lists, he will have access to All Site Content links displayed by these controls. So, set PermissionsString to ManageWeb in order that the links in question would be visible only for users able to perform administration tasks for the Web site (e.g. content managing, features activating and deactivating and so on). For example, within your copy of v4.master you’ll definitely run into such controls as MenuItemTemplate and ClusteredSPLinkButton declared as follows:

<SharePoint:SiteActions id="SiteActionsMenuMain" runat="server" ...>
  <CustomTemplate>
    <SharePoint:FeatureMenuTemplate ID="FeatureMenuTemplate1" runat="server" ...>
      ...
        <SharePoint:MenuItemTemplate runat="server" 
          id="MenuItem_ViewAllSiteContents"
          Text="<%$Resources:wss,quiklnch_allcontent%>"
          Description="<%$Resources:wss,siteactions_allcontentdescription%>"
          ImageUrl="/_layouts/images/allcontent32.png"
          MenuGroupId="300"
          Sequence="302"
          UseShortId="true"
          ClientOnClickNavigateUrl="~site/_layouts/viewlsts.aspx"
          PermissionsString="ViewFormPages"
          PermissionMode="Any" />
      ...
    </SharePoint:FeatureMenuTemplate>
  </CustomTemplate>
</SharePoint:SiteActions>

The control represents an item in the drop-down Site Actions menu.
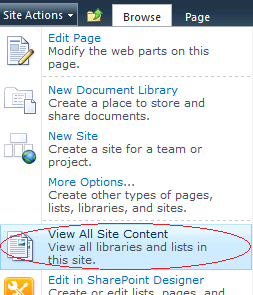
View All Site Content Site Actions Menu Item

Another control is ClusteredSPLinkButton

<asp:ContentPlaceHolder id="PlaceHolderQuickLaunchBottom" runat="server">
  ...
  <SharePoint:UIVersionedContent id="PlaceHolderQuickLaunchBottomV4" UIVersion="4" runat="server">
    <ContentTemplate>
      <ul class="s4-specialNavLinkList">
        ...
        <li>
          <SharePoint:ClusteredSPLinkButton
            id="idNavLinkViewAllV4"
            runat="server"
            PermissionsString="ViewFormPages"
            NavigateUrl="~site/_layouts/viewlsts.aspx"
            ImageClass="s4-specialNavIcon"
            ImageUrl="/_layouts/images/fgimg.png"
            ImageWidth=16
            ImageHeight=16
            OffsetX=0
            OffsetY=0
            Text="<%$Resources:wss,quiklnch_allcontent_short%>"
            accesskey="<%$Resources:wss,quiklnch_allcontent_AK%>"/>
        </li>       
      </ul>
    </ContentTemplate>
  </SharePoint:UIVersionedContent>
</asp:ContentPlaceHolder>

The control represents a link in the Quick Launch Bar.

All Site Content Quick Launch Link

So, change the PermissionsString property of the above controls to ManageWeb.

The controls, which are wrapped in a SPSecurityTrimmedControl

The controls lies in SPSecurityTrimmedControl. SPSecurityTrimmedControl renders the content it contains (Html or other controls) depending on the current user’s permissions. It exposes the same PermissionsString property. Thus, set the property to ManageWeb. Within a master page based on v4.master there is a SPLinkButton surrounded by the SPSecurityTrimmedControl, see the following markup:

<asp:ContentPlaceHolder id="PlaceHolderQuickLaunchTop" runat="server">
  <SharePoint:UIVersionedContent UIVersion="3" runat="server">
    <ContentTemplate>
      <h3 class="ms-standardheader">
        ...
        <Sharepoint:SPSecurityTrimmedControl runat="server" PermissionsString="ViewFormPages">
          <div class="ms-quicklaunchheader">
            <SharePoint:SPLinkButton id="idNavLinkViewAll" 
              runat="server" NavigateUrl="~site/_layouts/viewlsts.aspx" 
              Text="<%$Resources:wss,quiklnch_allcontent%>" 
              accesskey="<%$Resources:wss,quiklnch_allcontent_AK%>"/>
          </div>
        </SharePoint:SPSecurityTrimmedControl>
      </h3>
    </ContentTemplate>
  </SharePoint:UIVersionedContent>
</asp:ContentPlaceHolder>

Here the SPLinkButton represents the All Site Content link in the Quick Launch Bar as well, but it’s displayed for applications migrated from SharePoint 2007 with the previous version of UI. So, set the PermissionsString of the surrounding SPSecurityTrimmedControl to ManageWeb.

All other controls

The controls from the last group are not wrapped in SPSecurityTrimmedControl and don’t provide any ability to limit the access to their contents for unprivileged users. What is needed to do is put such controls into SPSecurityTrimmedControl and set the PermissionsString property of the last to ManageWeb. Within your copy of v4.master there are a few such controls:

<Sharepoint:UIVersionedContent runat="server" UIVersion="3">
  <ContentTemplate>
    <Sharepoint:SPNavigationManager id="TreeViewNavigationManager" runat="server" ...>
      <table class="ms-navSubMenu1" ...>
        <tr>
          <td>
            <table class="ms-navheader" ...>
              <tr>
                <td nowrap="nowrap" id="idSiteHierarchy">
                  <SharePoint:SPLinkButton runat="server" id="idNavLinkSiteHierarchy"
                    NavigateUrl="~site/_layouts/viewlsts.aspx"
                    Text="<%$Resources:wss,treeview_header%>" 
                    accesskey="<%$Resources:wss,quiklnch_allcontent_AK%>"/>
                </td>
              </tr>
            </table>
          </td>
        </tr>
      </table>
      ...
    </Sharepoint:SPNavigationManager>
  </ContentTemplate>
</SharePoint:UIVersionedContent>

Here the All Site Content link is presented by SPLinkButton. It’s displayed under Quick Launch, when the previous version of UI is enabled and when the TreeView navigation option is turned on in Site Settings. Wrap the link into SPSecurityTrimmedControl. It may look like the following:

<Sharepoint:UIVersionedContent runat="server" UIVersion="3">
  <ContentTemplate>
    <Sharepoint:SPNavigationManager id="TreeViewNavigationManager" runat="server" ...>
      <SharePoint:SPSecurityTrimmedControl ID="SPSecurityTrimmedControl2" 
          runat="server" PermissionsString="ManageWeb">
        <table class="ms-navSubMenu1" ...>
          <tr>
            <td>
              <table class="ms-navheader" ...>
                <tr>
                  <td nowrap="nowrap" id="idSiteHierarchy">
                    <SharePoint:SPLinkButton runat="server" id="idNavLinkSiteHierarchy"
                      NavigateUrl="~site/_layouts/viewlsts.aspx"
                      Text="<%$Resources:wss,treeview_header%>" 
                      accesskey="<%$Resources:wss,quiklnch_allcontent_AK%>"/>
                  </td>
                </tr>
              </table>
            </td>
          </tr>
        </table>
      </SharePoint:SPSecurityTrimmedControl>
      ...
    </Sharepoint:SPNavigationManager>
  </ContentTemplate>
</SharePoint:UIVersionedContent>

Another control is declared as SPLinkButton too:

<Sharepoint:UIVersionedContent runat="server" UIVersion="4">
  <ContentTemplate>
    <Sharepoint:SPNavigationManager id="TreeViewNavigationManagerV4" runat="server" ...>
      <SharePoint:SPLinkButton runat="server" id="idNavLinkSiteHierarchyV4"
          NavigateUrl="~site/_layouts/viewlsts.aspx" 
          Text="<%$Resources:wss,treeview_header%>" 
          accesskey="<%$Resources:wss,quiklnch_allcontent_AK%>" 
          CssClass="s4-qlheader" />
      ...
    </Sharepoint:SPNavigationManager>
  </ContentTemplate>
</SharePoint:UIVersionedContent>

It’s a link in the treeview under Quick Launch, when the TreeView Navigation option is enabled in Site Settings. It can be modified to the following:

<Sharepoint:UIVersionedContent runat="server" UIVersion="4">
  <ContentTemplate>
    <Sharepoint:SPNavigationManager id="TreeViewNavigationManagerV4" runat="server" ...>
      <SharePoint:SPSecurityTrimmedControl ID="SPSecurityTrimmedControl3" 
          runat="server" PermissionsString="ManageWeb">  
        <SharePoint:SPLinkButton runat="server" id="idNavLinkSiteHierarchyV4"
            NavigateUrl="~site/_layouts/viewlsts.aspx" 
            Text="<%$Resources:wss,treeview_header%>" 
            accesskey="<%$Resources:wss,quiklnch_allcontent_AK%>" 
            CssClass="s4-qlheader" />
      </SharePoint:SPSecurityTrimmedControl>
      ...
    </Sharepoint:SPNavigationManager>
  </ContentTemplate>
</SharePoint:UIVersionedContent>

Summary

Let’s sum up. If you see a control exposing PermissionsString, set the property to ManageWeb. If a control is within a SPSecurityTrimmedControl, set the PermissionsString of the last one to ManageWeb as well. And finally, if it’s just a control, add a new SPSecurityTrimmedControl, place the first one in it and set the ManageWeb permission.

SharePoint: How to create a custom master page

May 26th, 2012 No comments

    Sometimes we need to add a JavaScript to, change layout or make other alterations in a master page that is used by a SharePoint application. Certainly, we can modify built-in master pages, but it’s far away from the best practices. Moreover, all changes we made may be lost after a regular SharePoint update. So, we should make a copy of a particular built-in master page, deploy it through a feature and set as default for our application instead of the built-in one.

Making a full copy

Let’s assume our application is bound to the V4.master (usually located in C:\Program Files\Common Files\Microsoft Shared\Web Server Extensions\14\TEMPLATE\GLOBAL or C:\Program Files\Common Files\Microsoft Shared\Web Server Extensions\14\TEMPLATE\LAYOUTS), which is default for SharePoint 2010. We make a full copy of the master page and name it MyV4.master.

If you still use SharePoint 2007, your application is likely bound to the default.master (usually located in C:\Program Files\Common Files\Microsoft Shared\Web Server Extensions\12\TEMPLATE\GLOBAL). Create a full copy of it.

Creating a feature

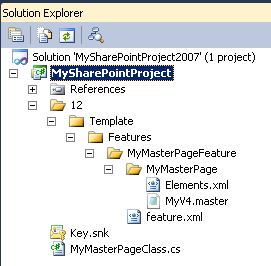
In a new VisualStudio 2010 SharePoint project or in an existent one, we create a feature and call it, for example, MyMasterPageFeature. We add a Module to the project, let’s say MyMasterPage, put the MyV4.master into the Module and modify Elements.xml properly. Below is the possible project’s structure:

Structure of SharePoint Project containing Feature

Where the Elements.xml from the MyMasterPage Module should look like:

<?xml version="1.0" encoding="utf-8"?>
<Elements xmlns="http://schemas.microsoft.com/sharepoint/">
  <Module Name="MyMasterPage" Url="_catalogs/masterpage" Path="" RootWebOnly="FALSE">    
    <File Path="MyMasterPage\MyV4.master" Url="MyV4.master" Type="GhostableInLibrary" />
  </Module>
</Elements>

The manifest of the MyMasterPageFeature in design mode (or the feature.xml in a resultant wsp package) should look like the following:

<?xml version="1.0" encoding="utf-8"?>
<Feature xmlns="http://schemas.microsoft.com/sharepoint/" 
             Title="MySharePointProject Feature" 
             Description="MySharePointProject Feature" 
             Id="a1e26f45-41c5-4581-8b69-8385923ddd11" 
             Scope="Web">
  <ElementManifests>
    <ElementManifest Location="MyMasterPage\Elements.xml" />
    <ElementFile Location="MyMasterPage\MyV4.master" />
  </ElementManifests>
</Feature>

If it’s a new SharePoint project intended for the feature only, we can leave Package.Template.xml and MyMasterPageFeature.Template.xml without any changes.

For a SharePoint 2007 application or one migrated from it the possible project’s structure is shown below. The content of the xml files in question is the same as for 2010 version.

Structure of SharePoint 2007 Project containing Feature

Subclassing MasterPage

On this stage I also suggest to subclass the master page‘s class. In this case you will have more control under the master page‘s rendering; it can be very useful in the future. For this, just add a new cs-file (for example, MyMasterPageClass.cs) to the project and put the following code into the file:

using System;
using System.Web.UI;

namespace MySharePointProject
{
    public class MyMasterPageClass : MasterPage
    {
        protected override void OnLoad(EventArgs e)
        {
            base.OnLoad(e);
        }
    }
}

In the MyV4.master replace the line

<%@Master language="C#" %>

with the one like this

<%@Master language="C#" 
   Inherits="MySharePointProject.MyMasterPageClass,MySharePointProject, 
   Version=1.0.0.0, Culture=neutral, PublicKeyToken=acf3114812c89a34" %>

Deploying the wsp package and activating the feature

Ok, now we need to build the project, make a wsp package and deploy it. All these actions can be easily done from Visual Studio 2010, or, in case of SharePoint 2007, by means of WSPBuilder. If you prefer deploying wsp packages through PowerShell (SharePoint 2010 only), it’s mentioned here. Or use stsadm.exe for SharePoint 2007.

Make sure that the MyMasterPageClass is registered as safe control in a web.config corresponding to your SharePoint application:

<SafeControls>
	...
	<SafeControl Assembly="MySharePointProject, Version=1.0.0.0, 
                                  Culture=neutral, PublicKeyToken=acf3114812c89a34" 
                          Namespace="MySharePointProject" TypeName="*" 
                          Safe="True" SafeAgainstScript="False" />
	...
</SafeControls>

Now everything is ready to activate the feature, so we do this through the UI, PowerShell (SharePoint 2010 only) or stsadm.exe (SharePoint 2007 only).

Set the custom Master Page as Default

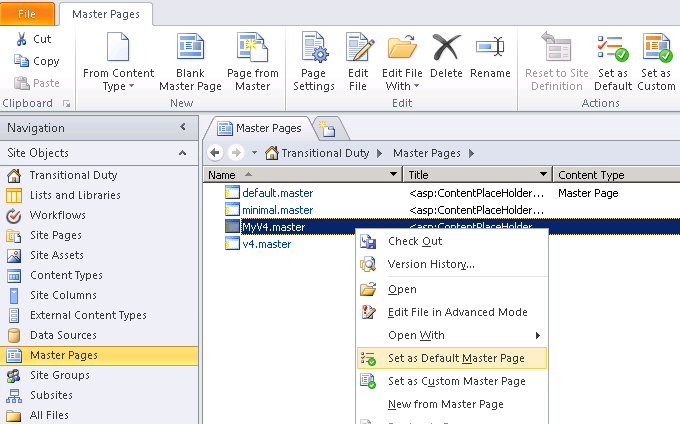
After the feature is activated we need to set the MyV4.master as Default. For already deployed SharePoint applications it can be done through the SharePoint Designer.

Set Default Master Page

For new applications we should provide something like this within our ONET.xml:

<Configurations>
    ...
    <Configuration ID="0" Name="Default" MasterUrl="_catalogs/masterpage/MyV4.master">
    ...
</Configurations>

Since that moment we have our own customizable master page and have a full control under what and how is being rendered.

SharePoint: “Value does not fall within the expected range” exception in SPFieldMap.GetColumnNumber

May 4th, 2012 No comments

    If you get the exception shown below, you likely need to increase the List View Lookup Threshold.

[ArgumentException: Value does not fall within the expected range.]
   Microsoft.SharePoint.SPFieldMap.GetColumnNumber(String strFieldName, Boolean bThrow) +23672719
   Microsoft.SharePoint.SPListItemCollection.GetColumnNumber(String groupName, Boolean bThrowException) +174
   Microsoft.SharePoint.SPListItemCollection.GetRawValue(String fieldname, Int32 iIndex, Boolean bThrow) +44
   Microsoft.SharePoint.SPListItem.GetValue(SPField fld, Int32 columnNumber, Boolean bRaw, Boolean bThrowException) +26792787
   Microsoft.SharePoint.SPListItem.GetValue(String strName, Boolean bThrowException) +77
   Microsoft.SharePoint.SPListItem.get_Item(String fieldName) +12
   ...

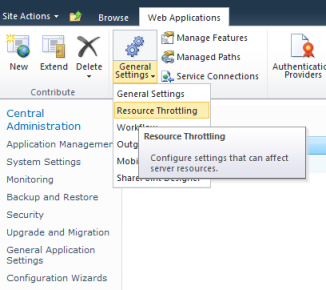
Go to Central Administration, click on Application Management, then click on Manage web applications, select an application throwing the exception (in my case it’s SharePoint – 80), in the upper Ribbon click on arrow below the General Settings group to display a drop-down menu, click on Resource Throttling.

General Settings - Resource Throttling

Increase a value of the List View Lookup Threshold. The default value is 8. I set to 20, and the exception is gone.

List View Lookup Threshold

SharePoint: Workflow + List Item Edit Form = Value cannot be null Exception

April 25th, 2012 No comments

    After migration of a SharePoint 2007 application to SharePoint 2010 we encountered an unhandled exception occurring arbitrarily when a list item is opening for editing. The exception looks as follows:

Exception Details: System.ArgumentNullException: Value cannot be null.
Parameter name: s

Source Error: 
An unhandled exception was generated during the execution of the current web request. Information regarding the origin and location of the exception can be identified using the exception stack trace below. 

Stack Trace: 

[ArgumentNullException: Value cannot be null. Parameter name: s]
   System.IO.StringReader..ctor(String s) +10151478
   Microsoft.SharePoint.Publishing.Internal.WorkflowUtilities.FlattenXmlToHashtable(String strXml) +117
   Microsoft.SharePoint.Publishing.Internal.WorkflowUtilities.DoesWorkflowCancelWhenItemEdited(String associationXml) +12
   Microsoft.SharePoint.Publishing.WebControls.ConsoleDataSource.EnsurePageNotInLockingWorkflowIfInEditMode() +207
   Microsoft.SharePoint.Publishing.WebControls.ConsoleDataSource.LoadDataSource() +199
   Microsoft.SharePoint.Publishing.WebControls.ConsoleDataSource.OnLoad(EventArgs e) +98
   Microsoft.SharePoint.Publishing.WebControls.XmlConsoleDataSource.OnLoad(EventArgs e) +201
   Microsoft.SharePoint.Publishing.WebControls.PublishingSiteActionsMenuCustomizer.OnLoad(EventArgs e) +186
   System.Web.UI.Control.LoadRecursive() +66
   System.Web.UI.Control.LoadRecursive() +191
   System.Web.UI.Control.LoadRecursive() +191
   System.Web.UI.Control.LoadRecursive() +191
   System.Web.UI.Control.LoadRecursive() +191
   System.Web.UI.Control.LoadRecursive() +191
   System.Web.UI.Control.LoadRecursive() +191
   System.Web.UI.Control.LoadRecursive() +191
   System.Web.UI.Control.LoadRecursive() +191
   System.Web.UI.Control.LoadRecursive() +191
   System.Web.UI.Page.ProcessRequestMain(Boolean includeStagesBeforeAsyncPoint, Boolean includeStagesAfterAsyncPoint) +2428

Having analyzed the stack trace we found out that the issue is, evidently, caused by workflow infrastructure. In the SharePoint application we have both handmade custom workflows and the ones that were made in SharePoint Designer (so called SPD Workflows). It’s interesting that the exception was rising for both workflow types. After some investigation using .Net Reflector, we discovered that the AssociationData xml-element is a cause of our troubles. The AssociationData is an element of the Workflow Definition Schema and specifies any custom data to pass to the workflow association form. Additionally, we use the association data when starting workflow on list items through the code. The workflow infrastructure, in SharePoint 2010, supposes that the AssociationData element is a valid xml string. So, if it’s empty or contains any data without xml-tags, the exception is thrown as opposite to SP 2007.

The solution consists of two steps. Firstly, for every Workflow Definition in your project you need to set <AssociationData> so that it contains a valid xml. Regardless of whether association data is actually used or not, <AssociationData> has to be presented in Workflow Definition and contain at least a fake valid xml. For example, I set dummy <Data />. In case you deploy a custom workflow through a SharePoint Feature, the Workflow Definition is usually located in Elements.xml file. If <AssociationData> element doesn’t exist within <Workflow> tag, add it at the same level as <MetaData>. The resultant workflow definition should look like:

<?xml version="1.0" encoding="utf-8" ?> 
<Elements xmlns="http://schemas.microsoft.com/sharepoint/">
  <Workflow ...>
    ...
    <AssociationData>
      <Data />
    </AssociationData>
    <MetaData>
      ...
    </MetaData>
    ...
  </Workflow>
</Elements>

The described first step of the solution affects only new applications created after the alterations have been applied to Workflow Definitions. Even if a SharePoint Feature containing a custom workflow is reactivated, changes are only applied to workflow instances that start after the workflow association is modified. But for live applications created before or migrated from previous version of SharePoint (like in my case), the first step is useless. Additionally, you may have the SPD workflow which doesn’t include usual Workflow Definition at all. So, the second step is a necessary and sufficient part of the solution.

The second step is get all SPWorkflowAssociation objects and adjust their AssociationData properties programmatically. I’ve developed a few methods allowing to achieve this goal. See the listing below:

using System;
using System.Xml;
using Microsoft.SharePoint;
using Microsoft.SharePoint.Workflow;

...

/// <summary>
/// Adjusts AssociationData properties of all Workflow Associations related to the passed Web, its child Lists and Content Types
/// </summary>
public static void AdjustAllWorkflowAssociations(SPWeb web)
{
    AdjustWebWorkflowAssociation(web);

    for (int i = 0; i < web.ContentTypes.Count; i ++)
        AdjustContentTypeWorkflowAssociation(web.ContentTypes[i]);

    for (int i = 0; i < web.Lists.Count; i ++)
    {
        AdjustListWorkflowAssociation(web.Lists[i]);
        for (int j = 0; j < web.Lists[i].ContentTypes.Count; j ++)
            AdjustContentTypeWorkflowAssociation(web.Lists[i].ContentTypes[j]);
    }
}

/// <summary>
/// Adjusts AssociationData properties of all Workflow Associations related to the passed List
/// </summary>
public static void AdjustListWorkflowAssociation(SPList list)
{
    AdjustAssociationData(list.WorkflowAssociations);
}

/// <summary>
/// Adjusts AssociationData properties of all Workflow Associations related to the passed Web
/// </summary>
public static void AdjustWebWorkflowAssociation(SPWeb web)
{
    AdjustAssociationData(web.WorkflowAssociations);
}

/// <summary>
/// Adjusts AssociationData properties of all Workflow Associations related to the passed Content Type
/// </summary>
public static void AdjustContentTypeWorkflowAssociation(SPContentType contentType)
{
    AdjustAssociationData(contentType.WorkflowAssociations);
}

/// <summary>
/// Adjusts AssociationData properties of all Workflow Associations in the passed collection
/// </summary>
public static void AdjustAssociationData(SPWorkflowAssociationCollection collection)
{
    for (int i = 0; i < collection.Count; i ++)
        AdjustAssociationData(collection[i], collection);
}

/// <summary>
/// Sets AssociationData property if it's not valid
/// </summary>
public static void AdjustAssociationData(SPWorkflowAssociation workflowAssociation, SPWorkflowAssociationCollection collection)
{
    if (!IsValidXml(workflowAssociation.AssociationData))
    {
        string newValue = string.IsNullOrEmpty(workflowAssociation.AssociationData)
                                ? "<Data />"
                                : string.Format("<Data>{0}</Data>", workflowAssociation.AssociationData);
        workflowAssociation.AssociationData = newValue;
        collection.Update(workflowAssociation);
    }
}

/// <summary>
/// Checks if the passed string is a valid xml
/// </summary>
public static bool IsValidXml(string str)
{
    if (!string.IsNullOrEmpty(str))
    {
        try
        {
            XmlDocument xmlDoc = new XmlDocument();
            xmlDoc.LoadXml(str);
            return true;
        }
        catch {}
    }
    return false;
}

The basic method in the set is AdjustAssociationData, which examines AssociationData property of a passed SPWorkflowAssociation object and then applies a valid xml-value to the property if it’s necessary. As we know, workflows can be associated with webs, lists or content types. The AdjustWebWorkflowAssociation, AdjustListWorkflowAssociation and AdjustContentTypeWorkflowAssociation methods adjust AssociationData of a passed SPWeb, SPList or SPContentType object respectively. Finally, the AdjustAllWorkflowAssociations tries to adjust all available workflow associations that can be reached through a passed SPWeb instance.

Note that I everywhere used the for-statement instead of foreach, because otherwise the exception “Collection was modified; enumeration operation may not execute” will be thrown.

Below is the piece of code from the simple console application, which I used against our problem SharePoint application:

static void Main(string[] args)
{
    try
    {
        AppArguments arguments = new AppArguments(args);

        if(string.IsNullOrEmpty(arguments.Url))
        {
            Console.WriteLine("Invalid application URL!");
            return;
        }

        using (SPSite spSite = new SPSite(arguments.Url))
            using (SPWeb spWeb = spSite.OpenWeb())
                AdjustAllWorkflowAssociations(spWeb);

    }
    catch (Exception ex)
    {
        Console.WriteLine(ex.Message);
    }
}

Where the AppArguments is a class derived from InputArguments. InputArguments is described here – Simple Command Line Arguments Parser.

public class AppArguments : InputArguments
{
    public string Url
    {
        get { return GetValue("url"); }
    }

    public AppArguments(string[] args) : base(args)
    {
    }
}

As for our SharePoint application, it has only workflows associated with lists. So, after executing of the console app described above, the exception in question is gone. I hope it’ll help somebody as well.

The full version of the console app you can download here (Visual Studio 2010 solution). To execute it use the command line with parameters as follows:

AdjustAssociationData.exe -url "http://yourservername/yourapppath"