WordPress: How to add Google +1 Button to WordPress blog post
Adding the Google +1 button to blog posts allows readers to recommend the content on Google Search and share it on Google+. In this article I’m going to explain how to add +1 buttons to the WordPress blog based on iNove theme.
Google provides with a special online tool allowing to generate the code you need to add into blog pages. Choosing different options, you can customize look and behavior of the +1 button you are about to add. For example, I’ve chosen asynchronous inclusion, which allows page to continue loading while browser fetches the +1 JavaScript. So, I’ve got the following code:
<!-- Place this tag where you want the +1 button to render -->
<g:plusone href="put some url here"></g:plusone>

<!-- Place this render call where appropriate -->
<script type="text/javascript">
  (function() {
    var po = document.createElement('script'); po.type = 'text/javascript'; po.async = true;
    po.src = 'https://apis.google.com/js/plusone.js';
    var s = document.getElementsByTagName('script')[0]; s.parentNode.insertBefore(po, s);
  })();
</script>
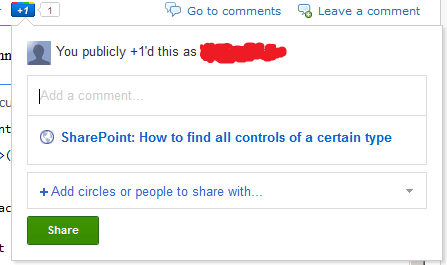
Google +1 button can be virtually divided into two parts: the button itself and a Share bubble. After +1‘ing a blog post, the reader will be able to share the page in Google+ social network through the surfaced Share bubble.
The share bubble contains, so called, +Snippet, which comprises the title and brief description of the page referenced by the +1 button‘s href attribute. In theory, the title and description are automatically extracted by the +1 JavaScript. To keep these pieces of data consistent, we are able to let the +1 JavaScript know what html-nodes exactly should be used to get the right title and description. The same online tool helps to customize +Snippet. For my needs, I’ve got the following markup:
<!-- Update your html tag to include the itemscope and itemtype attributes -->
<html itemscope itemtype="http://schema.org/Blog">

<!-- Add the following three tags to your body -->
<span itemprop="name">Title of your content</span>
<span itemprop="description">This would be a description of the content your users are sharing</span>
Looking ahead, I’d like to note that the most important in the above markup is the attributes, but not the html-tags containing them. I mean the attributes can be applied to different html-tags with the same effect.
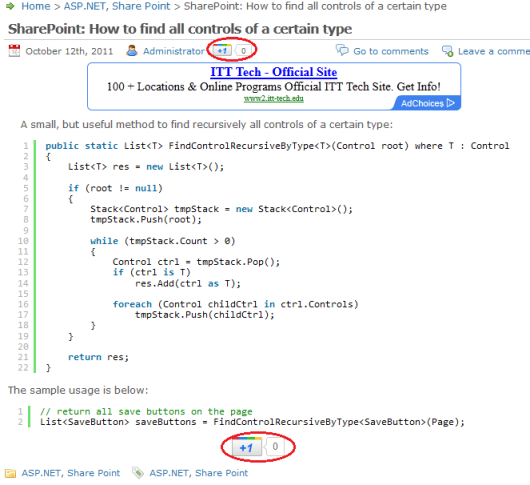
Ok, let’s add two +1 buttons to every single post page as it’s shown on the picture below: the small sized button at the beginning of the post content and the standard sized one right after it.
For that, first of all, you need to alter the single.php file (wp-content/themes/inove/single.php).
- Find the line, where the blog post title is being rendered:
<h2><?php the_title(); ?></h2>
and alter it to the following:
<h2 itemprop="name"><?php the_title(); ?></h2>
The modification signifies the title for +Snippet will be extracted from the given h2-tag.
- Find the line, where the post author is being added to the response stream:
<?php if ($options['author']) : ?><span class="author"><?php the_author_posts_link(); ?></span><?php endif; ?>
insert the following code after that line:
<!-- Google +1 code has begun -->
<span style="float:left; padding-left:10px;">
    <g:plusone size="small" href="<?php the_permalink() ?>"></g:plusone>
</span>
<!-- Google +1 code has ended -->
The small sized +1 button will appear at the beginning of every blog post. Note that, in the listed above code, the the_permalink() function returns the url of the current blog post. This url is used to set the href attribute, which explicitly defines the +1 target URL.
- Find the div-tag containing content of the post:
<div class="content">
    <?php the_content(); ?>
    <div class="fixed"></div>
</div>
You can mark the div-tag as a source for the brief description in +Snippet using the itemprop=”description” attribute:
<div itemprop="description" class="content">
    <?php the_content(); ?>
    <div class="fixed"></div>
</div>
But there is a pitfall here. The +1 JavaScript seems to transform the extracted text, removing html-tags and so on. In my case, after the transformation the description isn’t very readable. So, I decided to have an empty description at all. I added the following markup line next to the found div-tag:
<span itemprop="description" style="display:none"> </span>
The is required, otherwise the brief description will be formed automatically from other sources, mainly from meta-tags and so on.
- Insert the following code right after the content-containing div-tag you found in the previous step (or right after <span itemprop=”description”…, if you chose my approach with an empty description):
<!-- Google +1 code has begun -->
<div style="text-align:center; margin-bottom: 10px;">
    <g:plusone href="<?php the_permalink() ?>"></g:plusone>
</div>
<!-- Google +1 code has ended -->
The standard sized +1 button will appear at the end of every blog post.
The single.php file after all modification applied is outlined below (some parts are skipped):
<?php get_header(); ?>
<?php $options = get_option('inove_options'); ?>
<?php if (have_posts()) : the_post(); update_post_caches($posts); ?>
<div id="postpath">
...
</div>
<div class="post" id="post-<?php the_ID(); ?>">
<h2 itemprop="name"><?php the_title(); ?></h2>
<div class="info">
<span class="date"><?php the_time(__('F jS, Y', 'inove')) ?></span>
<?php if ($options['author']) : ?><span class="author"><?php the_author_posts_link(); ?></span><?php endif; ?>
<!-- Google +1 code has begun -->
<span style="float:left; padding-left:10px;">
<g:plusone size="small" href="<?php the_permalink() ?>"></g:plusone>
</span>
<!-- Google +1 code has ended -->
<?php edit_post_link(__('Edit', 'inove'), '<span class="editpost">', '</span>'); ?>
<?php if ($comments || comments_open()) : ?>
<span class="addcomment"><a href="#respond"><?php _e('Leave a comment', 'inove'); ?></a></span>
<span class="comments"><a href="#comments"><?php _e('Go to comments', 'inove'); ?></a></span>
<?php endif; ?>
<div class="fixed"></div>
</div>
...
<div class="content">
<?php the_content(); ?>
<div class="fixed"></div>
</div>
<span itemprop="description" style="display:none"> </span>
<!-- Google +1 code has begun -->
<div style="text-align:center; margin-bottom: 10px;">
<g:plusone href="<?php the_permalink() ?>"></g:plusone>
</div>
<!-- Google +1 code has ended -->
<div class="under">
...
</div>
</div>
...
<?php include('templates/comments.php'); ?>
<div id="postnavi">
...
</div>
<?php else : ?>
<div class="errorbox">
<?php _e('Sorry, no posts matched your criteria.', 'inove'); ?>
</div>
<?php endif; ?>
<?php get_footer(); ?>
Ok, then let’s make some supporting changes to header.php (wp-content/themes/inove/header.php) and footer.php (wp-content/themes/inove/footer.php).
- Find the <body> line in the header.php and alter it to
<body itemscope itemtype="http://schema.org/Blog">
The added attributes instruct the +1 JavaScript to extract data for +Snippet from html-nodes with the itemprop=”description” and itemprop=”name” attributes.
- Find the <!– content END –> line in the footer.php and insert the following JavaScript code right before it:
<script type="text/javascript">
  (function() {
    var po = document.createElement('script'); po.type = 'text/javascript'; po.async = true;
    po.src = 'https://apis.google.com/js/plusone.js';
    var s = document.getElementsByTagName('script')[0]; s.parentNode.insertBefore(po, s);
  })();
</script>
This code asynchronously includes the +1 JavaScript into the page. The included plusone.js is responsible for +1 button rendering.
The footer.php after the modification is outlined below (some parts are skipped):
	</div>
	<!-- main END -->
	...
</div>
<script type="text/javascript">
  (function() {
    var po = document.createElement('script'); po.type = 'text/javascript'; po.async = true;
    po.src = 'https://apis.google.com/js/plusone.js';
    var s = document.getElementsByTagName('script')[0]; s.parentNode.insertBefore(po, s);
  })();
</script>
<!-- content END -->

<!-- footer START -->
<div id="footer">
	...
</div>
<!-- footer END -->

</div>
<!-- container END -->
</div>
<!-- wrap END -->
...
The last step is to replace the old single.php, header.php and footer.php files with the modified ones on your web server.

