Archive

Archive for the ‘iNove theme’ Category

WordPress: How to add Google +1 Button to WordPress blog post

January 6th, 2012 No comments

    Adding the Google +1 button to blog posts allows readers to recommend the content on Google Search and share it on Google+. In this article I’m going to explain how to add +1 buttons to the WordPress blog based on iNove theme.

Google provides with a special online tool allowing to generate the code you need to add into blog pages. Choosing different options, you can customize look and behavior of the +1 button you are about to add. For example, I’ve chosen asynchronous inclusion, which allows page to continue loading while browser fetches the +1 JavaScript. So, I’ve got the following code:

<!-- Place this tag where you want the +1 button to render -->
<g:plusone href="put some url here"></g:plusone>

<!-- Place this render call where appropriate -->
<script type="text/javascript">
  (function() {
    var po = document.createElement('script'); po.type = 'text/javascript'; po.async = true;
    po.src = 'https://apis.google.com/js/plusone.js';
    var s = document.getElementsByTagName('script')[0]; s.parentNode.insertBefore(po, s);
  })();
</script>

Google +1 button can be virtually divided into two parts: the button itself and a Share bubble. After +1‘ing a blog post, the reader will be able to share the page in Google+ social network through the surfaced Share bubble.

Share bubble

The share bubble contains, so called, +Snippet, which comprises the title and brief description of the page referenced by the +1 button‘s href attribute. In theory, the title and description are automatically extracted by the +1 JavaScript. To keep these pieces of data consistent, we are able to let the +1 JavaScript know what html-nodes exactly should be used to get the right title and description. The same online tool helps to customize +Snippet. For my needs, I’ve got the following markup:

<!-- Update your html tag to include the itemscope and itemtype attributes -->
<html itemscope itemtype="http://schema.org/Blog">

<!-- Add the following three tags to your body -->
<span itemprop="name">Title of your content</span>
<span itemprop="description">This would be a description of the content your users are sharing</span>

Looking ahead, I’d like to note that the most important in the above markup is the attributes, but not the html-tags containing them. I mean the attributes can be applied to different html-tags with the same effect.

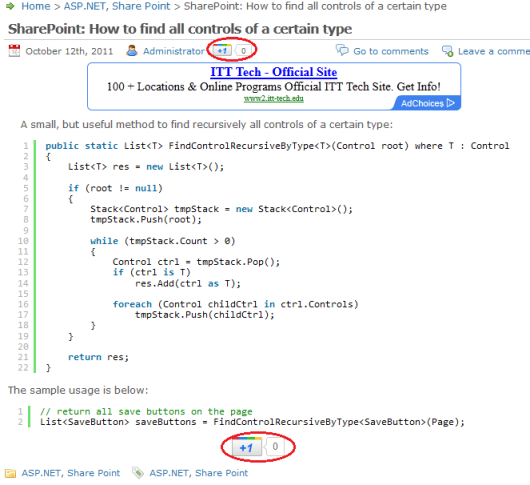
Ok, let’s add two +1 buttons to every single post page as it’s shown on the picture below: the small sized button at the beginning of the post content and the standard sized one right after it.

Single Blog Post with two +1 buttons

For that, first of all, you need to alter the single.php file (wp-content/themes/inove/single.php).

  1. Find the line, where the blog post title is being rendered:
    <h2><?php the_title(); ?></h2>
    

    and alter it to the following:

    <h2 itemprop="name"><?php the_title(); ?></h2>
    

    The modification signifies the title for +Snippet will be extracted from the given h2-tag.

  2. Find the line, where the post author is being added to the response stream:
    <?php if ($options['author']) : ?><span class="author"><?php the_author_posts_link(); ?></span><?php endif; ?>
    

    insert the following code after that line:

    <!-- Google +1 code has begun -->  
    <span style="float:left; padding-left:10px;">
        <g:plusone size="small" href="<?php the_permalink() ?>"></g:plusone>
    </span>
    <!-- Google +1 code has ended -->
    

    The small sized +1 button will appear at the beginning of every blog post. Note that, in the listed above code, the the_permalink() function returns the url of the current blog post. This url is used to set the href attribute, which explicitly defines the +1 target URL.

  3. Find the div-tag containing content of the post:
    <div class="content">
        <?php the_content(); ?>
        <div class="fixed"></div>
    </div>
    

    You can mark the div-tag as a source for the brief description in +Snippet using the itemprop=”description” attribute:

    <div itemprop="description" class="content">
        <?php the_content(); ?>
        <div class="fixed"></div>
    </div>
    

    But there is a pitfall here. The +1 JavaScript seems to transform the extracted text, removing html-tags and so on. In my case, after the transformation the description isn’t very readable. So, I decided to have an empty description at all. I added the following markup line next to the found div-tag:

    <span itemprop="description" style="display:none">&nbsp;</span>
    

    The &nbsp; is required, otherwise the brief description will be formed automatically from other sources, mainly from meta-tags and so on.

  4. Insert the following code right after the content-containing div-tag you found in the previous step (or right after <span itemprop=”description”…, if you chose my approach with an empty description):
    <!-- Google +1 code has begun -->
    <div style="text-align:center; margin-bottom: 10px;">
        <g:plusone href="<?php the_permalink() ?>"></g:plusone>
    </div>
    <!-- Google +1 code has ended -->
    

    The standard sized +1 button will appear at the end of every blog post.

The single.php file after all modification applied is outlined below (some parts are skipped):

<?php get_header(); ?>
<?php $options = get_option('inove_options'); ?>

<?php if (have_posts()) : the_post(); update_post_caches($posts); ?>

	<div id="postpath">
		...
	</div>

	<div class="post" id="post-<?php the_ID(); ?>">
		<h2 itemprop="name"><?php the_title(); ?></h2>                
		<div class="info">
			<span class="date"><?php the_time(__('F jS, Y', 'inove')) ?></span>
			<?php if ($options['author']) : ?><span class="author"><?php the_author_posts_link(); ?></span><?php endif; ?>
                        
	                <!-- Google +1 code has begun -->  
	                <span style="float:left; padding-left:10px;">
	                    <g:plusone size="small" href="<?php the_permalink() ?>"></g:plusone>
                        </span>
	                <!-- Google +1 code has ended -->

			<?php edit_post_link(__('Edit', 'inove'), '<span class="editpost">', '</span>'); ?>
			<?php if ($comments || comments_open()) : ?>
				<span class="addcomment"><a href="#respond"><?php _e('Leave a comment', 'inove'); ?></a></span>
				<span class="comments"><a href="#comments"><?php _e('Go to comments', 'inove'); ?></a></span>
			<?php endif; ?>
			<div class="fixed"></div>
		</div>
		...
		<div class="content">
			<?php the_content(); ?>
			<div class="fixed"></div>
		</div>

                <span itemprop="description" style="display:none">&nbsp;</span>
                <!-- Google +1 code has begun -->
                <div style="text-align:center; margin-bottom: 10px;">
                        <g:plusone href="<?php the_permalink() ?>"></g:plusone>
                </div>
                <!-- Google +1 code has ended -->                

		<div class="under">
			...
		</div>
	</div>
	...
	<?php include('templates/comments.php'); ?>

	<div id="postnavi">
		...
	</div>

<?php else : ?>
	<div class="errorbox">
		<?php _e('Sorry, no posts matched your criteria.', 'inove'); ?>
	</div>
<?php endif; ?>

<?php get_footer(); ?>

Ok, then let’s make some supporting changes to header.php (wp-content/themes/inove/header.php) and footer.php (wp-content/themes/inove/footer.php).

  1. Find the <body> line in the header.php and alter it to
    <body itemscope itemtype="http://schema.org/Blog">
    

    The added attributes instruct the +1 JavaScript to extract data for +Snippet from html-nodes with the itemprop=”description” and itemprop=”name” attributes.

  2. Find the <!– content END –> line in the footer.php and insert the following JavaScript code right before it:
    <script type="text/javascript">
      (function() {
        var po = document.createElement('script'); po.type = 'text/javascript'; po.async = true;
        po.src = 'https://apis.google.com/js/plusone.js';
        var s = document.getElementsByTagName('script')[0]; s.parentNode.insertBefore(po, s);
      })();
    </script>
    

    This code asynchronously includes the +1 JavaScript into the page. The included plusone.js is responsible for +1 button rendering.

The footer.php after the modification is outlined below (some parts are skipped):

	</div>
	<!-- main END -->
	...
</div>
<script type="text/javascript">
  (function() {
    var po = document.createElement('script'); po.type = 'text/javascript'; po.async = true;
    po.src = 'https://apis.google.com/js/plusone.js';
    var s = document.getElementsByTagName('script')[0]; s.parentNode.insertBefore(po, s);
  })();
</script>
<!-- content END -->

<!-- footer START -->
<div id="footer">
	...
</div>
<!-- footer END -->

</div>
<!-- container END -->
</div>
<!-- wrap END -->
...

The last step is to replace the old single.php, header.php and footer.php files with the modified ones on your web server.
Related posts:

WordPress: How to add Google Analytics to WordPress blog

October 27th, 2011 No comments

    Google Analytics is a web analytics solution that allows to see into our traffic data. It’s a small JavaScript code that we should put in every page, which requires tracking. Of course, at first we have to sign up for a Google Analytics account at http://www.google.com/analytics/. After registration we will be provided with the JavaScript code which looks similar to the following:

<script type="text/javascript">

  	var _gaq = _gaq || [];
  	_gaq.push(['_setAccount', 'UA-32102375-1']);
  	_gaq.push(['_trackPageview']);

  	(function() {
    	var ga = document.createElement('script'); ga.type = 'text/javascript'; ga.async = true;
    	ga.src = ('https:' == document.location.protocol ? 'https://ssl' : 'http://www') + '.google-analytics.com/ga.js';
    	var s = document.getElementsByTagName('script')[0]; s.parentNode.insertBefore(ga, s);
  	})();

</script>

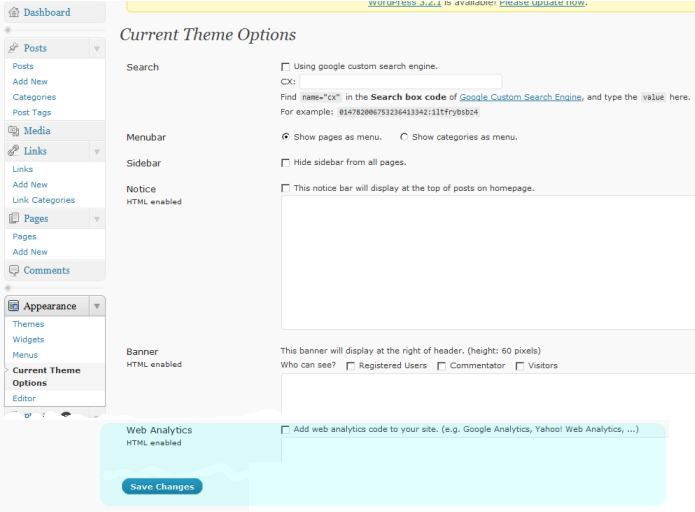
This script has to be placed within the HTML of the web pages of our WordPress blog. The simplest way to do that is to use the capabilities provided by your WordPress theme. Check if your current theme already allows to add a web analytics code to the blog. Log into admin section of the blog (wordpress/wp-admin), go to Appearance -> Current Theme Options (wordpress/wp-admin/themes.php), scroll to the Web Analytics field. If it’s exist, that means that your theme supports web analytics. Just put JavaScript code provided by Google into the field, check the ‘Add web analytics code to your site. (e.g. Google Analytics, Yahoo! Web Analytics, …)’ option and save changes. Ever since changes are applied web analitycs code gets inserted into every page.

Current Theme Options

My current theme, iNove, supports web analitycs, but the way described above is too easy for such geek as I’m. I decided to inject web analytics code into the site pages by my own hands.

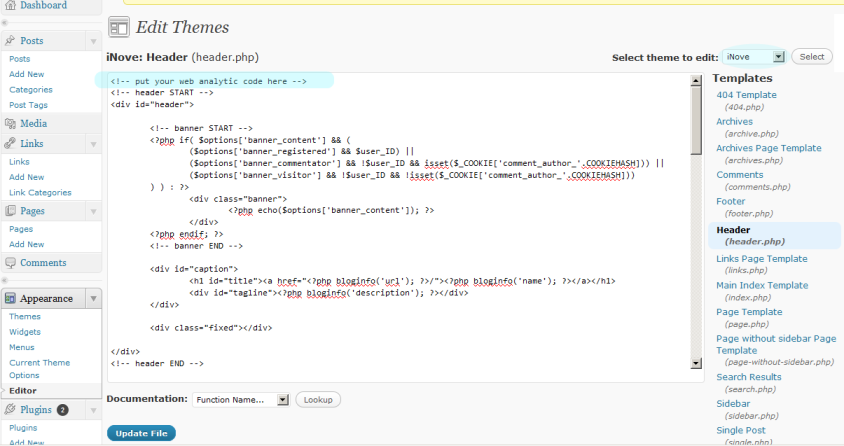
It is known, if you want to have some code inside every page of the WordPress blog, you should utilize such files as header.php or footer.php. Both are included into every page. We can alter them by using admin section. Go to Appearance -> Editor (wordpress/wp-admin/theme-editor.php), select the required theme in drop-down list on the right if it’s not selected yet, then select, for example, header.php, put your web analytics code before the original content and press Update File button.

Edit Theme Files

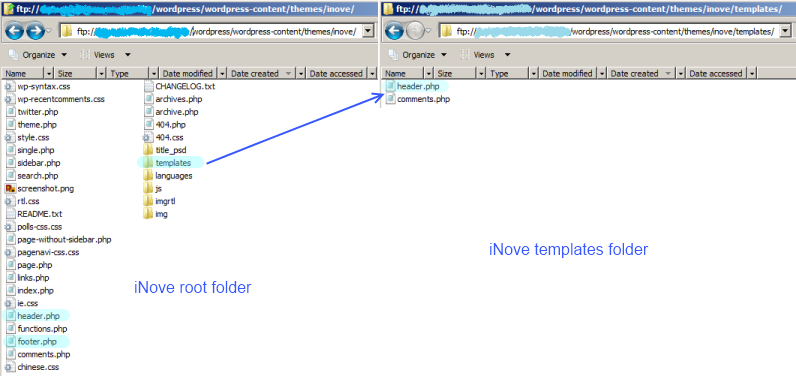
We can do the same through the ftp by locating header.php or footer.php in the appropriate folders. Copy one or another from the web server to the local environment, alter the php file and replace old version on the web server by modified one.

iNove Folders

Note that in iNove theme the header.php, which is available for edit through the Appearance -> Editor, is situated in the templates sub-folder, while the footer.php is in the root folder of iNove. In the root folder also there is another header.php. Both of them supplement each other, to be more precise the header.php from the root folder includes the one from the templates sub-folder by using the <?php include(‘templates/header.php’); ?> directive.

Personally I have modified the header.php from the root folder of iNove and replaced the old one through the ftp. I’ve put the web analitycs code right before the closing html head-tag (</head>). It works perfectly. The altered file is shown below:

<!DOCTYPE html PUBLIC "-//W3C//DTD XHTML 1.1//EN" "http://www.w3.org/TR/xhtml11/DTD/xhtml11.dtd">
<?php
	global $inove_nosidebar;
	$options = get_option('inove_options');
	if (is_home()) {
		$home_menu = 'current_page_item';
	} else {
		$home_menu = 'page_item';
	}
	if($options['feed'] && $options['feed_url']) {
		if (substr(strtoupper($options['feed_url']), 0, 7) == 'HTTP://') {
			$feed = $options['feed_url'];
		} else {
			$feed = 'http://' . $options['feed_url'];
		}
	} else {
		$feed = get_bloginfo('rss2_url');
	}
?>

<html xmlns="http://www.w3.org/1999/xhtml">
<head profile="http://gmpg.org/xfn/11">
	<meta http-equiv="Content-Type" content="<?php bloginfo('html_type'); ?>; charset=<?php bloginfo('charset'); ?>" />
	<meta http-equiv="X-UA-Compatible" content="IE=EmulateIE7" />

	<title><?php bloginfo('name'); ?><?php wp_title(); ?></title>
	<link rel="alternate" type="application/rss+xml" title="<?php _e('RSS 2.0 - all posts', 'inove'); ?>" href="<?php 

echo $feed; ?>" />
	<link rel="alternate" type="application/rss+xml" title="<?php _e('RSS 2.0 - all comments', 'inove'); ?>" href="<?php 

bloginfo('comments_rss2_url'); ?>" />
	<link rel="pingback" href="<?php bloginfo('pingback_url'); ?>" />

	<!-- style START -->
	<!-- default style -->
	<style type="text/css" media="screen">@import url( <?php bloginfo('stylesheet_url'); ?> );</style>
	<!-- for translations -->
	<?php if (strtoupper(get_locale()) == 'ZH_CN' || strtoupper(get_locale()) == 'ZH_TW') : ?>
		<link rel="stylesheet" href="<?php bloginfo('stylesheet_directory'); ?>/chinese.css" type="text/css" 

media="screen" />
	<?php elseif (strtoupper(get_locale()) == 'HE_IL' || strtoupper(get_locale()) == 'FA_IR' || strtoupper(get_locale()) 

== 'UG_CN' || strtoupper(get_locale()) == 'CKB') : ?>
		<link rel="stylesheet" href="<?php bloginfo('stylesheet_directory'); ?>/rtl.css" type="text/css" 

media="screen" />
	<?php endif; ?>
	<!--[if IE]>
		<link rel="stylesheet" href="<?php bloginfo('stylesheet_directory'); ?>/ie.css" type="text/css" 

media="screen" />
	<![endif]-->
	<!-- style END -->

	<!-- script START -->
	<script type="text/javascript" src="<?php bloginfo('template_url'); ?>/js/base.js"></script>
	<script type="text/javascript" src="<?php bloginfo('template_url'); ?>/js/menu.js"></script>
	<!-- script END -->

	<?php wp_head(); ?>
	
	<script type="text/javascript">

  	var _gaq = _gaq || [];
  	_gaq.push(['_setAccount', 'UA-32102375-1']);
  	_gaq.push(['_trackPageview']);

  	(function() {
    	var ga = document.createElement('script'); ga.type = 'text/javascript'; ga.async = true;
    	ga.src = ('https:' == document.location.protocol ? 'https://ssl' : 'http://www') + '.google-analytics.com/ga.js';
    	var s = document.getElementsByTagName('script')[0]; s.parentNode.insertBefore(ga, s);
  	})();

	</script>

</head>

<?php flush(); ?>

<body>
<!-- wrap START -->
<div id="wrap">

<!-- container START -->
<div id="container" <?php if($options['nosidebar'] || $inove_nosidebar){echo 'class="one-column"';} ?> >

<?php include('templates/header.php'); ?>

<!-- content START -->
<div id="content">

	<!-- main START -->
	<div id="main">

An alternative way is to use appropriate plugins. For example, like Google Analytics for WordPress or similar. But besides evident conveniences, the dealing with plugins has some small disadvantages as well. The use of too many plugins may slow down your site. As for me the adding of analytics code isn’t worth having one more plugin, which requires recurrent updates and some kind of maintenance.

Related posts:

PHP: Redirection Overview

September 30th, 2011 No comments

    This post is more for me than for somebody else, because it will let me keep the posted information handy. WordPress is written in PHP and I have to recall this script language when I need to alter some iNove theme scripts. This time I craved for adding redirection to some script. The easiest way is to utilize code like the following:

header( "HTTP/1.1 301 Moved Permanently" ); // this line is optional and can be skipped
header( "Location: http://dotnetfollower.com" );

Using header(“Location: some new url“) method we can transfer user to a new page. Under the hood header() asks browser to make another request for another url. Note that the header() must be called before any text (e.g. HTML tags, blank lines, something forwarded by PHP echo function and so on) is sent to the user browser, otherwise it will not work. That is the major limitation of the given approach we have to be aware of.

The first line of the code sample above sends the redirect response code to the browser. Redirect response code is considered as a reason of redirection. You can skip the sending of redirect code. But if you delete or move page to another location, I insistently recommend to send a relevant code, because such codes are being analyzed practically by all Search Engines. Including, of course, the evident leader – Google Search Engine, which examines such codes very thoroughly. The Google PageRank of a page you redirect to can directly depend on the redirect code you return. For instance, in example above I return 301, which means that page was moved permanently to another location that is pointed out in the second line of code. The code 301 also tells Search Engines that link value of the requested url has to be given to the new one. In theory, the new page inherits PageRank of the requested (but absent at the time) page. In reality, it happens not instantly, but some time later.

Redirect response codes are a subset of status codes available in HTTP 1.1. The complete HTTP 1.1 specification is accessible in RFC 2616. The first digit of the status code defines the category of response. The status codes are grouped into five categories:

  • 100s – informational, indicate that request is received and is being processed. For example,

    • 100 Continue;
    • 101 Switching Protocols and etc.
  • 200s – success, indicate that request was successfully received, understood, and accepted. For example,

    • 200 OK;
    • 202 Accepted and etc.
  • 300s – redirection, indicate further action must be taken in order to complete the request, because a requested resource has been moved. Response Http-header usually includes a Location header indicating the new address. For example,

    • 301 Moved Permanently;
    • 303 See Other and etc.
  • 400s – client error, indicate that request contains bad syntax or cannot be fulfilled. For example,

    • 400 Bad Request;
    • 401 Unauthorized;
    • 404 Not Found;
    • 408 Request Time-out and etc.
  • 500s – server Error, indicate that server failed to fulfill an valid request. For example,

    • 500 Internal Server Error;
    • 502 Bad Gateway;
    • 503 Service Unavailable and etc.

Evidently, the most applicable category for redirection is a 300s status code. The full list of available status codes of this category is presented below:

  • 300 Multiple Choices;
  • 301 Moved Permanently;
  • 302 Found;
  • 303 See Other;
  • 304 Not Modified;
  • 305 Use Proxy;
  • 307 Temporary Redirect;

OK, let’s revert to the changes I made in one of the iNove theme scripts. Some external sites have the corrupted links to one of my articles – Silverlight for Windows Phone 7: How to bind UserControl to itself. These bad links look like ‘http://dotnetfollower.com/wordpress/2011/06/silverlight-for-windows-phone-7-how-to-bound-usercontrol-to-itself/">http://dotnetfollower.com/wordpress/2011/06/silverlight-for-windows-phone-7-how-to-bound-usercontrol-to-itself/</a>‘. As you can see, such link doubles the required url and contains a few improper symbols (quotes and Html-tags). Of course, when somebody goes through the link he receives 404 Not Found error. I decided to change 404.php so that it directs user to valid url of the article if the initial requested url contains substring ‘silverlight-for-windows-phone-7-how-to-bound-usercontrol-to-itself’. The changes are below:

<?php 
$request=$_SERVER['REQUEST_URI'];

$pos = strpos($request, 'silverlight-for-windows-phone-7-how-to-bound-usercontrol-to-itself');
if ($pos !== false)
{
	header( "HTTP/1.1 301 Moved Permanently" );
	header( "Location: http://dotnetfollower.com/wordpress/2011/06/silverlight-for-windows-phone-7-how-to-bound-usercontrol-to-itself/" );
	exit();
}
?>
<!DOCTYPE html PUBLIC "-//W3C//DTD XHTML 1.1//EN" "http://www.w3.org/TR/xhtml11/DTD/xhtml11.dtd">
<html xmlns="http://www.w3.org/1999/xhtml">
<head profile="http://gmpg.org/xfn/11">
	<meta http-equiv="Content-Type" content="<?php bloginfo('html_type'); ?>; charset=<?php bloginfo('charset'); ?>" />

	<title><?php bloginfo('name'); ?><?php wp_title(); ?></title>
	... <!-- some text is skipped -->
</head>

<body>
	<div id="container">
		... <!-- some text is skipped -->
		<div id="notice">
			<h1><?php _e('Welcome to 404 error page!', 'inove'); ?></h1>		
			... <!-- some text is skipped -->
		</div>
		<div class="fixed"></div>
	</div>
</body>
</html>

Note again, the redirecting is in the beginning of the file in order to prevent sending any text to the browser. That’s important.

OK then, let’s find out what alternative ways to make redirect we have.

The first alternative I know is an usage of Html-tag meta with an attribute http-equiv=”refresh”. Meta refresh is a legacy approach, which instructs a web browser to refresh the current page (or frame) after a certain interval. In addition it can prompt the browser to go to a different url during the next page refreshing.

<meta http-equiv="refresh" content="5; url=http://dotnetfollower.com">

Or

echo '<meta http-equiv="refresh" content="5; url=http://dotnetfollower.com">';

The meta-tag redirects a browser to http://dotnetfollower.com after 5 seconds. Meta-tag has to be placed only inside the <head></head> region of Html markup. Inside other tags (e.g. <body></body>) it will be ignored. I think it’s a quite serious limitation.

The second alternative is a JavaScript redirect:

<script language="javascript">
	window.location.href='http://dotnetfollower.com';
</script>

Or

echo '<script language="javascript">';
echo 'window.location.href="http://dotnetfollower.com";';
echo '</script>';

This code makes browser go to another page. Such script-tag can be placed inside either the <header></header> or <body></body> regions of Html. It’s unlikely, but the JavaScript support can be turned off in browser. Obviously, in this case JavaScript redirection is unable to work as well.

So, let’s show a summary table:

Redirect method Description Limitations
Location header Sends a raw HTTP Location header to redirect a browser to a location different than requested url. It may follow the sending of a redirect response code, which acts as a reason of redirection Must be called before any actual output is sent

Example

    header( "Location: http://dotnetfollower.com" ); // directs user to the new location
    
Meta refresh Redirects a browser to a new location after a certain amount of seconds Has to be placed inside the <head></head> Html tags

Example

    <meta http-equiv="refresh" content="5; url=http://dotnetfollower.com">
    <!-- Directs the browser to the new location after 5 seconds -->
    
JavaScript redirect This code makes browser start loading another page Can be placed inside the <header></header> or <body></body> Html tags. It requires the JavaScript support is turned on in client browser

Example

    <script language="javascript">
        window.location.href='http://dotnetfollower.com';
    </script>
    

PS There is a function http_redirect. It’s a part of the PECL extension to PHP. Of course, to use http_redirect the extension has to be installed. I believe http_redirect uses Location header as well.

If you know other redirection methods in PHP, please don’t hesitate to reveal it here in the comments.

Related posts:

WordPress: Get the smaller sidebar of iNove theme

December 1st, 2010 No comments

In my blog I decided to use WordPress with iNove theme, and it seems that sidebar of this theme is too wide. I decided to decrease the width of the sidebar by 70px. To do this we should make changes in style.css of iNove theme. Below are the places in style.css where the changes should be done.

Here we increase the width of main content placeholder:

/* main START */
#main {
	background:#FFF url(img/main_shadow.gif) top repeat-x;
	width:675px;   /* <------ the original value is 605px  */
	padding:13px 15px 15px;
	float:left;
	overflow:hidden;
}

Here we decrease the width of sidebar:

/* sidebar START */
#sidebar {
	background:#F7F7F7 url(img/sidebar_shadow.gif) top repeat-x;
	width:230px;   /* <------ the original value is 300px */
	float:right;
	font-size:95%;
	line-height:145%;
	overflow:hidden;
	padding-top:8px;
}

Initially in the center of sidebar we have two widgets – Categories and Blogroll, which follow one after another horizontally. After getting sidebar smaller, they won’t have enough space. That is why we should place Blogroll-widget right after Categories-widget vertically. To do this we need to remove or comment the following width and float attributes:

#westsidebar {
	/* width:121px;
	float:left; */
	padding-right:5px;
	font-size:95%;
	overflow:hidden;
}
#eastsidebar {
	/* width:129px;
	float:right; */
	font-size:95%;
	overflow:hidden;
}

Here we increase the width of comments:

.comment .info {
	background:#EDEFF0 url(img/comment.gif) 0 0 no-repeat;
	float:left;
	padding:10px 15px 0;
	width:564px; /*  <------ the initial value is 494 */
}
#comment {
	width:671px; /*  <------ the initial value is 601 */
}

That’s all with style.css. Also we need to change the image img/sidesep.gif. In my case, I’ve cut off the image at right side from 301px to 231px. That’s all.

You can download revised files (style.css and sidestep.gif) here.

Related posts: