SharePoint: Brief introduction to Business Data Catalog (BDC)

November 4th, 2011 No comments

    Business Data Catalog (BDC) allows to integrate business data from external business applications into SharePoint application. BDC has built-in support for displaying data from such data sources as databases and web services. In other words, if the business application is a database or comprises a web service to emit data, its data can be easily incorporated into SharePoint application. If some business application isn’t database and doesn’t have any proper web services, you always can develop your own web service to provide access to the business application’s data.

Once the external business application has been registered within Business Data Catalog, its data can be used in Business Data Web Parts, Business Data Column, Search, User profile and other custom solutions.

BDC provides access to the underlying data sources with a declarative Metadata Model. The Metadata Model allows to describe a simplified and consistent client object model over any business application. What is Metadata? Metadata describes the business applications’ APIs. For each business application, Metadata defines the business entities that the business application interacts with and the methods available in the business application. The Business Data Catalog stores the metadata in the metadata repository. So, using the Metadata Model, developer describes the API of the business application in a xml-file, so called Application Definition File. Then SharePoint administrator imports the Application Definition into the Business Data Catalog to register Metadata the file contains. After that the data from business application becomes available. The schematic structure of Application Definition File is shown below:

<LobSystem Type="..." Name="...">
  <LobSystemInstances>
    <LobSystemInstance Name="...">
      <Properties>
        ...
      </Properties>
    </LobSystemInstance>
  </LobSystemInstances>
  <Entities>
    <Entity Name="...">
      <Properties>
        ...
      </Properties>
      <Identifiers>
        ...
      </Identifiers>
      <Methods>
        ...
      </Methods>
    </Entity>
  </Entities>
</LobSystem>

*Note: some attributes are skipped

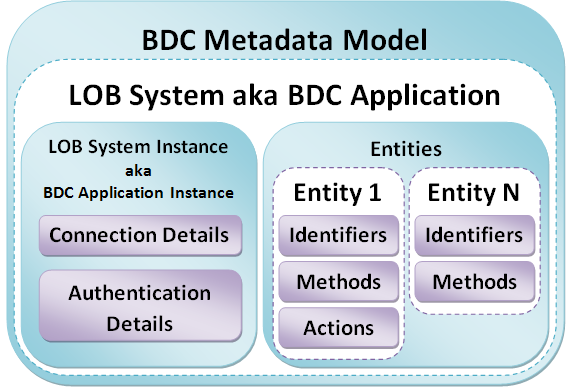
The LobSystem is a container for all of the other objects in the Metadata object model, and the root node in the Application Definition File. Each LobSystem object has an unique name and is of a certain type: either Database or Web Service. LobSystem object contains LobSystemInstances and Entities. The LobSystemInstance contains properties that define the authentication of the connection and the provider, which is used to connect to the external data source. Entity defines a type of returned business data object, it contains identifiers, methods and actions. Also Entity can have other related entities associated with them.

In terms of SharePoint Central Administration, the LobSystem is a Business Data Catalog Application or BDC Application, while LobSystemInstance can be named Business Data Catalog Application Instance or BDC Application Instance. Entity in SharePoint Central Administration and in Metadata Model means the same.

BDC Metadata Model Schema

All BDC Applications registered in Business Data Catalog can be viewed through the Central Administration: open SharePoint 3.0 Central Administration, click the name of Shared Service Provider (in my case it’s SharedServices1), then click the View applications link in the Business Data Catalog section. To create Application Definition File and import it to the Business Data Catalog, read the very good article written by Tobias Zimmergren.

To work with BDC programmatically you should use types from the following namespaces:

using Microsoft.Office.Server;
using Microsoft.Office.Server.ApplicationRegistry.MetadataModel;
using Microsoft.Office.Server.ApplicationRegistry.Infrastructure;
using Microsoft.Office.Server.ApplicationRegistry.Runtime;

You mainly will use the next interfaces and objects:

namespace Microsoft.Office.Server.ApplicationRegistry.MetadataModel
{
    // Provides access to all of the LOB systems and LOB system instances registered in the Business Data Catalog
    public sealed class ApplicationRegistry { ... }

    // Represents a business application registered in the Business Data Catalog
    public class LobSystem : MetadataObject { ... }

    // Represents an instance of a business application registered in the Business Data Catalog
    public class LobSystemInstance : MetadataObject { ... }

    // Represents a type of returned business data object, contains identifiers, methods and actions
    public class Entity : DataClass { ... }
}

namespace Microsoft.Office.Server.ApplicationRegistry.Runtime
{
    // Represents a filter that limits the instances returned to those that meet the comparison operator condition
    public class ComparisonFilter : UserInputFilter { ... }

    // Represents a filter that limits the instances returned to those where field like value, where value may contain the asterisk (*) wildcard character
    public class WildcardFilter : ComparisonFilter { ... }

    // Represents instances of business objects
    public interface IEntityInstance : IInstance { ... }

    // Provides a single iteration over the entity instance collection
    public interface IEntityInstanceEnumerator : IEnumerator<IEntityInstance> { ... }
}

namespace Microsoft.Office.Server.ApplicationRegistry.Infrastructure
{
    // Provides encoding and decoding of entity instance identifiers
    public static class EntityInstanceIdEncoder { ... }

    // Represents the SQL session provider to connect to the Shared Services Provider database
    public sealed class SqlSessionProvider { ... }
}

The Business Data Catalog is implemented as a Microsoft Office SharePoint Server 2007 Shared Service. If you are going to deal with BDC inside a standalone window/console-based application or inside SharePoint Jobs, you have to prepare Shared Resource Provider to use in the Object Model. For that, you need to invoke the method SqlSessionProvider.Instance().SetSharedResourceProviderToUse:

namespace Microsoft.Office.Server.ApplicationRegistry.Infrastructure
{
    public sealed class SqlSessionProvider
    {
        // some methods are omitted
        public void SetSharedResourceProviderToUse(string sharedResourceProviderName);
        public void SetSharedResourceProviderToUse(ServerContext serverContext);        
    }
}

The first variant of the method accepts a name of Shared Resource Provider. In terms of SharePoint Central Administration, the method requires the name of Shared Service. You can see all deployed Shared Services through the Central Administration: open SharePoint 3.0 Central Administration, find the Shared Services Administration section inside the left-side navigation bar and look through the available Shared Services. One of them is a default Shared Service. Another way is to get programmatically the name of Shared Service, which serves your web application. To learn more, please read the following article – How to get Shared Service name.

The second variant of the method use an instance of ServerContext. Below is two auxiliary methods I usually use as wrappers to SetSharedResourceProviderToUse:

public static void PrepareSharedServices(SPSite spSite)
{
    ServerContext sc = ServerContext.GetContext(spSite);
    SqlSessionProvider.Instance().SetSharedResourceProviderToUse(sc);
}

public static void PrepareSharedServices(string sharedServicesName)
{
    SqlSessionProvider.Instance().SetSharedResourceProviderToUse(sharedServicesName);    
}

Do not use this method inside your SharePoint web application, otherwise an exception will be thrown. Because in web context the Business Data Catalog uses the default Shared Services Provider automatically. As I said above, use SetSharedResourceProviderToUse only inside standalone non-web applications or SP Jobs.
WordPress: How to add Google Analytics to WordPress blog

October 27th, 2011 No comments

    Google Analytics is a web analytics solution that allows to see into our traffic data. It’s a small JavaScript code that we should put in every page, which requires tracking. Of course, at first we have to sign up for a Google Analytics account at http://www.google.com/analytics/. After registration we will be provided with the JavaScript code which looks similar to the following:

<script type="text/javascript">

  	var _gaq = _gaq || [];
  	_gaq.push(['_setAccount', 'UA-32102375-1']);
  	_gaq.push(['_trackPageview']);

  	(function() {
    	var ga = document.createElement('script'); ga.type = 'text/javascript'; ga.async = true;
    	ga.src = ('https:' == document.location.protocol ? 'https://ssl' : 'http://www') + '.google-analytics.com/ga.js';
    	var s = document.getElementsByTagName('script')[0]; s.parentNode.insertBefore(ga, s);
  	})();

</script>

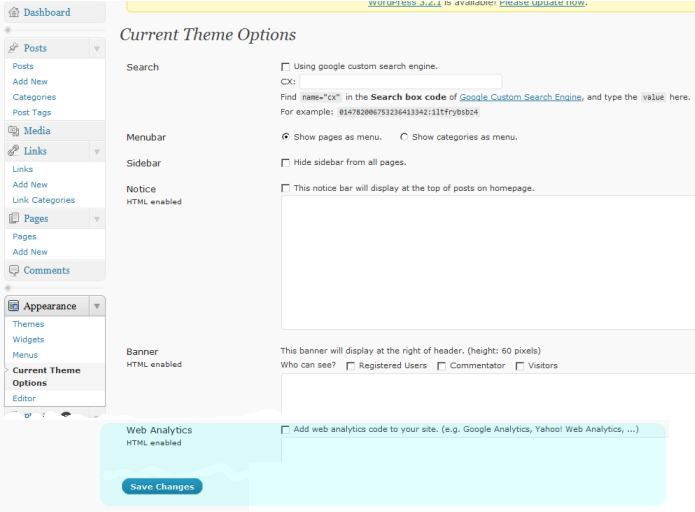
This script has to be placed within the HTML of the web pages of our WordPress blog. The simplest way to do that is to use the capabilities provided by your WordPress theme. Check if your current theme already allows to add a web analytics code to the blog. Log into admin section of the blog (wordpress/wp-admin), go to Appearance -> Current Theme Options (wordpress/wp-admin/themes.php), scroll to the Web Analytics field. If it’s exist, that means that your theme supports web analytics. Just put JavaScript code provided by Google into the field, check the ‘Add web analytics code to your site. (e.g. Google Analytics, Yahoo! Web Analytics, …)’ option and save changes. Ever since changes are applied web analitycs code gets inserted into every page.

Current Theme Options

My current theme, iNove, supports web analitycs, but the way described above is too easy for such geek as I’m. I decided to inject web analytics code into the site pages by my own hands.

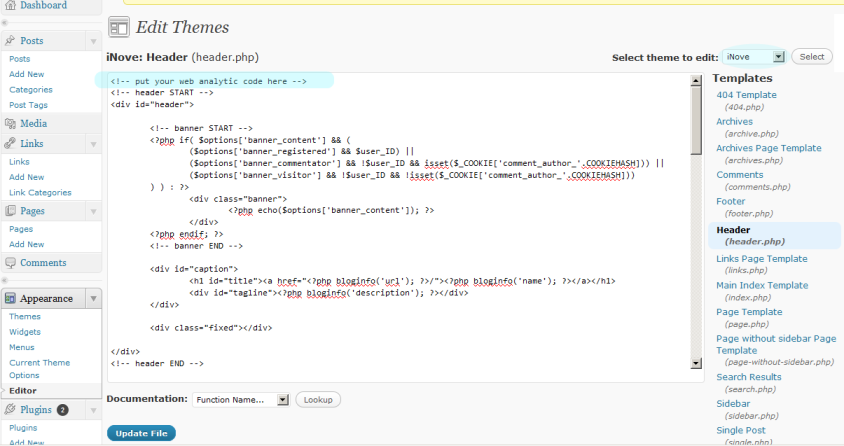
It is known, if you want to have some code inside every page of the WordPress blog, you should utilize such files as header.php or footer.php. Both are included into every page. We can alter them by using admin section. Go to Appearance -> Editor (wordpress/wp-admin/theme-editor.php), select the required theme in drop-down list on the right if it’s not selected yet, then select, for example, header.php, put your web analytics code before the original content and press Update File button.

Edit Theme Files

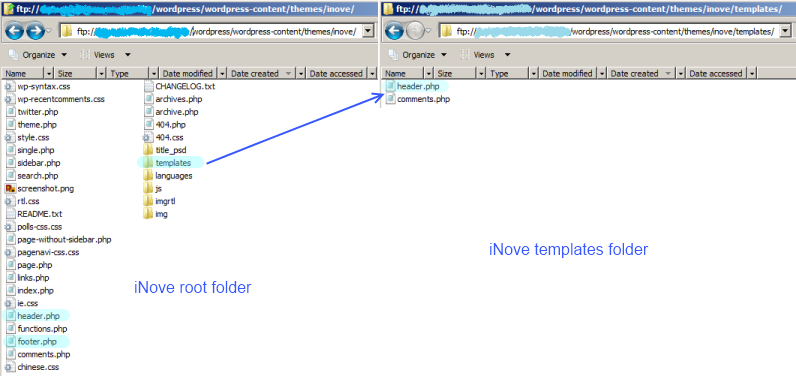
We can do the same through the ftp by locating header.php or footer.php in the appropriate folders. Copy one or another from the web server to the local environment, alter the php file and replace old version on the web server by modified one.

iNove Folders

Note that in iNove theme the header.php, which is available for edit through the Appearance -> Editor, is situated in the templates sub-folder, while the footer.php is in the root folder of iNove. In the root folder also there is another header.php. Both of them supplement each other, to be more precise the header.php from the root folder includes the one from the templates sub-folder by using the <?php include(‘templates/header.php’); ?> directive.

Personally I have modified the header.php from the root folder of iNove and replaced the old one through the ftp. I’ve put the web analitycs code right before the closing html head-tag (</head>). It works perfectly. The altered file is shown below:

<!DOCTYPE html PUBLIC "-//W3C//DTD XHTML 1.1//EN" "http://www.w3.org/TR/xhtml11/DTD/xhtml11.dtd">
<?php
	global $inove_nosidebar;
	$options = get_option('inove_options');
	if (is_home()) {
		$home_menu = 'current_page_item';
	} else {
		$home_menu = 'page_item';
	}
	if($options['feed'] && $options['feed_url']) {
		if (substr(strtoupper($options['feed_url']), 0, 7) == 'HTTP://') {
			$feed = $options['feed_url'];
		} else {
			$feed = 'http://' . $options['feed_url'];
		}
	} else {
		$feed = get_bloginfo('rss2_url');
	}
?>

<html xmlns="http://www.w3.org/1999/xhtml">
<head profile="http://gmpg.org/xfn/11">
	<meta http-equiv="Content-Type" content="<?php bloginfo('html_type'); ?>; charset=<?php bloginfo('charset'); ?>" />
	<meta http-equiv="X-UA-Compatible" content="IE=EmulateIE7" />

	<title><?php bloginfo('name'); ?><?php wp_title(); ?></title>
	<link rel="alternate" type="application/rss+xml" title="<?php _e('RSS 2.0 - all posts', 'inove'); ?>" href="<?php 

echo $feed; ?>" />
	<link rel="alternate" type="application/rss+xml" title="<?php _e('RSS 2.0 - all comments', 'inove'); ?>" href="<?php 

bloginfo('comments_rss2_url'); ?>" />
	<link rel="pingback" href="<?php bloginfo('pingback_url'); ?>" />

	<!-- style START -->
	<!-- default style -->
	<style type="text/css" media="screen">@import url( <?php bloginfo('stylesheet_url'); ?> );</style>
	<!-- for translations -->
	<?php if (strtoupper(get_locale()) == 'ZH_CN' || strtoupper(get_locale()) == 'ZH_TW') : ?>
		<link rel="stylesheet" href="<?php bloginfo('stylesheet_directory'); ?>/chinese.css" type="text/css" 

media="screen" />
	<?php elseif (strtoupper(get_locale()) == 'HE_IL' || strtoupper(get_locale()) == 'FA_IR' || strtoupper(get_locale()) 

== 'UG_CN' || strtoupper(get_locale()) == 'CKB') : ?>
		<link rel="stylesheet" href="<?php bloginfo('stylesheet_directory'); ?>/rtl.css" type="text/css" 

media="screen" />
	<?php endif; ?>
	<!--[if IE]>
		<link rel="stylesheet" href="<?php bloginfo('stylesheet_directory'); ?>/ie.css" type="text/css" 

media="screen" />
	<![endif]-->
	<!-- style END -->

	<!-- script START -->
	<script type="text/javascript" src="<?php bloginfo('template_url'); ?>/js/base.js"></script>
	<script type="text/javascript" src="<?php bloginfo('template_url'); ?>/js/menu.js"></script>
	<!-- script END -->

	<?php wp_head(); ?>
	
	<script type="text/javascript">

  	var _gaq = _gaq || [];
  	_gaq.push(['_setAccount', 'UA-32102375-1']);
  	_gaq.push(['_trackPageview']);

  	(function() {
    	var ga = document.createElement('script'); ga.type = 'text/javascript'; ga.async = true;
    	ga.src = ('https:' == document.location.protocol ? 'https://ssl' : 'http://www') + '.google-analytics.com/ga.js';
    	var s = document.getElementsByTagName('script')[0]; s.parentNode.insertBefore(ga, s);
  	})();

	</script>

</head>

<?php flush(); ?>

<body>
<!-- wrap START -->
<div id="wrap">

<!-- container START -->
<div id="container" <?php if($options['nosidebar'] || $inove_nosidebar){echo 'class="one-column"';} ?> >

<?php include('templates/header.php'); ?>

<!-- content START -->
<div id="content">

	<!-- main START -->
	<div id="main">

An alternative way is to use appropriate plugins. For example, like Google Analytics for WordPress or similar. But besides evident conveniences, the dealing with plugins has some small disadvantages as well. The use of too many plugins may slow down your site. As for me the adding of analytics code isn’t worth having one more plugin, which requires recurrent updates and some kind of maintenance.

Related posts:

SharePoint: How to find all controls of a certain type

October 12th, 2011 No comments

    A small, but useful method to find recursively all controls of a certain type:

public static List<T> FindControlRecursiveByType<T>(Control root) where T : Control
{
    List<T> res = new List<T>();

    if (root != null)
    {
        Stack<Control> tmpStack = new Stack<Control>();
        tmpStack.Push(root);

        while (tmpStack.Count > 0)
        {
            Control ctrl = tmpStack.Pop();
            if (ctrl is T)
                res.Add(ctrl as T);

            foreach (Control childCtrl in ctrl.Controls)
                tmpStack.Push(childCtrl);
        }
    }

    return res;
}

The sample usage is below:

// return all save buttons on the page
List<SaveButton> saveButtons = FindControlRecursiveByType<SaveButton>(Page);
Related posts:
Categories: ASP.NET, Share Point Tags: ,

JavaScript: Event aggregator

October 3rd, 2011 No comments

    JavaScript is an event-driven language. The most of JavaScript objects (from document to button) contains events, which some response actions can be bound to. Suddenly I wanted to use the event-driven approach with my own objects, so that they could subscribe to events of each other. I implemented a special object – EventAggregator, which allows to manage listeners of events. EventAggregator is a pure JavaScript implementation, without jQuery and others.

function EventAggregator() {

    this._eventToListenersMap = {}; // key-value dictionary: key is an event name, value is an array of listeners

    // Method adds listener
    // eventName - a string event name
    // callback  - a function that has to be called, when event is raised
    // context   - object containing the callback function
    this.Subscribe = function(eventName, callback, context) {
    
        if (!this._eventToListenersMap.hasOwnProperty(eventName)) // check if key exists
            this._eventToListenersMap[eventName] = []; // create an array to store listeners

        // add listener of a certain event to the array. Listener is a combination of 
        // a callback function to call when event is raised and an object containing the callback function
        this._eventToListenersMap[eventName].push({ 'Callback': callback, 'Context': (typeof context != "undefined" ? context : null) });
    }

    // Method removes listener
    // eventName - a string event name
    // callback  - a function that has to be removed
    this.Unsubscribe = function(eventName, callback) {

        if (this._eventToListenersMap.hasOwnProperty(eventName)) { // check if key exists
            // get through the array of listeners of a certain event to find the listener that has to be removed
            for (var i = 0; i < this._eventToListenersMap[eventName].length; ++i) {
                // check if it's a required listener    
                if (callback == this._eventToListenersMap[eventName][i].Callback) {
                    this._eventToListenersMap[eventName].splice(i, 1); // remove the found listener
                    break;
                }
            }
            
        }
    }

    // Method raises event
    // eventName - a string event name
    // args      - a data that has to be passed into a callback function
    this.Fire = function(eventName, args) {

        if (this._eventToListenersMap.hasOwnProperty(eventName)) { // check if key exists
            // get through the array of listeners of a certain event to find the listeners that has to be called
            for (var i = 0; i < this._eventToListenersMap[eventName].length; ++i) {
                try {
                    // get the object containing the callback function
                    var contextObj = this._eventToListenersMap[eventName][i].Context;
                    // invoke callback in context of the object
                    this._eventToListenersMap[eventName][i].Callback.call(contextObj, args);
                } catch (e) {
                }
            }
        }
    }
}    

Note that if you use the Subscribe method and pass a callback function, which is a member of some object, you have to pass this object as well. If you pass null as the parameter context or pass nothing, EventAggregator try to call the callback function of the top-level object of the client-side object hierarchy. This top-level object is the window object.

Code sample how to use EventAggregator is shown below:

function Dog() {
    this.Events = new EventAggregator();
    
    this.ON_BARK  = "OnBark";
    this.ON_WHINE = "OnWhine";   

    this.Bark = function() {
        this.Events.Fire(this.ON_BARK, this);
    }
    this.Whine = function() {
        this.Events.Fire(this.ON_WHINE, this);
    }
}

function Master() {
    this.Events = new EventAggregator();
    this.Dog    = new Dog();

    this.ON_WAKE_UP = "OnWakeUp";

    this._init = function() {
        this.Dog.Events.Subscribe(this.Dog.ON_BARK, this._wakeUp, this);
        this.Dog.Events.Subscribe(this.Dog.ON_WHINE, this._wakeUp, this);
    }

    this._wakeUp = function(args) {
        this.Events.Fire(this.ON_WAKE_UP, args);
    }

    this._init();
}


var ownerlessDog = new Dog();
ownerlessDog.Events.Subscribe(ownerlessDog.ON_BARK, function() { alert('Dog barked'); }, null);
ownerlessDog.Bark();

var master = new Master();
master.Events.Subscribe(master.ON_WAKE_UP, function() { alert('Master woke up') }, null);
master.Dog.Whine();

Probably, It will be useful for somebody.

Categories: JavaScript Tags: ,

PHP: Redirection Overview

September 30th, 2011 No comments

    This post is more for me than for somebody else, because it will let me keep the posted information handy. WordPress is written in PHP and I have to recall this script language when I need to alter some iNove theme scripts. This time I craved for adding redirection to some script. The easiest way is to utilize code like the following:

header( "HTTP/1.1 301 Moved Permanently" ); // this line is optional and can be skipped
header( "Location: http://dotnetfollower.com" );

Using header(“Location: some new url“) method we can transfer user to a new page. Under the hood header() asks browser to make another request for another url. Note that the header() must be called before any text (e.g. HTML tags, blank lines, something forwarded by PHP echo function and so on) is sent to the user browser, otherwise it will not work. That is the major limitation of the given approach we have to be aware of.

The first line of the code sample above sends the redirect response code to the browser. Redirect response code is considered as a reason of redirection. You can skip the sending of redirect code. But if you delete or move page to another location, I insistently recommend to send a relevant code, because such codes are being analyzed practically by all Search Engines. Including, of course, the evident leader – Google Search Engine, which examines such codes very thoroughly. The Google PageRank of a page you redirect to can directly depend on the redirect code you return. For instance, in example above I return 301, which means that page was moved permanently to another location that is pointed out in the second line of code. The code 301 also tells Search Engines that link value of the requested url has to be given to the new one. In theory, the new page inherits PageRank of the requested (but absent at the time) page. In reality, it happens not instantly, but some time later.

Redirect response codes are a subset of status codes available in HTTP 1.1. The complete HTTP 1.1 specification is accessible in RFC 2616. The first digit of the status code defines the category of response. The status codes are grouped into five categories:

  • 100s – informational, indicate that request is received and is being processed. For example,

    • 100 Continue;
    • 101 Switching Protocols and etc.
  • 200s – success, indicate that request was successfully received, understood, and accepted. For example,

    • 200 OK;
    • 202 Accepted and etc.
  • 300s – redirection, indicate further action must be taken in order to complete the request, because a requested resource has been moved. Response Http-header usually includes a Location header indicating the new address. For example,

    • 301 Moved Permanently;
    • 303 See Other and etc.
  • 400s – client error, indicate that request contains bad syntax or cannot be fulfilled. For example,

    • 400 Bad Request;
    • 401 Unauthorized;
    • 404 Not Found;
    • 408 Request Time-out and etc.
  • 500s – server Error, indicate that server failed to fulfill an valid request. For example,

    • 500 Internal Server Error;
    • 502 Bad Gateway;
    • 503 Service Unavailable and etc.

Evidently, the most applicable category for redirection is a 300s status code. The full list of available status codes of this category is presented below:

  • 300 Multiple Choices;
  • 301 Moved Permanently;
  • 302 Found;
  • 303 See Other;
  • 304 Not Modified;
  • 305 Use Proxy;
  • 307 Temporary Redirect;

OK, let’s revert to the changes I made in one of the iNove theme scripts. Some external sites have the corrupted links to one of my articles – Silverlight for Windows Phone 7: How to bind UserControl to itself. These bad links look like ‘http://dotnetfollower.com/wordpress/2011/06/silverlight-for-windows-phone-7-how-to-bound-usercontrol-to-itself/">http://dotnetfollower.com/wordpress/2011/06/silverlight-for-windows-phone-7-how-to-bound-usercontrol-to-itself/</a>‘. As you can see, such link doubles the required url and contains a few improper symbols (quotes and Html-tags). Of course, when somebody goes through the link he receives 404 Not Found error. I decided to change 404.php so that it directs user to valid url of the article if the initial requested url contains substring ‘silverlight-for-windows-phone-7-how-to-bound-usercontrol-to-itself’. The changes are below:

<?php 
$request=$_SERVER['REQUEST_URI'];

$pos = strpos($request, 'silverlight-for-windows-phone-7-how-to-bound-usercontrol-to-itself');
if ($pos !== false)
{
	header( "HTTP/1.1 301 Moved Permanently" );
	header( "Location: http://dotnetfollower.com/wordpress/2011/06/silverlight-for-windows-phone-7-how-to-bound-usercontrol-to-itself/" );
	exit();
}
?>
<!DOCTYPE html PUBLIC "-//W3C//DTD XHTML 1.1//EN" "http://www.w3.org/TR/xhtml11/DTD/xhtml11.dtd">
<html xmlns="http://www.w3.org/1999/xhtml">
<head profile="http://gmpg.org/xfn/11">
	<meta http-equiv="Content-Type" content="<?php bloginfo('html_type'); ?>; charset=<?php bloginfo('charset'); ?>" />

	<title><?php bloginfo('name'); ?><?php wp_title(); ?></title>
	... <!-- some text is skipped -->
</head>

<body>
	<div id="container">
		... <!-- some text is skipped -->
		<div id="notice">
			<h1><?php _e('Welcome to 404 error page!', 'inove'); ?></h1>		
			... <!-- some text is skipped -->
		</div>
		<div class="fixed"></div>
	</div>
</body>
</html>

Note again, the redirecting is in the beginning of the file in order to prevent sending any text to the browser. That’s important.

OK then, let’s find out what alternative ways to make redirect we have.

The first alternative I know is an usage of Html-tag meta with an attribute http-equiv=”refresh”. Meta refresh is a legacy approach, which instructs a web browser to refresh the current page (or frame) after a certain interval. In addition it can prompt the browser to go to a different url during the next page refreshing.

<meta http-equiv="refresh" content="5; url=http://dotnetfollower.com">

Or

echo '<meta http-equiv="refresh" content="5; url=http://dotnetfollower.com">';

The meta-tag redirects a browser to http://dotnetfollower.com after 5 seconds. Meta-tag has to be placed only inside the <head></head> region of Html markup. Inside other tags (e.g. <body></body>) it will be ignored. I think it’s a quite serious limitation.

The second alternative is a JavaScript redirect:

<script language="javascript">
	window.location.href='http://dotnetfollower.com';
</script>

Or

echo '<script language="javascript">';
echo 'window.location.href="http://dotnetfollower.com";';
echo '</script>';

This code makes browser go to another page. Such script-tag can be placed inside either the <header></header> or <body></body> regions of Html. It’s unlikely, but the JavaScript support can be turned off in browser. Obviously, in this case JavaScript redirection is unable to work as well.

So, let’s show a summary table:

Redirect method Description Limitations
Location header Sends a raw HTTP Location header to redirect a browser to a location different than requested url. It may follow the sending of a redirect response code, which acts as a reason of redirection Must be called before any actual output is sent

Example

    header( "Location: http://dotnetfollower.com" ); // directs user to the new location
    
Meta refresh Redirects a browser to a new location after a certain amount of seconds Has to be placed inside the <head></head> Html tags

Example

    <meta http-equiv="refresh" content="5; url=http://dotnetfollower.com">
    <!-- Directs the browser to the new location after 5 seconds -->
    
JavaScript redirect This code makes browser start loading another page Can be placed inside the <header></header> or <body></body> Html tags. It requires the JavaScript support is turned on in client browser

Example

    <script language="javascript">
        window.location.href='http://dotnetfollower.com';
    </script>
    

PS There is a function http_redirect. It’s a part of the PECL extension to PHP. Of course, to use http_redirect the extension has to be installed. I believe http_redirect uses Location header as well.

If you know other redirection methods in PHP, please don’t hesitate to reveal it here in the comments.

Related posts: