Archive

Posts Tagged ‘Administration’

SharePoint: Get Installation Directory Path

December 30th, 2011 No comments

    To get the directory path, which SharePoint was installed into, the SPUtility.GetGenericSetupPath method can be used. MSDN says the method returns the full local path for the specified subdirectory. It’s supposed, you pass a relative path of the subdirectory being located inside the SP installation directory. Getting exactly the SP installation directory path, just pass an empty string to the method.

...
using Microsoft.SharePoint.Utilities;
...
string spInstDirPath = SPUtility.GetGenericSetupPath(string.Empty);

In my case the above code sample returns C:\Program Files\Common Files\Microsoft Shared\Web Server Extensions\14 for SharePoint 2010 and C:\Program Files\Common Files\Microsoft Shared\Web Server Extensions\12 for SharePoint 2007. To get the path of the Features directory, use the following code snippet:

string spFeaturesDirPath = SPUtility.GetGenericSetupPath(@"template\features");

The GetGenericSetupPath method is accessible only if an application has reference to Microsoft.SharePoint.dll. Let’s assume we develop a SharePoint independent application. How can we get the SP installation directory path in this case? Having analyzed the GetGenericSetupPath method using .Net Reflector, I’ve disclosed that the directory path we are interested in is read from Windows Registry. The SharePoint independent method to get the SP installation directory path and an accompanying method are presented below:

using System;
using System.IO;
using Microsoft.Win32;

...

public static T GetLocalMachineRegistryValue<T>(string path, string valueName, T defaultValue)
{            
    T res = defaultValue;
    try
    {
        using (RegistryKey key = Registry.LocalMachine.OpenSubKey(path))
        {
            if (key != null)
            {
                object valObj = key.GetValue(valueName);
                if (valObj is T)
                    res = (T)valObj;
            }
        }
    }
    catch (Exception)
    {
        // write to log
    }            
    return res;
}

public static string GetSPInstallationDirectoryPath()
{
    const string keyVer2007 = @"SOFTWARE\Microsoft\Shared Tools\Web Server Extensions\12.0";
    const string keyVer2010 = @"SOFTWARE\Microsoft\Shared Tools\Web Server Extensions\14.0";            
    const string valueName  = "Location";

    string res = GetLocalMachineRegistryValue<string>(keyVer2010, valueName, null);

    if(res == null)
        res = GetLocalMachineRegistryValue<string>(keyVer2007, valueName, null);

    return res;
}

The following method is dedicated to get the path of the Features directory:

public static string GetSPFeaturesDirectoryPath()
{
    const string featuresDirPathPattern = @"template\features";

    string res = null;

    string instDirPath = GetSPInstallationDirectoryPath();
    if (instDirPath != null)
        res = Path.Combine(instDirPath, featuresDirPathPattern);

    return res;
}

Here is how you can use these methods:

string spInstallationDir = GetSPInstallationDirectoryPath();
string spFeaturesDir     = GetSPFeaturesDirectoryPath();

Please note, when accessing Registry on x64 Windows from a x32 application, you may stumble upon Registry Reflection and Registry Redirector. Please, take a look at the article to read from the right Registry Key.
Related posts:

SharePoint: How to make error messages more detailed

December 21st, 2011 No comments

    If an unexpected error occurs on a SharePoint environment, by default, you get a meaningless error message as the following: An unexpected error has occurred. Despite the given error message is considered as friendly one for users, we as developers want to have more information to detect the reason. SharePoint is built on ASP.Net technology, it means we can enable the detailed error message and, in addition, displaying of call-stack by changing some settings in a web.config file. We need to find the node customErrors and change its mode to “Off”, which specifies that custom errors are disabled and the detailed errors are shown to the local and remote clients. Then we need to find the node SafeMode and change its CallStack to “true”. CallStack attribute defines whether a call-stack and an exception message are displayed when a system-level exception takes place while ASP.NET processes a request from the local and remote clients. The last step is to save the made changes. The nodes we are interested in are shown below:

Before:

<customErrors mode="On" />
<SafeMode MaxControls="200" CallStack="false" ... >

After:

<customErrors mode="Off" />
<SafeMode MaxControls="200" CallStack="true" ... >

The required web.config file containing main settings locates in \inetpub\wwwroot\wss\VirtualDirectories\<SHAREPOINT APP PORT NUMBER>. For SharePoint 2007 it’s usually enough to make changes in the given file only. As for SharePoint 2010, the changes also should be applied to a number of additional web.config files in 14 hive (\Program Files\Common Files\Microsoft Shared\Web Server Extensions\14) of SharePoint 2010. If you make a search for web.config inside the 14 folder you likely will find more than 30 different files. I recommend firstly to make changes in web.config files locating in \14\TEMPLATE\ADMIN and \14\TEMPLATE\LAYOUTS and then check whether you still get not detailed error message. If so, continue making the changes file by file until the message will get more detailed.

Related posts:

SharePoint 2010: Some issues during solution package deploying

December 17th, 2011 No comments

    Deploying a .wsp-file on SharePoint 2010, you may stumble over the next error message:
Install-SPSolution : Admin SVC must be running in order to create deployment timer job.

How have I got it? In SharePoint 2010 Management Shell I had successfully performed the following command to upload my SP2010 solution package into the system:

Add-SPSolution "C:\WSPDeployment\My2010Solution.wsp"

Then I had tried to run the next one to deploy the uploaded solution:

Install-SPSolution -Identity My2010Solution.wsp -GACDeployment -AllWebApplications

and after that I received the mentioned error.

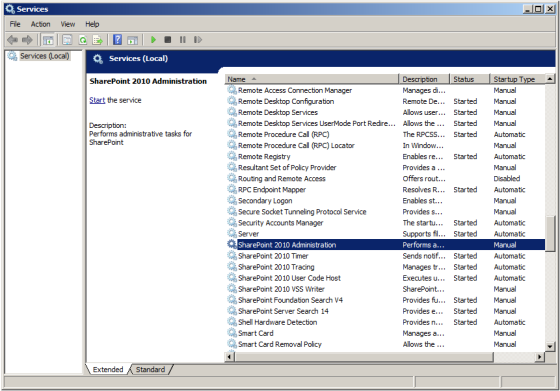
Now, how to fix it. It’s needed to go to Administrative Tools -> Services and manually start the service called SharePoint 2010 Administration. Not to have such error in the future, change service’s Startup type to Automatic.

SharePoint 2010 Administration service

Having made this, I run Install-SPSolution once again and received a new error:
A deployment or retraction is already under way for the solution “My2010Solution.wsp”, and only one deployment or retraction at a time is supported.

It looked like an appropriate deployment job was added to the list of timer jobs, but the attempt to execute the job failed due to unstarted SharePoint 2010 Administration service. I found a solution here. We need to cancel the deployment job by performing the next steps:

  1. Grab the id of the job by running the command: stsadm -o enumdeployments. Yep, the old friend, stsadm helps us out 🙂 Look through the result, find the required deployment job and grab the id. The result should look like
    C:\...red\Web Server Extensions\14\BIN>stsadm -o enumdeployments
    
    <Deployments Count="1">
       <Deployment JobId="2de92a5f-6c70-4325-ac2c-293a34dd9c67">
          <Title>Microsoft SharePoint Foundation Solution Deployment for "My2010Solution.wsp"</Title>
          <Type>Deployment</Type>
          <State>Pending</State>
          <Schedule>12/16/2011 3:47 PM</Schedule>
          <File>My2010Solution.wsp</File>
          <ServerType>Front-end Web server</ServerType>
          <Target>http://mySPServer/</Target>
       </Deployment>
    </Deployments>
    
  2. Using the found id, cancel the job by means of the command stsadm-o canceldeployment-id “found Job id”. For example, in my case it’s
    stsadm -o canceldeployment -id "2de92a5f-6c70-4325-ac2c-293a34dd9c67"

    If it succeed you get “Operation completed successfully” message.

  3. Run again stsadm -o enumdeployments to make sure that the given deployment job disappeared

Ok, now you can repeat deployment of your solution, run Install-SPSolution again. The issues was overcome in my case.