Archive

Archive for the ‘WinForms’ Category

SharePoint: Manually Upgrade Business Data Catalog Application Definitions to Business Data Connectivity Models

March 13th, 2012 No comments

    Trying to import a legacy Application Definition File of SharePoint 2007 into Business Data Connectivity Service of SharePoint 2010, you apparently got at least one of the errors shown below:

  • Application definition import failed. The following error occurred: The root element of a valid Metadata package must be ‘Model’ in namespace ‘http://schemas.microsoft.com/windows/2007/BusinessDataCatalog’. The root in the given package is ‘LobSystem’ in namespace ‘http://schemas.microsoft.com/office/2006/03/BusinessDataCatalog’. Error was encountered at or just before Line: ‘2’ and Position: ‘2’;
  • Application definition import failed. The following error occurred: BDC Model does not correctly match the schema. The required attribute ‘Namespace’ is missing. Error was encountered at or just before Line: ’20’ and Position: ’10’;
  • Application definition import failed. The following error occurred: ReturnTypeDescriptor of MethodInstance with Name ‘ProductSpecificFinderInstance’ on Entity (External Content Type) with Name ‘Product’ in Namespace ‘ExternalProductDB’ should not be a Collection TypeDescriptor for MethodInstances of Type ‘SpecificFinder’. Parameter name: rawValues.ReturnTypeDescriptorId Error was encountered at or just before Line: ‘171’ and Position: ’18’;
  • and so on

As it’s known, in SharePoint 2010, Business Data Catalog (BDC) was replaced with Business Data Connectivity with the same abbreviation. One of the changed things is the format of xml-based Application Definition Files. If you make an in-place upgrade of a live SharePoint 2007 application to SharePoint 2010, bdc metadata will be automatically upgraded as well and will become usable with the Business Data Connectivity. But if the in-place upgrade isn’t an option for you, you can upgrade your xml-based Application Definition Files manually. The manual algorithm step by step is described here – How to: Manually Upgrade Business Data Catalog Application Definitions to Business Data Connectivity Models.

For one of our applications we settled on the manual upgrade of its metadata files. But If I call myself a programmer, I have to try to automate the algorithm, especially taking into account 20+ files required to upgrade. So, I’ve developed a simple application for alteration of the legacy xml-based Application Definition Files to make them compatible with SharePoint 2010. However I’d like to notice that the given converter doesn’t follow entirely the procedure described by Microsoft, but performs only steps allowing our particular metadata files to be successfully imported into the Business Data Connectivity Service. For example, our files don’t comprise actions and associations, thus the application does nothing at all with <Action> and <Association> elements. So, consider this converter as a start point of developing the new one satisfying your own conditions and requirements.

Below I enumerated the necessary and sufficient changes to be applied to our particular metadata files so that it enables us to make them compatible with SharePoint 2010. Exactly these very steps and a few less important I’ve implemented in the converter.

  • the root element in the Application Definition File must be a <Model>;
  • the <Model> must contain <LobSystems> element, which in turn must wrap the former root node – <LobSystem>;
  • the <LobSystem> element mustn’t contain the Version-attribute;
  • the <Entity> element must contain the new attributes – Namespace and Version;
  • the <Identifier> element mustn’t contain an assembly name in its TypeName-attribute; For example, TypeName=”System.String, mscorlib” has to turn into TypeName=”System.String”;
  • the <MethodInstance> element with Type-attribute value of SpecificFinder should include the Default-attribute with value of true;
  • if the <TypeDescriptor> element has the IsCollection attribute set to true, the MethodInstance return TypeDescriptor should be updated to be an element of the collection. In practice, that means the ReturnTypeDescriptorPath-attribute with an appropriate value should be added to <MethodInstance> element, and the obsolete ReturnTypeDescriptorLevel and ReturnTypeDescriptorName attributes should be deleted;

Note that when modifying a <Entity> element, the values of the Namespace and Version attributes are copied respectively from the values of Name and Version attributes of the <LobSystem> element, which wraps the <Entity> element. The same approach is used while the in-place upgrade takes place.

After the changes are applied, and if they are sufficient for your metadata, the result files can be imported into Business Data Connectivity Service. During the import process, you may get the warnings. Consider fixing them in the future, but at the present stage you can simply ignore them. The most popular warnings are listed below:

  • This Model contains LobSystem (External System) of Type ‘WebService’ which is deprecated and may be removed in future releases.
  • The MethodInstance of type ‘Finder’ with Name ‘FindProducts’ does not have a Limit Filter.
  • The TypeDescriptor ‘From’ on Parameter ‘GetProductsFiltered’ on Method ‘GetItems’ of Entity (External Content Type) ‘Product’ with Namespace ‘ExternalProductDB’ has a DateTime value, but there is no Interpretation describing what the External System expects and returns as the DateTimeKind. The DateTime value is assumed to be UTC.
  • Note: I made the converter-application fix the warnings regarding the DateTime type and UTC, so they won’t bother you.

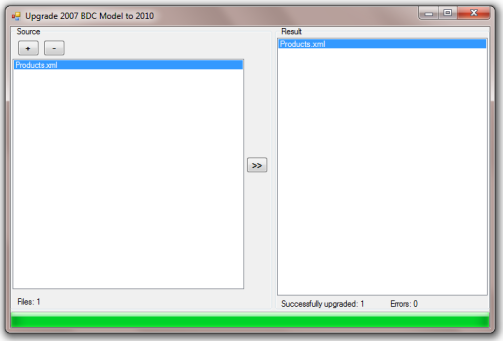
    The converter is very straightforward to use. Using the button ‘+’, simply add to the left section the files to be upgraded. Then click the button ‘>>’, and you’ll get the upgraded ones in the right section. Double click on file name opens an overview form to browse the input or result xml. Physically, the result files are located in c:\output folder. The application doesn’t use any SharePoint-related libraries.

    Upgrade 2007 BDC model to SP2010

    You can download the application from this page or by using the direct link. The Visual Studio 2010 solution and appropriate executable file are in the archive.
WinForms: Show progress on long-running operations

January 30th, 2012 No comments

    When I have a long-running operation to execute I always use the best practice demonstrated here. Keeping the UI responsive to user interaction, I start a lengthy task in a separate thread and then update a ProgressBar control step by step from the executing operation. The progress data is passed to UI thread through the BeginInvoke or Invoke methods of the ProgressBar control or any other UI control, since all UI controls are created in UI thread and must be updated from it. Much time has passed since the time when the article was written. So now we have Anonymous Methods, Actions, Funcs, the upgraded ThreadPool class and so on. Using these innovations I’ve rewritten the approach described by Chris Sells. Look at the code sample below. This code sample simulates a treatment of group of files:

private void startBtn_Click(object sender, EventArgs e)
{
    // the array of file paths
    string[] filePaths = ... 

    UpdateProgressBar(0);            

    // start lengthy task in separate thread
    ThreadPool.QueueUserWorkItem(new WaitCallback(new Action<object>(delegate(object state)
    {                
        DoSomethingWithFiles(filePaths);
    })));
}

private void DoSomethingWithFiles(string[] filePaths)
{
    for (int i = 0; i < filePaths.Length; i++)
    {
        string fileText = File.ReadAllText(filePaths[i]);

        // do something with the read file content
        ...
                
        // set refreshed value to ProgressBar
        UpdateProgressBar((i + 1) * 100 / filePaths.Length);                
    }

    // set refreshed value to ProgressBar
    UpdateProgressBar(100);
}

private void UpdateProgressBar(int currentValue)
{
    // if it's UI thread, simply update ProgressBar as usual. 
    // Otherwise, make the current method be called in UI thread.
    if (progressBar1.InvokeRequired)
        progressBar1.BeginInvoke(new Action(delegate() { UpdateProgressBar(currentValue); }));
    else
        progressBar1.Value = currentValue;
}

It’s assumed that startBtn and progressBar1 are added to the form. When startBtn is clicked, the startBtn_Click method is called and starts the DoSomethingWithFiles long-running operation in separate thread. The DoSomethingWithFiles calls the UpdateProgressBar from time to time to show the current progress. The UpdateProgressBar checks whether it’s called from UI thread. If so, it just updates the ProgressBar, otherwise, initiates its own invoking from the UI thread.

As you can see, the obtained code does the same but is more compact.

Related posts:
Categories: C#, WinForms Tags: ,

WinForms: Show individual tooltip for each ListBox item

January 30th, 2012 No comments

    Unlike ListViewItem we don’t have a built-in way to set individual tooltip text for each item in ListBox. But there is an easily realizable workaround. Add the following handler to your ListBox‘s MouseMove event:

private void listBox_MouseMove(object sender, MouseEventArgs e)
{
    ListBox lb = (ListBox)sender;
    int index = lb.IndexFromPoint(e.Location);

    if (index >= 0 && index < lb.Items.Count)
    {
        string toolTipString = lb.Items[index].ToString();                

        // check if tooltip text coincides with the current one,
        // if so, do nothing
        if (toolTip1.GetToolTip(lb) != toolTipString)
            toolTip1.SetToolTip(lb, toolTipString);
    }
    else
        toolTip1.Hide(lb);
}

The toolTip1 is a System.Windows.Forms.ToolTip control, which should be dropped on your form.

If your ListBox items are more complex rather than a string, and you want tooltip to have a value different from the returned by ToString(), you can take as a basis the following code sample:

public class FileListItem
{
    public string FilePath { get; set; }

    public override string ToString()
    {
        // return file name without directory path
        return Path.GetFileName(FilePath);
    }
}
...
private void listBox_MouseMove(object sender, MouseEventArgs e)
{
    ListBox lb = (ListBox)sender;
    int index = lb.IndexFromPoint(e.Location);

    if (index >= 0 && index < lb.Items.Count)
    {
        string toolTipString = lb.Items[index].ToString();

        // if the item is a FileListItem object,
        // set tooltip to the value of FilePath property
        FileListItem fileListItem = lb.Items[index] as FileListItem;
        if (fileListItem != null)
            toolTipString = fileListItem.FilePath;

        // check if new tooltip text coincides with the current one,
        // if so, do nothing
        if (toolTip1.GetToolTip(lb) != toolTipString)
            toolTip1.SetToolTip(lb, toolTipString);
    }
    else
        toolTip1.Hide(lb);
}
Related posts:
Categories: C#, WinForms Tags: ,

WinForms: How to hide checkbox of the certain TreeNode in TreeView control

May 18th, 2011 4 comments

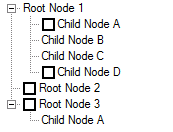
     Recently I needed to hide the checkboxes of some nodes in a TreeView-control, i.e. some nodes should be checkable, but the rest shouldn’t.

The standard TreeView doesn’t allow doing that directly, but Windows API will help us out. The main idea is to catch the moment when a node has been added to the TreeView, then to examine whether the node’s checkbox must be hidden and, if yes, to send a certain TVM_SETITEM message to the TreeView to hide the checkbox.

Unfortunately, the TreeView doesn’t provide us with an event to be fired right after a node has been added. So, we don’t have any choice, but to deal with WinAPI messages directly inside WndProc.

Having used .Net Reflector I’ve found out that while a node is being added to the Nodes-collection of either the TreeView or another node the following code is running (this piece of code is borrowed from the internal Realize method of the TreeNode class):

this.handle = UnsafeNativeMethods.SendMessage(
      new HandleRef(this.TreeView, this.TreeView.Handle), 
      NativeMethods.TVM_INSERTITEM, 0, ref lParam); // the first statement
treeView.nodeTable[this.handle] = this; // the second statement
this.UpdateNode(4); // the third statement

As we can see, after the first statement has been executed the TreeView receives a TVM_INSERTITEM message. In the WndProc of the TreeView, we could catch this message and fetch out the newly added node’s handle from it. The next step would be a getting a TreeNode-object corresponding to the handle as we need the latter to examine whether its checkbox must be hidden. However, at that stage the handle and the TreeNode wrapping it couldn’t yet be matched. The correct matching is available only after the pair <node’s handle, TreeNode-object> has been added to the TreeView‘s hashtable named nodeTable, in other words, after the second statement has completed. Evidently, the TVM_INSERTITEM message would be already processed by that moment. That means the TVM_INSERTITEM can’t be used, and we have to catch and handle another WinAPI message.

Luckily, right after the node has been added and the mapping between the handle and the TreeNode-object has been set up, the UpdateNode method (the third statement) emits a TVM_SETITEM message to the TreeView. So, I decided to handle this type of messages to hide unwanted checkboxes.

Below are two classes, HiddenCheckBoxTreeNode and MixedCheckBoxesTreeView, derived from the built-in TreeNode and TreeView classes respectively. The HiddenCheckBoxTreeNode class indicates a node with checkbox to be hidden. The MixedCheckBoxesTreeView class, in turn, hides unwanted checkboxes.

/// <summary>
/// Represents a node with hidden checkbox
/// </summary>
public class HiddenCheckBoxTreeNode : TreeNode
{
    public HiddenCheckBoxTreeNode() { }
    public HiddenCheckBoxTreeNode(string text) : base(text) { }
    public HiddenCheckBoxTreeNode(string text, TreeNode[] children) : base(text, children) { }
    public HiddenCheckBoxTreeNode(string text, int imageIndex, int selectedImageIndex) : base(text, imageIndex, selectedImageIndex) { }
    public HiddenCheckBoxTreeNode(string text, int imageIndex, int selectedImageIndex, TreeNode[] children) : base(text, imageIndex, selectedImageIndex, children) { }
    protected HiddenCheckBoxTreeNode(SerializationInfo serializationInfo, StreamingContext context) : base(serializationInfo, context) { }
}

public class MixedCheckBoxesTreeView : TreeView
{
    /// <summary>
    /// Specifies the attributes of a node
    /// </summary>
    [StructLayout(LayoutKind.Sequential, CharSet = CharSet.Auto)]
    public struct TV_ITEM
    {
        public int    Mask;
        public IntPtr ItemHandle;
        public int    State;
        public int    StateMask;
        public IntPtr TextPtr;
        public int    TextMax;
        public int    Image;
        public int    SelectedImage;
        public int    Children;
        public IntPtr LParam;
    }
 
    public const int TVIF_STATE          = 0x8;
    public const int TVIS_STATEIMAGEMASK = 0xF000;
 
    public const int TVM_SETITEMA = 0x110d;
    public const int TVM_SETITEM  = 0x110d;
    public const int TVM_SETITEMW = 0x113f;

    public const int TVM_GETITEM  = 0x110C;
 
    [DllImport("user32.dll", CharSet = CharSet.Auto)]
    public static extern IntPtr SendMessage(HandleRef hWnd, int msg, int wParam, ref TV_ITEM lParam);
 
    protected override void WndProc(ref Message m)
    {
        base.WndProc(ref m);
 
        // trap TVM_SETITEM message
        if (m.Msg == TVM_SETITEM || m.Msg == TVM_SETITEMA || m.Msg == TVM_SETITEMW)
            // check if CheckBoxes are turned on
            if (CheckBoxes)
            {
                // get information about the node
                TV_ITEM tv_item = (TV_ITEM)m.GetLParam(typeof(TV_ITEM));
                HideCheckBox(tv_item);
            }
    }   
 
    protected void HideCheckBox(TV_ITEM tv_item)
    {
        if (tv_item.ItemHandle != IntPtr.Zero)
        {
            // get TreeNode-object, that corresponds to TV_ITEM-object
            TreeNode currentTN = TreeNode.FromHandle(this, tv_item.ItemHandle);
 
            HiddenCheckBoxTreeNode hiddenCheckBoxTreeNode = currentTN as HiddenCheckBoxTreeNode;
            // check if it's HiddenCheckBoxTreeNode and
            // if its checkbox already has been hidden

            if(hiddenCheckBoxTreeNode != null)
            {
                HandleRef treeHandleRef = new HandleRef(this, Handle);

                // check if checkbox already has been hidden
                TV_ITEM currentTvItem    = new TV_ITEM();
                currentTvItem.ItemHandle = tv_item.ItemHandle;
                currentTvItem.StateMask  = TVIS_STATEIMAGEMASK;
                currentTvItem.State      = 0;

                IntPtr res = SendMessage(treeHandleRef, TVM_GETITEM, 0, ref currentTvItem);
                bool needToHide = res.ToInt32() > 0 && currentTvItem.State != 0;

                if (needToHide)
                {
                    // specify attributes to update
                    TV_ITEM updatedTvItem    = new TV_ITEM();
                    updatedTvItem.ItemHandle = tv_item.ItemHandle;
                    updatedTvItem.Mask       = TVIF_STATE;
                    updatedTvItem.StateMask  = TVIS_STATEIMAGEMASK;
                    updatedTvItem.State      = 0;
 
                    // send TVM_SETITEM message
                    SendMessage(treeHandleRef, TVM_SETITEM, 0, ref updatedTvItem);
                }
            }
        }
    }
 
    protected override void OnBeforeCheck(TreeViewCancelEventArgs e)
    {
        base.OnBeforeCheck(e);
 
        // prevent checking/unchecking of HiddenCheckBoxTreeNode,
        // otherwise, we will have to repeat checkbox hiding
        if (e.Node is HiddenCheckBoxTreeNode)
            e.Cancel = true;
    }
}

Note the OnBeforeCheck method is intended to prohibit a TreeNode‘s Checked property changing, otherwise we would have to hide an appropriate checkbox again.

Below is a sample of using. Put a MixedCheckBoxesTreeView control upon a form and set a Load handler to the method listed below.

private void Form1_Load(object sender, EventArgs e)
{
    mixedCheckBoxesTreeView1.CheckBoxes = true;
    mixedCheckBoxesTreeView1.Nodes.Clear();

    HiddenCheckBoxTreeNode tn = new HiddenCheckBoxTreeNode("Root Node 1");
    mixedCheckBoxesTreeView1.Nodes.Add(tn);

    TreeNode tn2 = new TreeNode("Child Node Z");
    tn.Nodes.Add(tn2);

    HiddenCheckBoxTreeNode tn3 = new HiddenCheckBoxTreeNode("Child Node A");
    tn3.Checked = true; // just to test that nothing happens here
    tn.Nodes.Add(tn3);

    HiddenCheckBoxTreeNode tn4 = new HiddenCheckBoxTreeNode("Child Node X");
    tn.Nodes.Add(tn4);

    TreeNode tn5 = new TreeNode("Child Node D");
    tn.Nodes.Add(tn5);

    TreeNode tn6 = new TreeNode("Root Node 2");
    mixedCheckBoxesTreeView1.Nodes.Add(tn6);

    TreeNode tn7 = new TreeNode("Root Node 3");
    mixedCheckBoxesTreeView1.Nodes.Add(tn7);

    HiddenCheckBoxTreeNode tn8 = new HiddenCheckBoxTreeNode("Child Node A");
    tn7.Nodes.Add(tn8);

    mixedCheckBoxesTreeView1.ExpandAll();
}

To play with the approach implementation, download a Visual Studio 2010 solution from here.

Related posts: