Archive

Archive for January, 2012

WinForms: Show progress on long-running operations

January 30th, 2012 No comments

    When I have a long-running operation to execute I always use the best practice demonstrated here. Keeping the UI responsive to user interaction, I start a lengthy task in a separate thread and then update a ProgressBar control step by step from the executing operation. The progress data is passed to UI thread through the BeginInvoke or Invoke methods of the ProgressBar control or any other UI control, since all UI controls are created in UI thread and must be updated from it. Much time has passed since the time when the article was written. So now we have Anonymous Methods, Actions, Funcs, the upgraded ThreadPool class and so on. Using these innovations I’ve rewritten the approach described by Chris Sells. Look at the code sample below. This code sample simulates a treatment of group of files:

private void startBtn_Click(object sender, EventArgs e)
{
    // the array of file paths
    string[] filePaths = ... 

    UpdateProgressBar(0);            

    // start lengthy task in separate thread
    ThreadPool.QueueUserWorkItem(new WaitCallback(new Action<object>(delegate(object state)
    {                
        DoSomethingWithFiles(filePaths);
    })));
}

private void DoSomethingWithFiles(string[] filePaths)
{
    for (int i = 0; i < filePaths.Length; i++)
    {
        string fileText = File.ReadAllText(filePaths[i]);

        // do something with the read file content
        ...
                
        // set refreshed value to ProgressBar
        UpdateProgressBar((i + 1) * 100 / filePaths.Length);                
    }

    // set refreshed value to ProgressBar
    UpdateProgressBar(100);
}

private void UpdateProgressBar(int currentValue)
{
    // if it's UI thread, simply update ProgressBar as usual. 
    // Otherwise, make the current method be called in UI thread.
    if (progressBar1.InvokeRequired)
        progressBar1.BeginInvoke(new Action(delegate() { UpdateProgressBar(currentValue); }));
    else
        progressBar1.Value = currentValue;
}

It’s assumed that startBtn and progressBar1 are added to the form. When startBtn is clicked, the startBtn_Click method is called and starts the DoSomethingWithFiles long-running operation in separate thread. The DoSomethingWithFiles calls the UpdateProgressBar from time to time to show the current progress. The UpdateProgressBar checks whether it’s called from UI thread. If so, it just updates the ProgressBar, otherwise, initiates its own invoking from the UI thread.

As you can see, the obtained code does the same but is more compact.

Related posts:
Categories: C#, WinForms Tags: ,

WinForms: Show individual tooltip for each ListBox item

January 30th, 2012 No comments

    Unlike ListViewItem we don’t have a built-in way to set individual tooltip text for each item in ListBox. But there is an easily realizable workaround. Add the following handler to your ListBox‘s MouseMove event:

private void listBox_MouseMove(object sender, MouseEventArgs e)
{
    ListBox lb = (ListBox)sender;
    int index = lb.IndexFromPoint(e.Location);

    if (index >= 0 && index < lb.Items.Count)
    {
        string toolTipString = lb.Items[index].ToString();                

        // check if tooltip text coincides with the current one,
        // if so, do nothing
        if (toolTip1.GetToolTip(lb) != toolTipString)
            toolTip1.SetToolTip(lb, toolTipString);
    }
    else
        toolTip1.Hide(lb);
}

The toolTip1 is a System.Windows.Forms.ToolTip control, which should be dropped on your form.

If your ListBox items are more complex rather than a string, and you want tooltip to have a value different from the returned by ToString(), you can take as a basis the following code sample:

public class FileListItem
{
    public string FilePath { get; set; }

    public override string ToString()
    {
        // return file name without directory path
        return Path.GetFileName(FilePath);
    }
}
...
private void listBox_MouseMove(object sender, MouseEventArgs e)
{
    ListBox lb = (ListBox)sender;
    int index = lb.IndexFromPoint(e.Location);

    if (index >= 0 && index < lb.Items.Count)
    {
        string toolTipString = lb.Items[index].ToString();

        // if the item is a FileListItem object,
        // set tooltip to the value of FilePath property
        FileListItem fileListItem = lb.Items[index] as FileListItem;
        if (fileListItem != null)
            toolTipString = fileListItem.FilePath;

        // check if new tooltip text coincides with the current one,
        // if so, do nothing
        if (toolTip1.GetToolTip(lb) != toolTipString)
            toolTip1.SetToolTip(lb, toolTipString);
    }
    else
        toolTip1.Hide(lb);
}
Related posts:
Categories: C#, WinForms Tags: ,

C#: Use Of XmlDocumentFragment

January 18th, 2012 No comments

    To create even a simple hierarchy of XmlNodes, we need several successive calls of the CreateElement and AppendChild methods, and I don’t even mention about adding of attributes. But there is an easier way to achieve that. XmlDocumentFragment is a lightweight object, that is useful for inserting a small Xml-fragment into a document. Below is the method creating a new XmlNode-object based on the passed xml-based string:

public static XmlNode CreateNode(XmlDocument xmlDoc, string nodesXml)
{
    XmlDocumentFragment xmlDocFragment = xmlDoc.CreateDocumentFragment();
    xmlDocFragment.InnerXml = nodesXml;
    return xmlDocFragment;
}

The XmlDocumentFragment is derived from XmlNode and supports all node manipulations (insert/remove/replace) and capabilities. The CreateNode method can be used in the following way:

// create XmlDocument object
XmlDocument xmlDOc = new XmlDocument();
xmlDOc.LoadXml(@"<rootNode><firstChildNode name=""first"" /></rootNode>");
XmlNode rootNode = xmlDOc.SelectSingleNode("/rootNode");
rootNode.AppendChild(CreateNode(xmlDOc, 
    @"<secondChildNode name=""secondChildNode""><thirdChildNode name=""thirdChildNode"" /></secondChildNode>"));
Categories: C#, XML Tags: ,

C#: Get indented xml-based string

January 18th, 2012 No comments

    Manipulating XmlNodes we can get the result xml-based string using the InnerXml property of the XmlDocument-object the XmlNodes belong to. For example,

using System;
using System.Xml;
using System.IO;
...
// create XmlDocument object
XmlDocument xmlDOc = new XmlDocument();
xmlDOc.LoadXml(@"<rootNode><firstChildNode name=""first"" /></rootNode>");            

// manipulate with its nodes
XmlNode secondChildNode = xmlDOc.CreateElement("secondChildNode");
XmlAttribute nameAttr = xmlDOc.CreateAttribute("name");
nameAttr.Value = "secondChildNode";
secondChildNode.Attributes.Append(nameAttr);
XmlNode rootNode = xmlDOc.SelectSingleNode("/rootNode");
rootNode.AppendChild(secondChildNode);

// get the result xml-based string
string result = xmlDOc.InnerXml;

The following string is obtained:

<rootNode><firstChildNode name="first" /><secondChildNode name="secondChildNode" /></rootNode>

However, very often the result xml-based string is required to be formatted with indentations as it looks in many xml editors. The following method can be used for this:

public static string XmlDocToString(XmlDocument xmlDoc)
{
    StringWriter sw = new StringWriter();
    XmlTextWriter xw = new XmlTextWriter(sw);
    xw.Formatting = Formatting.Indented;
    xmlDoc.WriteTo(xw);
    return sw.ToString();
}

I usually use this method before displaying or saving the string in file. The indented result looks like:

<rootNode>
  <firstChildNode name="first" />
  <secondChildNode name="secondChildNode" />
</rootNode>

How to use:

string formattedStr = XmlDocToString(xmlDOc);
Categories: C#, XML Tags: ,

WordPress: How to add Google +1 Button to WordPress blog post

January 6th, 2012 No comments

    Adding the Google +1 button to blog posts allows readers to recommend the content on Google Search and share it on Google+. In this article I’m going to explain how to add +1 buttons to the WordPress blog based on iNove theme.

Google provides with a special online tool allowing to generate the code you need to add into blog pages. Choosing different options, you can customize look and behavior of the +1 button you are about to add. For example, I’ve chosen asynchronous inclusion, which allows page to continue loading while browser fetches the +1 JavaScript. So, I’ve got the following code:

<!-- Place this tag where you want the +1 button to render -->
<g:plusone href="put some url here"></g:plusone>

<!-- Place this render call where appropriate -->
<script type="text/javascript">
  (function() {
    var po = document.createElement('script'); po.type = 'text/javascript'; po.async = true;
    po.src = 'https://apis.google.com/js/plusone.js';
    var s = document.getElementsByTagName('script')[0]; s.parentNode.insertBefore(po, s);
  })();
</script>

Google +1 button can be virtually divided into two parts: the button itself and a Share bubble. After +1‘ing a blog post, the reader will be able to share the page in Google+ social network through the surfaced Share bubble.
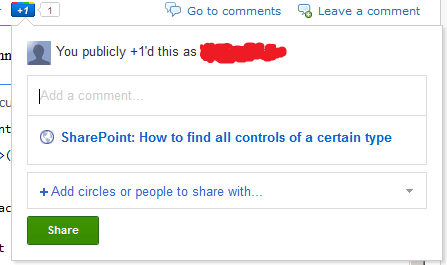
Share bubble

The share bubble contains, so called, +Snippet, which comprises the title and brief description of the page referenced by the +1 button‘s href attribute. In theory, the title and description are automatically extracted by the +1 JavaScript. To keep these pieces of data consistent, we are able to let the +1 JavaScript know what html-nodes exactly should be used to get the right title and description. The same online tool helps to customize +Snippet. For my needs, I’ve got the following markup:

<!-- Update your html tag to include the itemscope and itemtype attributes -->
<html itemscope itemtype="http://schema.org/Blog">

<!-- Add the following three tags to your body -->
<span itemprop="name">Title of your content</span>
<span itemprop="description">This would be a description of the content your users are sharing</span>

Looking ahead, I’d like to note that the most important in the above markup is the attributes, but not the html-tags containing them. I mean the attributes can be applied to different html-tags with the same effect.

Ok, let’s add two +1 buttons to every single post page as it’s shown on the picture below: the small sized button at the beginning of the post content and the standard sized one right after it.
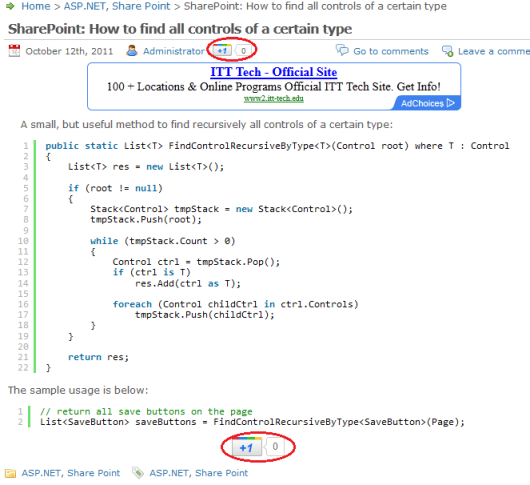
Single Blog Post with two +1 buttons

For that, first of all, you need to alter the single.php file (wp-content/themes/inove/single.php).

  1. Find the line, where the blog post title is being rendered:
    <h2><?php the_title(); ?></h2>
    

    and alter it to the following:

    <h2 itemprop="name"><?php the_title(); ?></h2>
    

    The modification signifies the title for +Snippet will be extracted from the given h2-tag.

  2. Find the line, where the post author is being added to the response stream:
    <?php if ($options['author']) : ?><span class="author"><?php the_author_posts_link(); ?></span><?php endif; ?>
    

    insert the following code after that line:

    <!-- Google +1 code has begun -->  
    <span style="float:left; padding-left:10px;">
        <g:plusone size="small" href="<?php the_permalink() ?>"></g:plusone>
    </span>
    <!-- Google +1 code has ended -->
    

    The small sized +1 button will appear at the beginning of every blog post. Note that, in the listed above code, the the_permalink() function returns the url of the current blog post. This url is used to set the href attribute, which explicitly defines the +1 target URL.

  3. Find the div-tag containing content of the post:
    <div class="content">
        <?php the_content(); ?>
        <div class="fixed"></div>
    </div>
    

    You can mark the div-tag as a source for the brief description in +Snippet using the itemprop=”description” attribute:

    <div itemprop="description" class="content">
        <?php the_content(); ?>
        <div class="fixed"></div>
    </div>
    

    But there is a pitfall here. The +1 JavaScript seems to transform the extracted text, removing html-tags and so on. In my case, after the transformation the description isn’t very readable. So, I decided to have an empty description at all. I added the following markup line next to the found div-tag:

    <span itemprop="description" style="display:none">&nbsp;</span>
    

    The &nbsp; is required, otherwise the brief description will be formed automatically from other sources, mainly from meta-tags and so on.

  4. Insert the following code right after the content-containing div-tag you found in the previous step (or right after <span itemprop=”description”…, if you chose my approach with an empty description):
    <!-- Google +1 code has begun -->
    <div style="text-align:center; margin-bottom: 10px;">
        <g:plusone href="<?php the_permalink() ?>"></g:plusone>
    </div>
    <!-- Google +1 code has ended -->
    

    The standard sized +1 button will appear at the end of every blog post.

The single.php file after all modification applied is outlined below (some parts are skipped):

<?php get_header(); ?>
<?php $options = get_option('inove_options'); ?>

<?php if (have_posts()) : the_post(); update_post_caches($posts); ?>

	<div id="postpath">
		...
	</div>

	<div class="post" id="post-<?php the_ID(); ?>">
		<h2 itemprop="name"><?php the_title(); ?></h2>                
		<div class="info">
			<span class="date"><?php the_time(__('F jS, Y', 'inove')) ?></span>
			<?php if ($options['author']) : ?><span class="author"><?php the_author_posts_link(); ?></span><?php endif; ?>
                        
	                <!-- Google +1 code has begun -->  
	                <span style="float:left; padding-left:10px;">
	                    <g:plusone size="small" href="<?php the_permalink() ?>"></g:plusone>
                        </span>
	                <!-- Google +1 code has ended -->

			<?php edit_post_link(__('Edit', 'inove'), '<span class="editpost">', '</span>'); ?>
			<?php if ($comments || comments_open()) : ?>
				<span class="addcomment"><a href="#respond"><?php _e('Leave a comment', 'inove'); ?></a></span>
				<span class="comments"><a href="#comments"><?php _e('Go to comments', 'inove'); ?></a></span>
			<?php endif; ?>
			<div class="fixed"></div>
		</div>
		...
		<div class="content">
			<?php the_content(); ?>
			<div class="fixed"></div>
		</div>

                <span itemprop="description" style="display:none">&nbsp;</span>
                <!-- Google +1 code has begun -->
                <div style="text-align:center; margin-bottom: 10px;">
                        <g:plusone href="<?php the_permalink() ?>"></g:plusone>
                </div>
                <!-- Google +1 code has ended -->                

		<div class="under">
			...
		</div>
	</div>
	...
	<?php include('templates/comments.php'); ?>

	<div id="postnavi">
		...
	</div>

<?php else : ?>
	<div class="errorbox">
		<?php _e('Sorry, no posts matched your criteria.', 'inove'); ?>
	</div>
<?php endif; ?>

<?php get_footer(); ?>

Ok, then let’s make some supporting changes to header.php (wp-content/themes/inove/header.php) and footer.php (wp-content/themes/inove/footer.php).

  1. Find the <body> line in the header.php and alter it to
    <body itemscope itemtype="http://schema.org/Blog">
    

    The added attributes instruct the +1 JavaScript to extract data for +Snippet from html-nodes with the itemprop=”description” and itemprop=”name” attributes.

  2. Find the <!– content END –> line in the footer.php and insert the following JavaScript code right before it:
    <script type="text/javascript">
      (function() {
        var po = document.createElement('script'); po.type = 'text/javascript'; po.async = true;
        po.src = 'https://apis.google.com/js/plusone.js';
        var s = document.getElementsByTagName('script')[0]; s.parentNode.insertBefore(po, s);
      })();
    </script>
    

    This code asynchronously includes the +1 JavaScript into the page. The included plusone.js is responsible for +1 button rendering.

The footer.php after the modification is outlined below (some parts are skipped):

	</div>
	<!-- main END -->
	...
</div>
<script type="text/javascript">
  (function() {
    var po = document.createElement('script'); po.type = 'text/javascript'; po.async = true;
    po.src = 'https://apis.google.com/js/plusone.js';
    var s = document.getElementsByTagName('script')[0]; s.parentNode.insertBefore(po, s);
  })();
</script>
<!-- content END -->

<!-- footer START -->
<div id="footer">
	...
</div>
<!-- footer END -->

</div>
<!-- container END -->
</div>
<!-- wrap END -->
...

The last step is to replace the old single.php, header.php and footer.php files with the modified ones on your web server.

Related posts: